
短视频利器 ffmpeg (2)
ffmpeg 官网这样写到
Converting video and audio has never been so easy.
如何轻松简单的使用:
1、下载
官网:http://www.ffmpeg.org
安装参考文档:
https://blog.csdn.net/qq_36765018/article/details/139067654
2、安装
# 启用RPM Fusion仓库。你可以选择免费或非免费仓库。对于ffmpeg,你通常需要免费仓库。
sudo yum localinstall --nogpgcheck https://download1.rpmfusion.org/free/el/rpmfusion-free-release-7.noarch.rpm
# 启用仓库后,你可以安装ffmpeg:
sudo yum install ffmpeg
#通过检查ffmpeg版本来验证安装:
ffmpeg -version
ffmpeg version 3.4.13 Copyright (c) 2000-2023 the FFmpeg developers
built with gcc 4.8.5 (GCC) 20150623 (Red Hat 4.8.5-44)
libavutil      55. 78.100 / 55. 78.100
libavcodec     57.107.100 / 57.107.100
libavformat    57. 83.100 / 57. 83.100
libavdevice    57. 10.100 / 57. 10.100
libavfilter     6.107.100 /  6.107.100
libavresample   3.  7.  0 /  3.  7.  0
libswscale      4.  8.100 /  4.  8.100
libswresample   2.  9.100 /  2.  9.100
libpostproc    54.  7.100 / 54.  7.100
#如果在使用RPM Fusion仓库时遇到任何问题,你可以尝试使用--enablerepo选项来显式指定仓库:
#sudo yum --enablerepo=rpmfusion-free install ffmpeg
3、使用场景
3.1 视频格式转换
手机主流视频格式:
"mp4", "avi", "rmvb",
苹果手机默认是 mov : (需要把这种格式进行格式转换)
# 格式转换,先转为mp4 然后再进行处理
仅将其流式传输到Adobe Premiere Pro 等一些应用程序所需的新容器(mp4)而不编码 (fast)的命令为
ffmpeg -i input.mov -qscale 0 output.mp4
注释中提到的替代,它以最佳质量(-qscale 0)重新编码
ffmpeg -i fengj.mov -q:v 0 fengj.mp4
3.2、视频切图片(缺点是文件有点大,比原视频还大)
从视频文件或gif图片中逐帧提取图片,并加上编号。(很有意思,这里演示视频格式,gif图片你可以试下。)
ffmpeg -i video.mp4 frame_%d.png
4、提取视频文件指定时间点的1帧,下面演示的是提取第2秒的1帧。
ffmpeg -ss 00:02 -i fengj.mp4 -frames 1  -f image2 fengj0002.png
3.3、给视频加文字水印,颜色为红色,水印内容为LinuxTime。水印位置对应命令中的x轴和y轴。(待验证)
ffmpeg -hwaccel cuvid -i fengj1.mp4 -c:v libx264 -c:a copy -vf "drawtext=fontfile=zh.ttf:text='LinuxTime':x=1200:y=900:fontsize=50:fontcolor=red:shadowy=2" fengj2.mp4
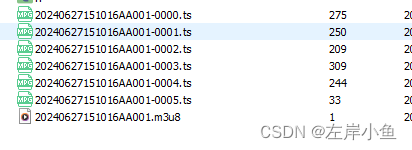
3.4、视频切片
ffmpeg -y -i shouye_202462117216.mp4 -vcodec copy -acodec copy -vbsf h264_mp4toannexb video_xiongmao/shouye.ts
ffmpeg -i video_xiongmao/shouye.ts -c copy -map 0 -f segment -segment_list video_xiongmao/shouye.m3u8 -segment_time 1 video_xiongmao/shouye-%04d.ts
4、shell 脚本编写
如需要使用 java 或者其他语言调用 这个软件,执行相关命令,则可以编写如下脚本。方便调用
4.1、视频文件转ts容器,根据不同的视频编码,确定使用不同的 比特流过滤器
#!/bin/bash
# chmod +x convert_mp4_to_ts.sh
# 检查是否提供了两个参数
if [ "$#" -ne 2 ]; then
    echo "Usage: $0 input.mp4 output.ts"
    exit 1
fi
# 获取输入和输出文件名
input_file="$1"
output_file="$2"
# 期待的视频编码
expected_codec="h264"
# 使用ffprobe获取视频编码
actual_codec=$(ffprobe -v error -select_streams v:0 -show_entries stream=codec_name -of default=noprint_wrappers=1:nokey=1 "$input_file")
# 检查编码类型
if [ "$actual_codec" = "$expected_codec" ]; then
    echo "The video is encoded with H.264."
    # 使用ffmpeg转换视频:将MP4文件转换为TS格式
    ffmpeg -y -i "$input_file" -vcodec copy -acodec copy -vbsf h264_mp4toannexb "$output_file"
else
    echo "The video is NOT encoded with H.264. It is encoded with $actual_codec."
    ffmpeg -y -i "$input_file" -c:v libx264 -preset veryfast -crf 23 -c:a aac -b:a 128k -movflags +faststart "$output_file"
fi
# 检查ffmpeg执行结果
if [ $? -eq 0 ]; then
    echo "Video conversion successful."
else
    echo "Video conversion failed. Check the logs for more information."
fi
4.2、将ts 容器进行切片
#!/bin/bash
# 文件可执行 chmod +x convert_video.sh
# 检查是否提供了三个参数
if [ "$#" -ne 3 ]; then
    echo "Usage: $0 input.ts output.m3u8 output.ts"
    exit 1
fi
# 获取输入和输出文件名
input_file="$1"
m3u8_file="$2"
output_file="$3"
# 使用ffmpeg转换视频: 将 ts 文件进行切片,并输出为 m3u8 文件和 切片文件
ffmpeg -y -i "$input_file" -c copy -map 0 -f segment -segment_list "$m3u8_file" -segment_time 1 "$output_file"
# 检查ffmpeg执行结果
if [ $? -eq 0 ]; then
    echo "Video conversion successful."
else
    echo "Video conversion failed. Check the logs for more information."
fi
5、java 中如何调用
  public static void main(String[] args) {
        executeCommandForScript(Arrays.asList("sh", "/xxxx.sh", "sourceFile", "outputFile"));
    }
public static void executeCommandForScript(List command) {
        // 使用ProcessBuilder执行命令
        try {
            log.info("---------->>>>command:{}", StringUtils.join(command, " "));
            ProcessBuilder pb = new ProcessBuilder(command);
            Process process = pb.start();
            // 获取并打印命令的输出
            //Thread stdoutThread = readStream(process.getInputStream(), "OUTPUT");
            //Thread stderrThread = readStream(process.getErrorStream(), "ERROR");
            //stdoutThread.start();
            //stderrThread.start();
            // 等待命令执行完成
            int exitCode = process.waitFor();
            if (exitCode == 0) {
                log.info("Video conversion completed successfully.");
            } else {
                log.error("Video conversion failed with exit code: " + exitCode);
            }
            // 确保读取线程完成
            //stdoutThread.join();
            //stderrThread.join();
        } catch (IOException | InterruptedException e) {
            e.printStackTrace();
        }
    }
6、HTML验证
比如使用了 4.1和4.2 的脚本进行切片处理后,如何使用
可以来一个简单的 nginx配置,
    # 视频调试
    location  / {
        root  /home/minio/data/xxx/video_test;

        try_files $uri $uri/ /index.html;
        index  index.html index.htm;
        proxy_set_header   X-Real-IP         $remote_addr;
        proxy_set_header   Host              $http_host;
        proxy_set_header   X-Forwarded-For   $proxy_add_x_forwarded_for;
        error_page 405 =200 @405;
      }
编写一个简单的index.html 文件
    H5播放m3u8文件


  .centered-video-container {
    display: flex;
    justify-content: center;
    align-items: center;
    height: 100vh; /* Full height of the viewport */
  }
  video {
    max-width: 100%; /* To prevent the video from overflowing the container */
  }


  Your browser does not support the video tag.


  var m3u8FilePath = "20240627151016AA001.m3u8";
  if (Hls.isSupported()) {
    var video = document.getElementById('video');
   // video.play();
    var hls = new Hls();
    hls.loadSource(m3u8FilePath);
    hls.attachMedia(video);
    hls.on(Hls.Events.MANIFEST_PARSED, function() {
      video.play();
    });
  } else if (video.canPlayType('application/vnd.apple.mpegURL')) {
    video.src = m3u8FilePath;
    video.addEventListener('loadedmetadata', function() {
      video.play();
    });
  }
小结:
使用 ffmpeg 做为视频切片工具,非常方便,有很多点值得探索,本文主要分享了, ffmpeg如果下载 ,安装,使用。并编写通用可执行shell 脚本,方便程序语言 在对用户上传的视频文件进行切片调用。
其中 m3u8 文件,记录了一个播放文件的顺序列表。方便在网络低带宽的情况下,依然可以满足用户观看视频的需求。
其他文章
ffmpeg命令中文手册-腾讯云开发者社区-腾讯云
ffmpeg命令中文手册-腾讯云开发者社区-腾讯云
免责声明:我们致力于保护作者版权,注重分享,被刊用文章因无法核实真实出处,未能及时与作者取得联系,或有版权异议的,请联系管理员,我们会立即处理! 部分文章是来自自研大数据AI进行生成,内容摘自(百度百科,百度知道,头条百科,中国民法典,刑法,牛津词典,新华词典,汉语词典,国家院校,科普平台)等数据,内容仅供学习参考,不准确地方联系删除处理! 图片声明:本站部分配图来自人工智能系统AI生成,觅知网授权图片,PxHere摄影无版权图库和百度,360,搜狗等多加搜索引擎自动关键词搜索配图,如有侵权的图片,请第一时间联系我们,邮箱:ciyunidc@ciyunshuju.com。本站只作为美观性配图使用,无任何非法侵犯第三方意图,一切解释权归图片著作权方,本站不承担任何责任。如有恶意碰瓷者,必当奉陪到底严惩不贷!


