
QGraphicsView 显示图片
温馨提示:这篇文章已超过377天没有更新,请注意相关的内容是否还可用!
QGraphicsView 显示图片
QGraphicsView 是 PyQt6 里负责显示图形的组件,搭配 QGraphicsScene 和 QtGui.QPixmap() 就可以显示图片,这篇教学会介绍如何在 PyQt6 窗口里加入 QGraphicsView 组件并显示图片。
快速预览:
-
QGraphicsView 显示图片
-
改变图片尺寸
-
设定图片位置
-
显示多张图片
QGraphicsView 显示图片
建立 PyQt6 窗口物件后,透过 QtWidgets.QGraphicsView(widget)方法,就能在指定的组件中建立显示图形组件,QGraphicsView 建立后,需再使用 QtWidgets.QGraphicsScene()建立场景组件,再透过QtGui.QPixmap()于场景中加入图片,最后将场景加入 QGraphicsView 就可以显示图片,如果场景大小超过显示区域,会自动出现卷轴。
from PyQt6 import QtWidgets, QtGui import sys app = QtWidgets.QApplication(sys.argv) Form = QtWidgets.QWidget() Form.setWindowTitle('千牛编程思维') Form.resize(300, 300) grview = QtWidgets.QGraphicsView(Form) # 加入 QGraphicsView grview.setGeometry(20, 20, 260, 200) # 设定 QGraphicsView 位置与大小 scene = QtWidgets.QGraphicsScene() # 加入 QGraphicsScene scene.setSceneRect(0, 0, 300, 400) # 设定 QGraphicsScene 位置与大小 img = QtGui.QPixmap('mona.jpg') # 加入图片 scene.addPixmap(img) # 將图片加入 scene grview.setScene(scene) # 设定 QGraphicsView 的场景為 scene Form.show() sys.exit(app.exec())class 写法:
from PyQt6 import QtWidgets, QtGui import sys class MyWidget(QtWidgets.QWidget): def __init__(self): super().__init__() self.setWindowTitle('千牛编程思维') self.resize(300, 300) self.ui() def ui(self): self.grview = QtWidgets.QGraphicsView(self) # 加入 QGraphicsView self.grview.setGeometry(20, 20, 260, 200) # 设定 QGraphicsView 位置与大小 scene = QtWidgets.QGraphicsScene() # 加入 QGraphicsScene scene.setSceneRect(0, 0, 300, 400) # 设定 QGraphicsScene 位置与大小 img = QtGui.QPixmap('mona.jpg') # 加入图片 scene.addPixmap(img) # 將图片加入 scene self.grview.setScene(scene) # 设定 QGraphicsView 的场景為 scene if __name__ == '__main__': app = QtWidgets.QApplication(sys.argv) Form = MyWidget() Form.show() sys.exit(app.exec())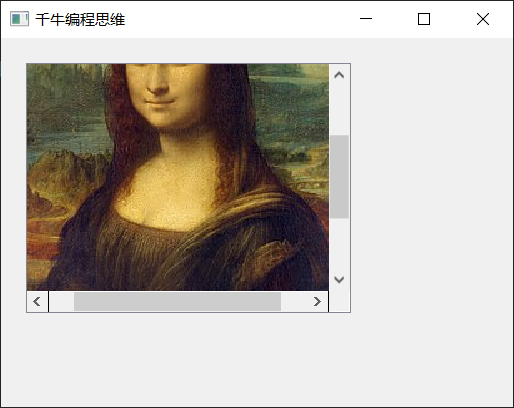
改变图片尺寸
使用 QtGui.QPixmap() 建立图片后,就能透过scaled(w, h)方法调整图片大小,下方的程序执行后,会显示缩小后的图片。
from PyQt6 import QtWidgets, QtGui import sys app = QtWidgets.QApplication(sys.argv) Form = QtWidgets.QWidget() Form.setWindowTitle('千牛编程思维') Form.resize(300, 300) # 窗口大小 grview = QtWidgets.QGraphicsView(Form) grview.setGeometry(20, 20, 260, 200) # QGraphicsView 位置 (20, 20) 和大小 260x200 scene = QtWidgets.QGraphicsScene() scene.setSceneRect(0, 0, 120, 160) # QGraphicsScene 相對位置 (20, 20) 和大小 120x160 img = QtGui.QPixmap('mona.jpg') img = img.scaled(120,160) # 调整图片大小為 120x160 scene.addPixmap(img) grview.setScene(scene) Form.show() sys.exit(app.exec())class 写法:
from PyQt6 import QtWidgets, QtGui import sys class MyWidget(QtWidgets.QWidget): def __init__(self): super().__init__() self.setWindowTitle('千牛编程思维') self.resize(300, 300) self.ui() def ui(self): self.grview = QtWidgets.QGraphicsView(self) self.grview.setGeometry(20, 20, 260, 200) # QGraphicsView 位置 (20, 20) 和大小 260x200 scene = QtWidgets.QGraphicsScene() scene.setSceneRect(0, 0, 120, 160) # QGraphicsScene 相對位置 (20, 20) 和大小 120x160 img = QtGui.QPixmap('mona.jpg') img = img.scaled(120,160) # 调整图片大小為 120x160 scene.addPixmap(img) self.grview.setScene(scene) if __name__ == '__main__': app = QtWidgets.QApplication(sys.argv) Form = MyWidget() Form.show() sys.exit(app.exec())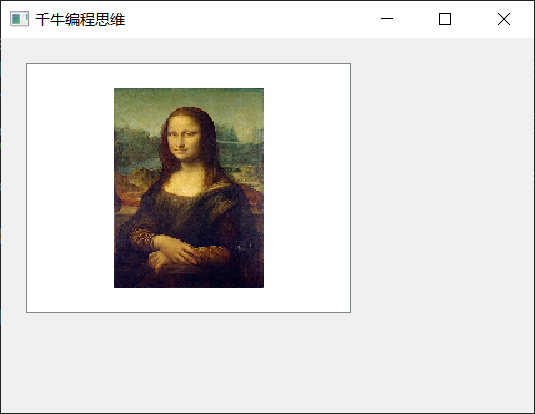
设定图片位置
因为使用 setSceneRect 时定位是以「中心点」为主,如果要改成熟悉的「左上角」定位,可透过简单的数学公式换算,下方的程序执行后,会将定位点改成左上角,修改 x 和 y 的数值,就可以控制图片左上角的坐标。
from PyQt6 import QtWidgets, QtGui import sys app = QtWidgets.QApplication(sys.argv) Form = QtWidgets.QWidget() Form.setWindowTitle('千牛编程思维') Form.resize(300, 300) grview = QtWidgets.QGraphicsView(Form) gw = 260 gh = 200 grview.setGeometry(20, 20, gw, gh) # QGraphicsView 的長寬改成變數 scene = QtWidgets.QGraphicsScene() img = QtGui.QPixmap('mona.jpg') img_w = 120 # 顯示图片的寬度 img_h = 160 # 顯示图片的高度 img = img.scaled(img_w, img_h) x = 20 # 左上角 x 座標 y = 20 # 左上角 y 座標 dx = int((gw - img_w) / 2) - x # 修正公式 dy = int((gh - img_h) / 2) - y scene.setSceneRect(dx, dy, img_w, img_h) scene.addPixmap(img) grview.setScene(scene) Form.show() sys.exit(app.exec())class 写法:
from PyQt6 import QtWidgets, QtGui import sys class MyWidget(QtWidgets.QWidget): def __init__(self): super().__init__() self.setWindowTitle('千牛编程思维') self.resize(300, 300) self.ui() def ui(self): self.grview = QtWidgets.QGraphicsView(self) gw = 260 gh = 200 self.grview.setGeometry(20, 20, gw, gh) # QGraphicsView 的長寬改成變數 scene = QtWidgets.QGraphicsScene() img = QtGui.QPixmap('mona.jpg') img_w = 120 # 顯示图片的寬度 img_h = 160 # 顯示图片的高度 img = img.scaled(img_w, img_h) x = 20 # 左上角 x 座標 y = 20 # 左上角 y 座標 dx = int((gw - img_w) / 2) - x # 修正公式 dy = int((gh - img_h) / 2) - y scene.setSceneRect(dx, dy, img_w, img_h) scene.addPixmap(img) self.grview.setScene(scene) if __name__ == '__main__': app = QtWidgets.QApplication(sys.argv) Form = MyWidget() Form.show() sys.exit(app.exec())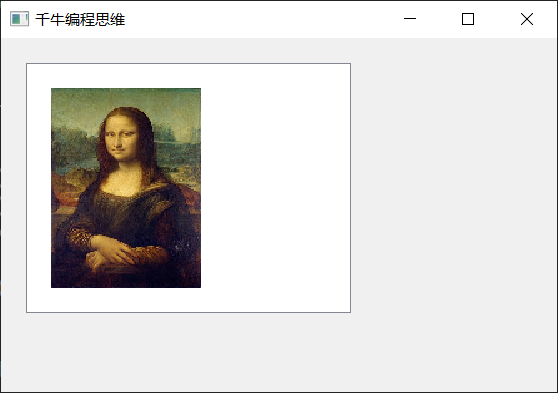
显示多张图片
如果要加入多张图片,就要使用 QItem 的做法,下方的程序执行后,会在场景里放入两个图片尺寸不同的 QItem。
from PyQt6 import QtWidgets, QtGui import sys app = QtWidgets.QApplication(sys.argv) MainWindow = QtWidgets.QMainWindow() MainWindow.setObjectName("MainWindow") MainWindow.setWindowTitle("千牛编程思维") MainWindow.resize(300, 300) grview = QtWidgets.QGraphicsView(MainWindow) # 加入 QGraphicsView grview.setGeometry(0, 0, 300, 300) # 设定 QGraphicsView 位置与大小 scene = QtWidgets.QGraphicsScene() # 加入 QGraphicsScene scene.setSceneRect(0, 0, 200, 200) # 设定 QGraphicsScene 位置与大小 img = QtGui.QPixmap('mona.jpg') # 建立图片 img1 = img.scaled(200,50) # 建立不同尺寸图片 qitem1 = QtWidgets.QGraphicsPixmapItem(img1) # 设定 QItem,內容是 img1 img2 = img.scaled(100,150) # 建立不同尺寸图片 qitem2 = QtWidgets.QGraphicsPixmapItem(img2) # 设定 QItem,內容是 img2 scene.addItem(qitem1) # 场景中加入 QItem scene.addItem(qitem2) # 场景中加入 QItem grview.setScene(scene) # 设定 QGraphicsView 的场景為 scene MainWindow.show() sys.exit(app.exec())class 写法:
from PyQt6 import QtWidgets, QtGui import sys class MyWidget(QtWidgets.QWidget): def __init__(self): super().__init__() self.setWindowTitle('千牛编程思维') self.resize(300, 300) self.ui() def ui(self): self.grview = QtWidgets.QGraphicsView(self) # 加入 QGraphicsView self.grview.setGeometry(0, 0, 300, 300) # 设定 QGraphicsView 位置与大小 scene = QtWidgets.QGraphicsScene() # 加入 QGraphicsScene scene.setSceneRect(0, 0, 200, 200) # 设定 QGraphicsScene 位置与大小 img = QtGui.QPixmap('mona.jpg') # 建立图片 img1 = img.scaled(200,50) # 建立不同尺寸图片 qitem1 = QtWidgets.QGraphicsPixmapItem(img1) # 设定 QItem,內容是 img1 img2 = img.scaled(100,150) # 建立不同尺寸图片 qitem2 = QtWidgets.QGraphicsPixmapItem(img2) # 设定 QItem,內容是 img2 scene.addItem(qitem1) # 场景中加入 QItem scene.addItem(qitem2) # 场景中加入 QItem self.grview.setScene(scene) # 设定 QGraphicsView 的场景為 scene if __name__ == '__main__': app = QtWidgets.QApplication(sys.argv) Form = MyWidget() Form.show() sys.exit(app.exec())
免责声明:我们致力于保护作者版权,注重分享,被刊用文章因无法核实真实出处,未能及时与作者取得联系,或有版权异议的,请联系管理员,我们会立即处理! 部分文章是来自自研大数据AI进行生成,内容摘自(百度百科,百度知道,头条百科,中国民法典,刑法,牛津词典,新华词典,汉语词典,国家院校,科普平台)等数据,内容仅供学习参考,不准确地方联系删除处理! 图片声明:本站部分配图来自人工智能系统AI生成,觅知网授权图片,PxHere摄影无版权图库和百度,360,搜狗等多加搜索引擎自动关键词搜索配图,如有侵权的图片,请第一时间联系我们,邮箱:ciyunidc@ciyunshuju.com。本站只作为美观性配图使用,无任何非法侵犯第三方意图,一切解释权归图片著作权方,本站不承担任何责任。如有恶意碰瓷者,必当奉陪到底严惩不贷!


