
diffusion model(六)Dalle2技术小结


Dalle2 技术小结
文章目录
- Dalle2 技术小结
- 系列阅读
- 背景
- Dalle2的总体架构
- DiffusionPrior模块
- 训练阶段
- 推理阶段
- DiffusionDecode 模块
- Dalle2的生成质量和目前的局限性
- Dalle2的生成效果
- 基于MS-COCO caption生成效果
- Other
- Dalle2的局限性
- 参考文献
系列阅读
- diffusion model(一)DDPM技术小结 (denoising diffusion probabilistic)
- diffusion model(二)—— DDIM技术小结
- diffusion model(三)—— classifier guided diffusion model
- diffusion model(四)文生图diffusion model(classifier-free guided)
- diffusion model(五)stable diffusion底层原理(latent diffusion model, LDM
背景
随着AIGC概念及diffusion model在视觉领域的发光发热。OpenAI结合CLIP与diffusion model提出了一个二阶段的文本生成图片范式Dalle2[1],能够更精细的从语义层面控制图片的生成效果。得益于其训练范式,Dalle2的图片生成的质量不弱于GLIDE[2],但生成器的多样性有明显提升。下面我们来看它是怎么做的吧!
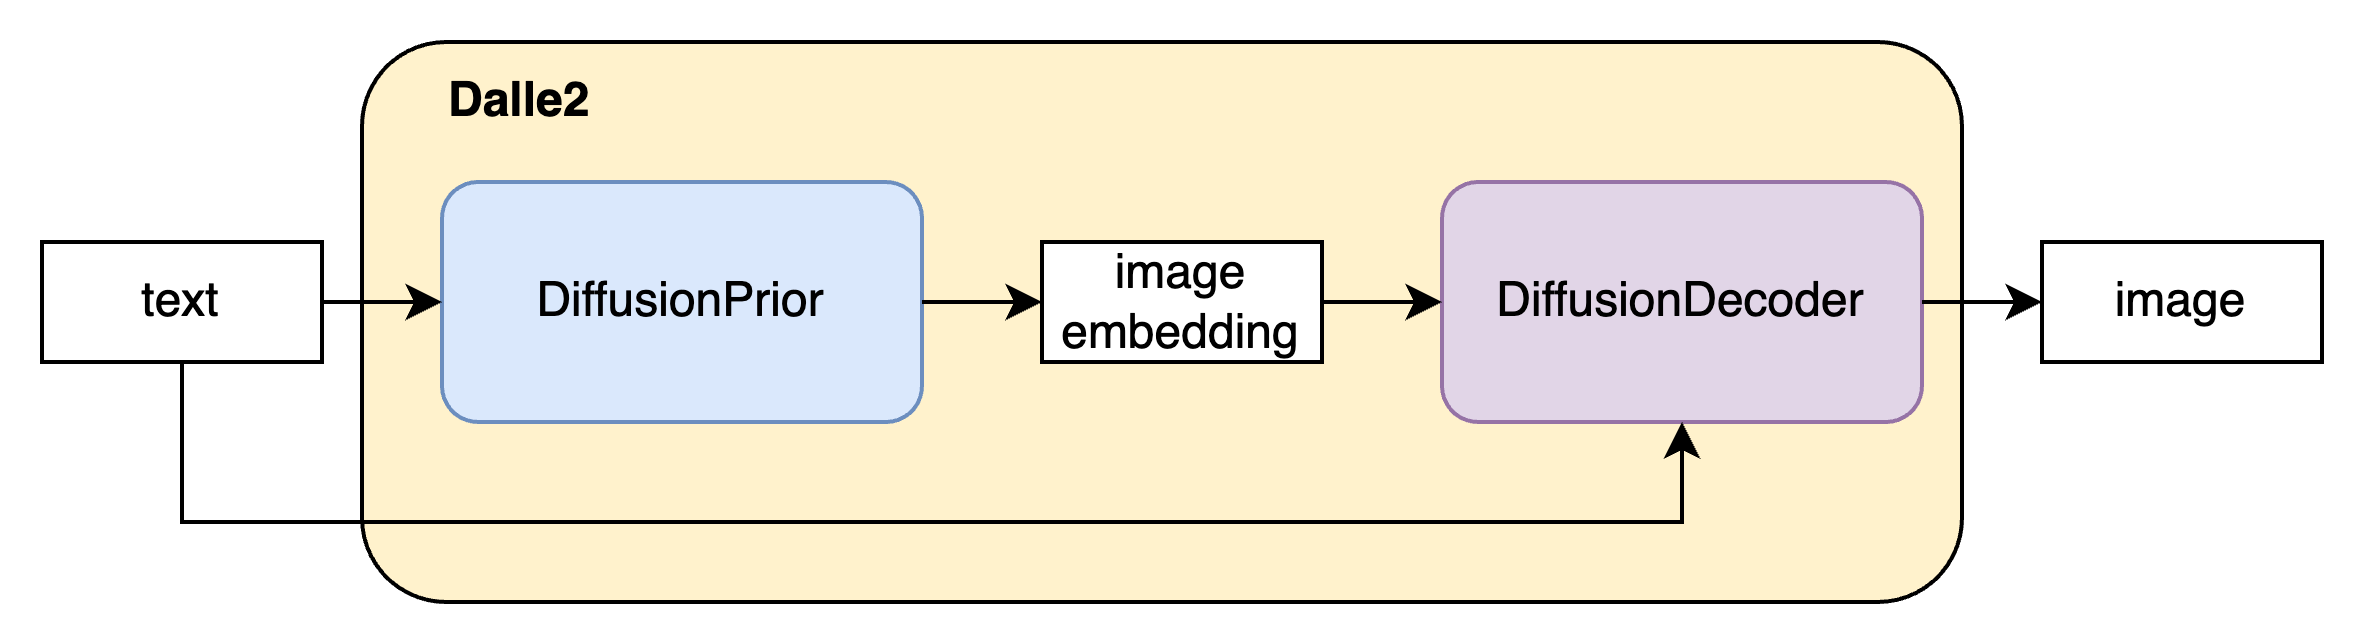
Dalle2的总体架构
Dalle2作为一个文到图的生成模型,其输入是文本,其输出是基于该文本对应的图片即 P ( x ∣ y ) P(x|y) P(x∣y) 。Dalle2将该过程分为两个阶段
其一是DiffusionPrior P ( z i ∣ y ) P(z_i|y) P(zi∣y),其作用是获得输入文本 y y y对应的CLIP图片向量 z i z_i zi。
其二是DiffusionDecode P ( x ∣ z i , y ) P(x|z_i,y) P(x∣zi,y),作用是根据输入的文本 y y y和估计的图片向量 z i z_i zi生成图片 x x x。下面我们对这两个模块进行详细介绍。
上述两个阶段可用公式(1)进行表述
P ( x ∣ y ) = P ( x , z i ∣ y ) = P ( x ∣ z i , y ) P ( z i ∣ y ) P(x|y)=P(x,z_i|y) = P(x|z_i, y)P(z_i|y) P(x∣y)=P(x,zi∣y)=P(x∣zi,y)P(zi∣y)
可能会有读者疑问为什么 P ( x ∣ y ) = p ( x , z i ∣ y ) P(x|y)=p(x,z_i|y) P(x∣y)=p(x,zi∣y)这是因为 z i z_i zi是 x x x的CLIP的image embedding,CLIP是一个确定的函数,故相等。
DiffusionPrior模块
Prior模块的作用是给定文本,生成该文本对应的CLIP模型的图片向量。(generate possible CLIP image embedding from a given text caption)
前置知识:
-
DIffusion model的原理,可参考博客[^5]。
-
CLIP的基本原理[^4]。
训练阶段
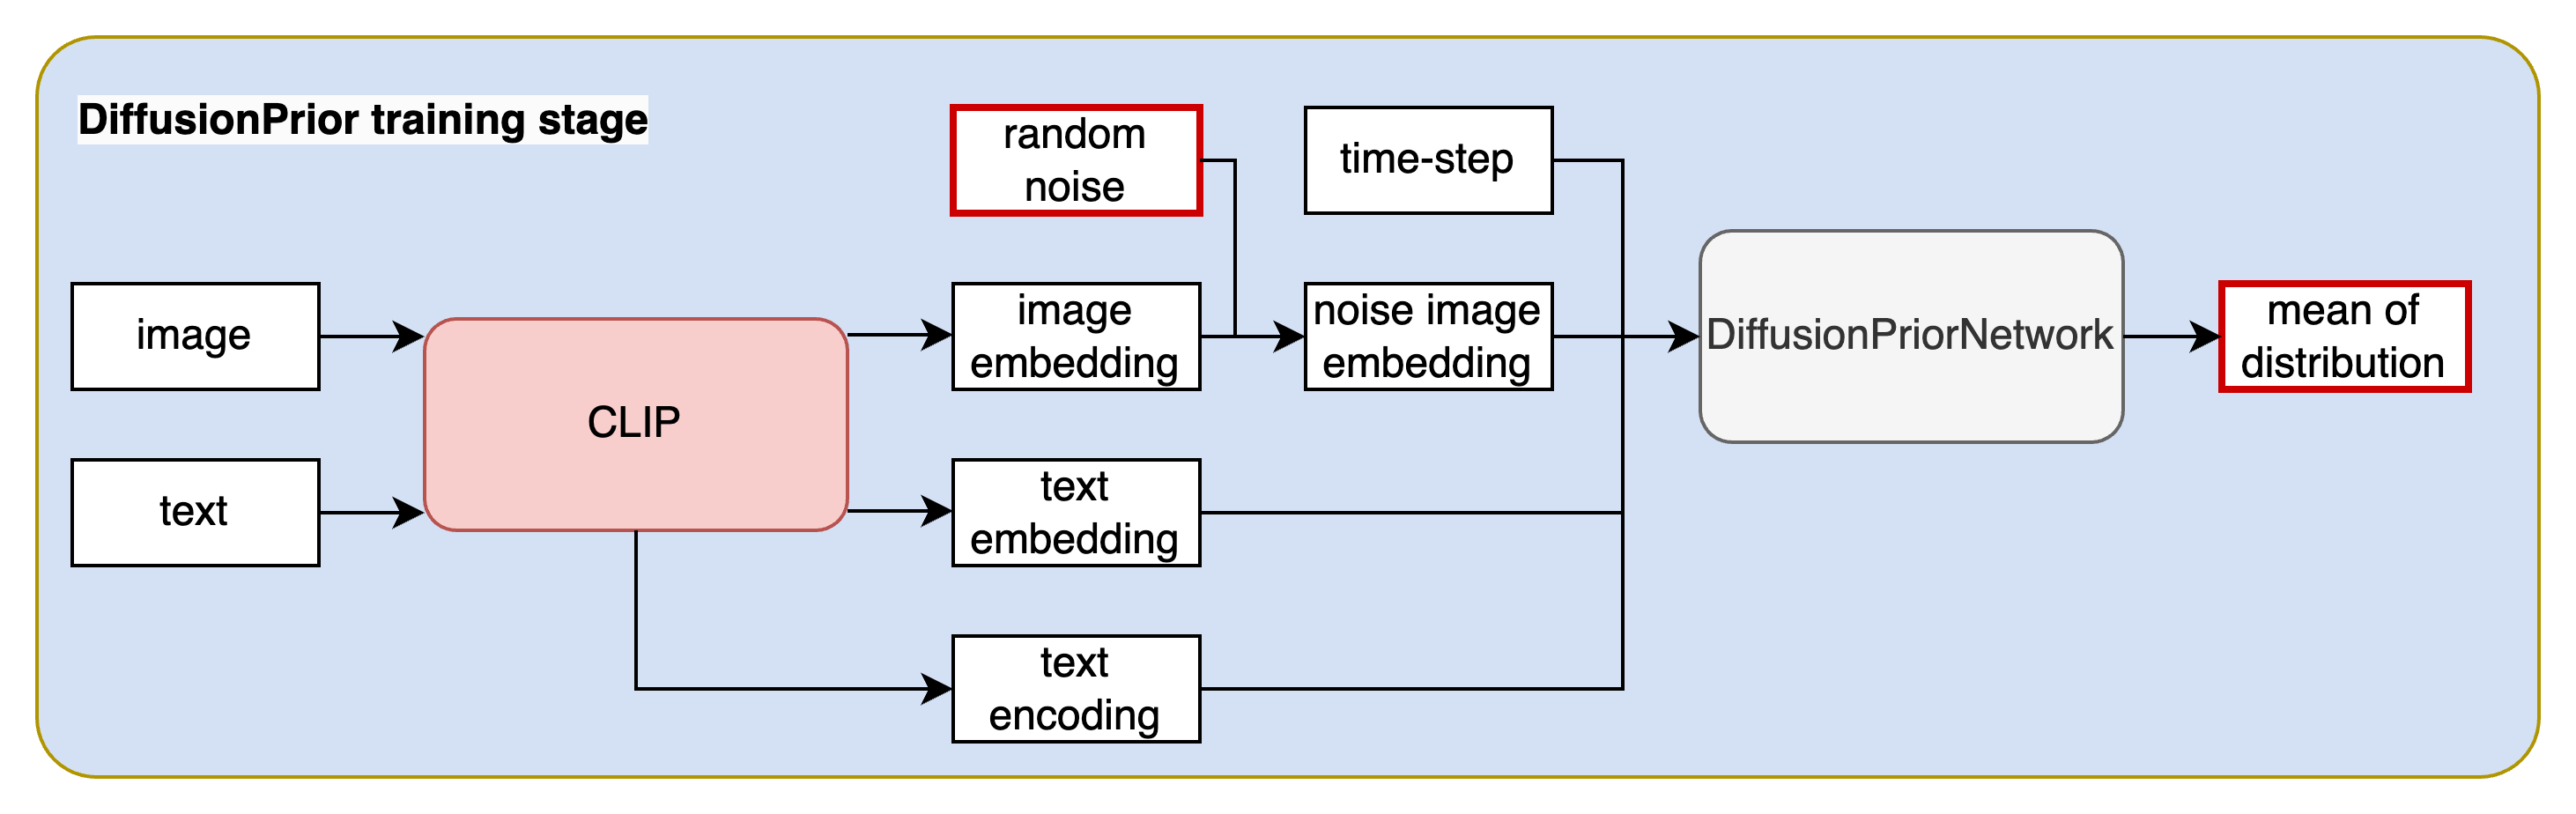
训练数据: 图片文本对 { ( x i , y i ) ∣ i = 1 , 2 , . . . , N } \{(x_i,y_i)| i=1,2,...,N\} {(xi,yi)∣i=1,2,...,N}
对DuffusionPrior的训练主要包含以下几个步骤:
Step1:将图片文本对输入到CLIP[^4]模型中获得对应的文本向量编码(text embedding)文本中每个token的编码(text encoding)及图像向量编码(image embedding)。这里值得注意的是:CLIP的模型权重冻结,不参加训练。
Step2: 对image embedding(此处的image embedding就是diffusion model中的 x 0 x_0 x0)。随机采样时间步 t t t,对 x 0 x_0 x0进行加噪,得到第 t t t时刻的noise image embedding x t x_t xt。
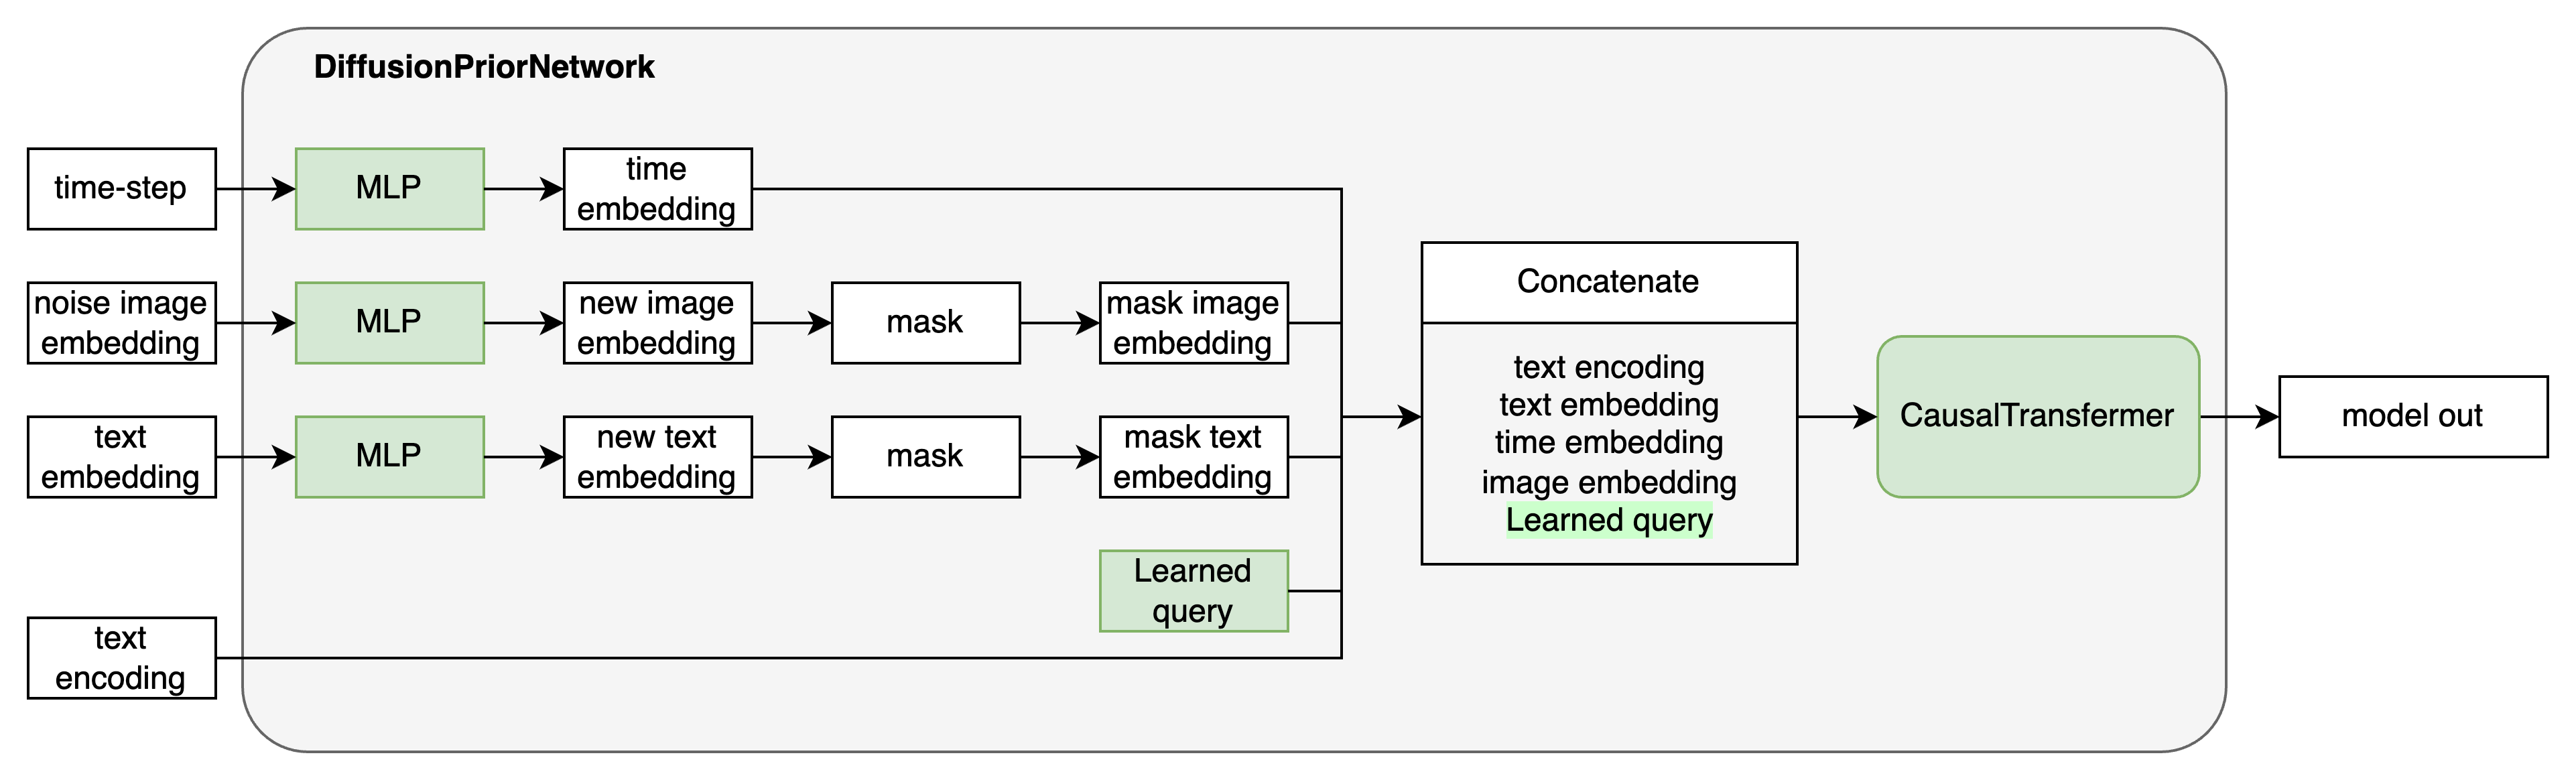
Step3: 将文本向量编码、文本token编码、时间步向量、 t t t时刻的图像向量编码输入到模型中(其本质是一个decode-only transformer with a causal attention mask)。该模型的作用是预测分布 p ( x t − 1 ∣ x t ) p(x_{t-1}|x_t) p(xt−1∣xt)分布的均值。
Step4: 计算预测分布与实际分布的KL散度实现训练。
PS:作者训练中用了很多trick,由于本文主要关注在理解dalle2的工作原理,故未详细描述,若想深入了解可参考代码。
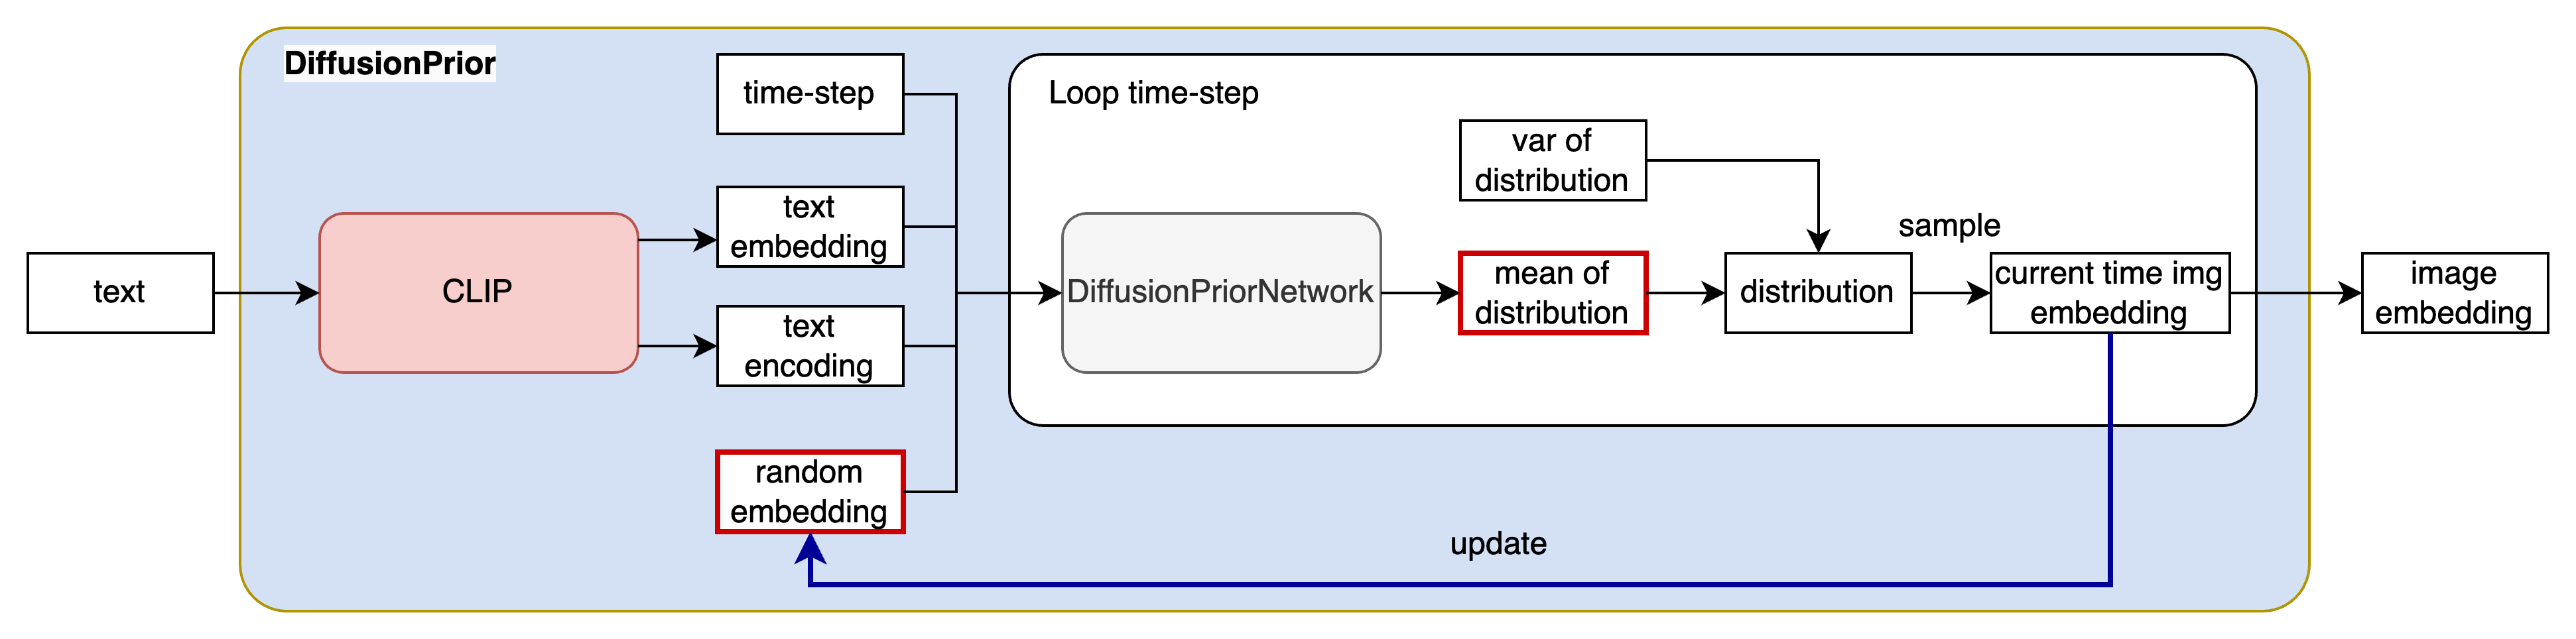
推理阶段
推理阶段主要包含以下步骤:
Step1:将文本内容 y y y送入到CLIP模型中得到文本向量文本向量编码(text embedding)文本中每个token的编码(text encoding)。
Step2: 从高斯分布中随机采样一组向量作为 T T T时刻的图片向量编码。将文本向量编码、文本中每个token的编码、时间步编码、 T T T时刻的图片向量编码送入到DiffusionPriorNetwork中,预测 T − 1 T-1 T−1时刻的图片向量编码。
Step3: 不断重复步骤2,直至时间步到 0 0 0得到所需的image embedding。
可能会有读者有疑问:CLIP模型不是已经在文本特征与图片特征对齐了吗?为什么要多此一举设计DiffusionPrior模块来根据文本embedding来生成图片embedding而不是直接用文本embedding来作为图片embedding。
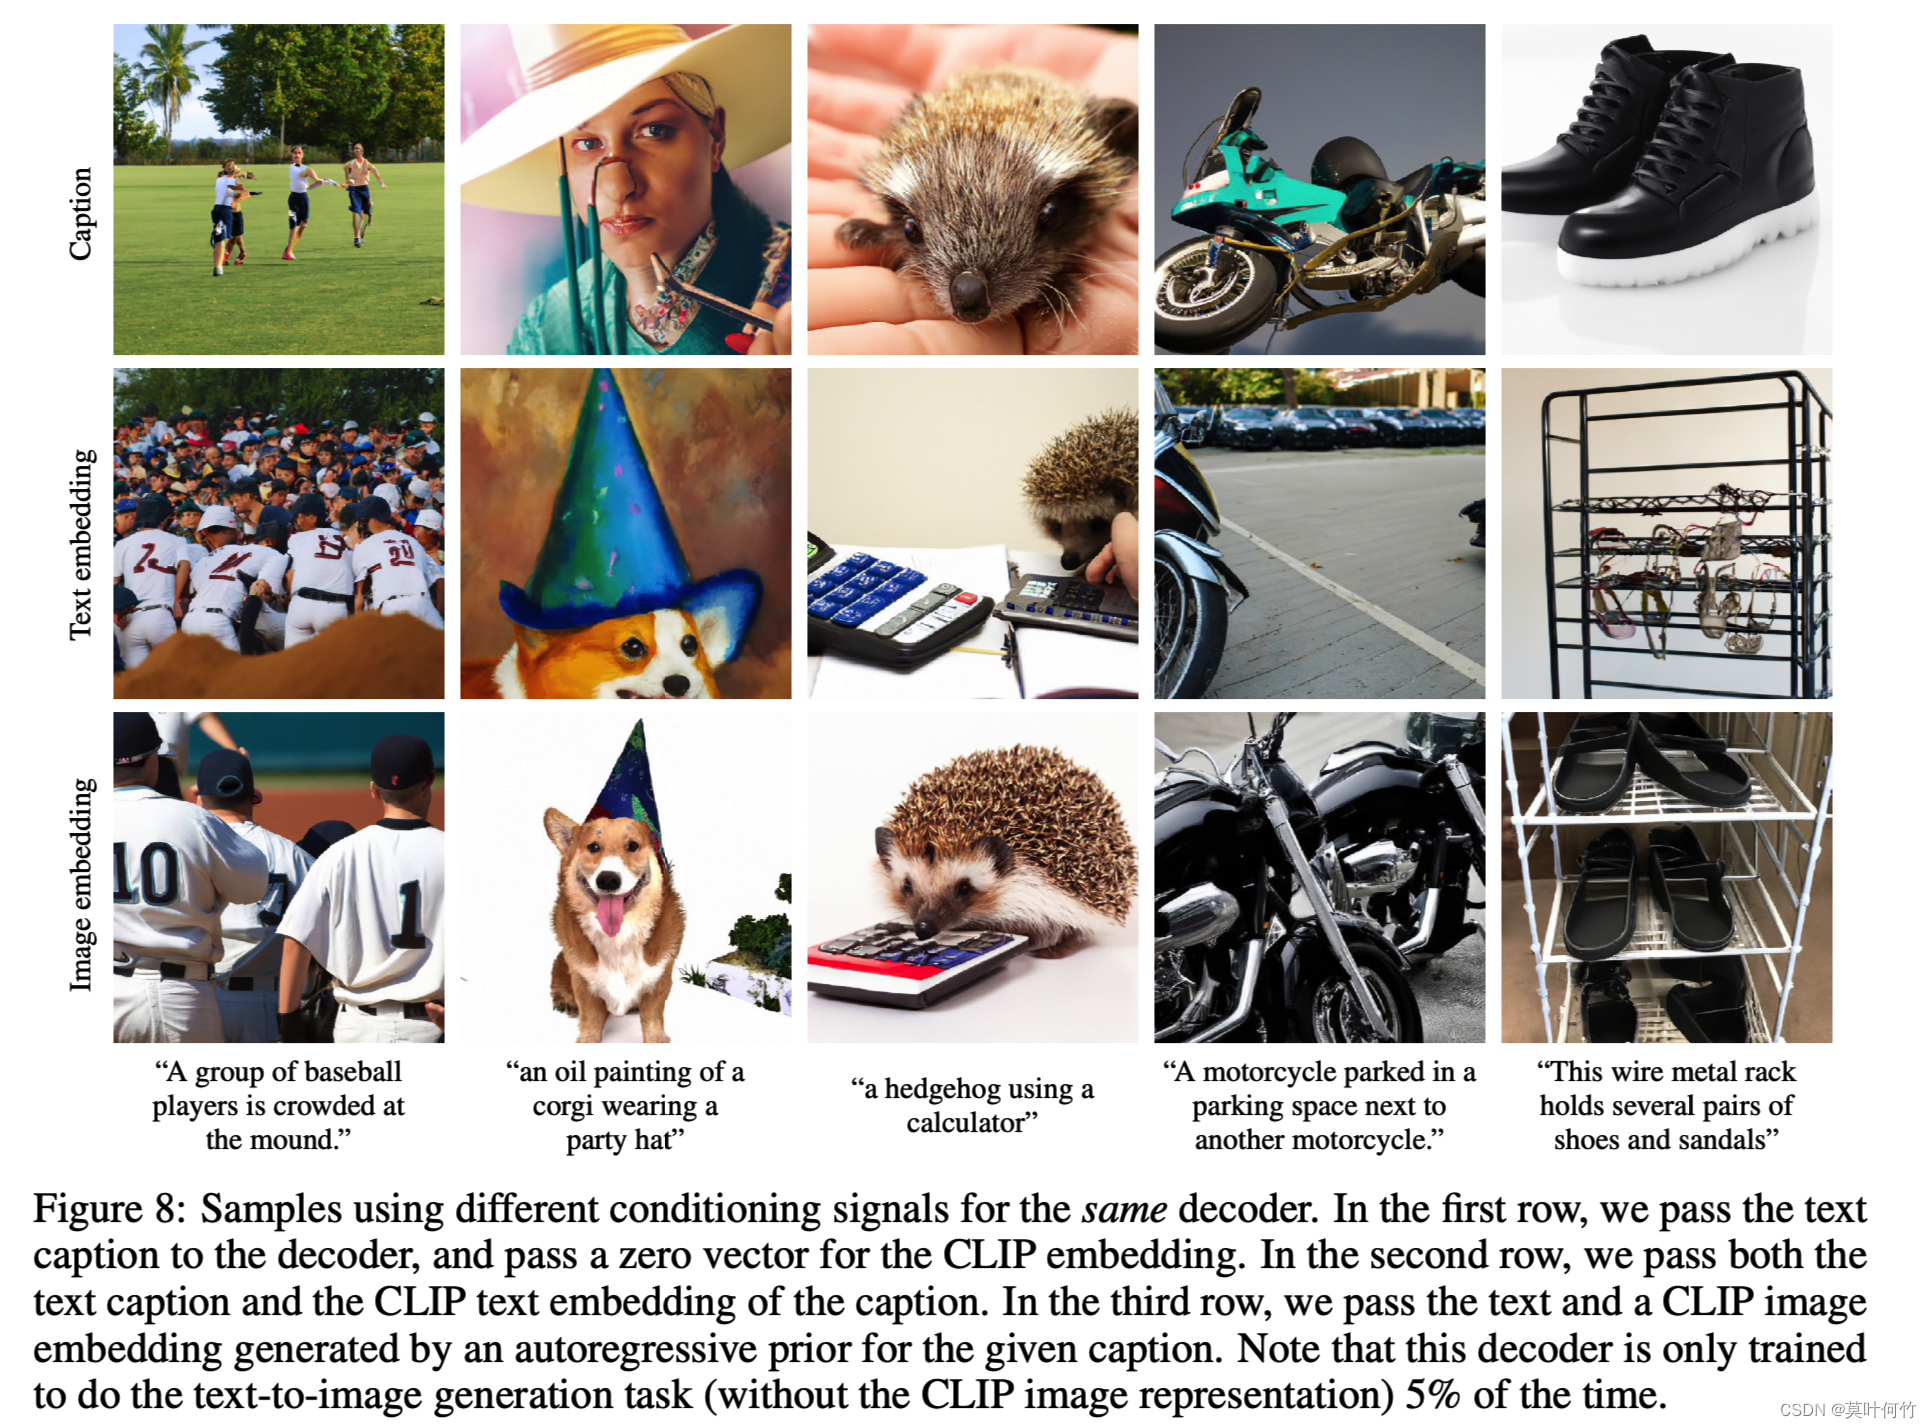
这是因为虽然CLIP在训练过程中通过对比损失使得图片特征与文本特征进行对齐,但是模态间还是有存在Gap[^6],Prior模块的很大的意义是给定文本embedding,准确预测出其对应CLIP的image embedding,更有益于重建的效果。如下图将CLIP的image embedding送入decode生成的图像(第三行)从相关性与质量上明显优于直接送入text embedding的效果(第二行)。
DiffusionDecode 模块
Decode部分也是个diffusion model。其主要作用是根据image embedding和文本embedding进行图像重建。这里值得强调的是,之前基于文本生成图片的任务只有文本向量作为条件(condition)。与之不同的是,Dalle2生成图片的条件有两个:其一是文本向量;其二是基于Prior模块估计的图片向量,这个操作使得它的生成效果更逼真、稳定。
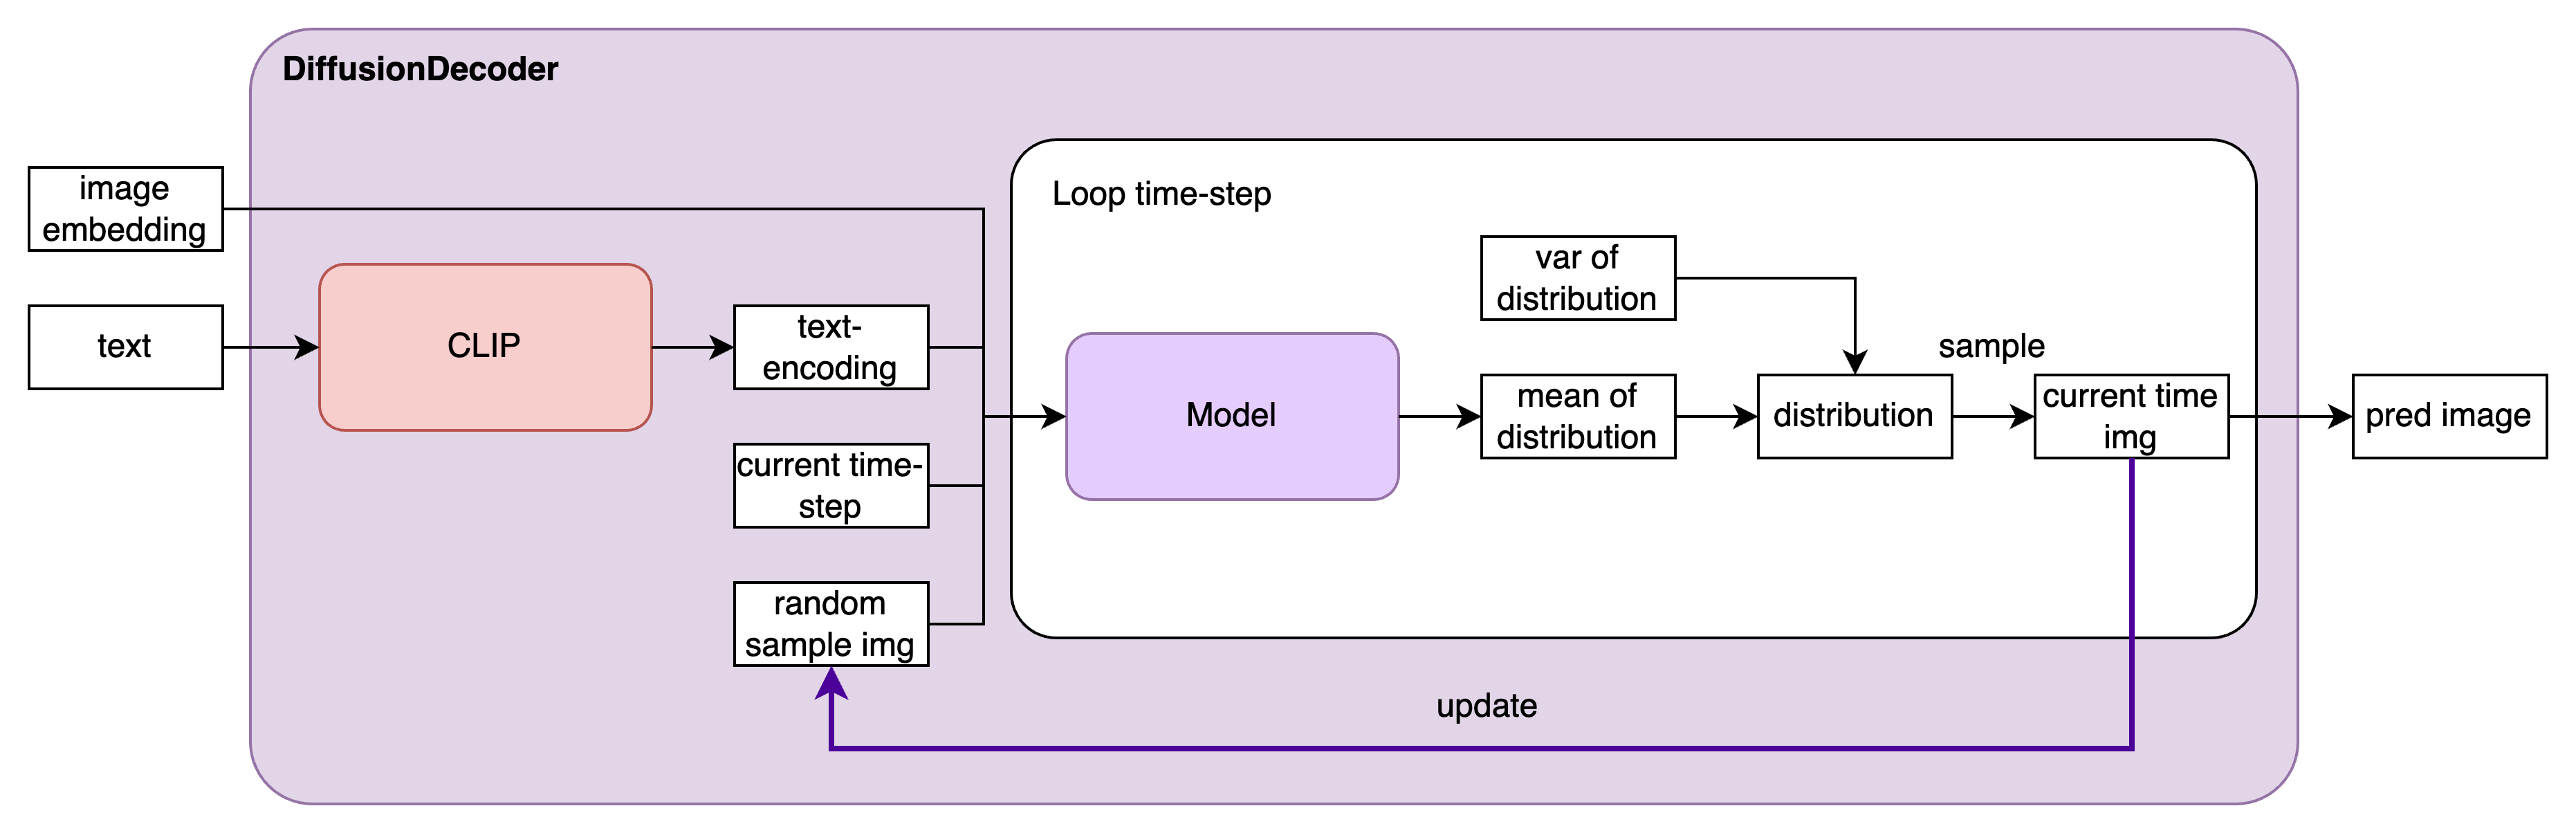
decode模块有两个比较关键训练trick
-
如何实现classifier-free guidance[^7]
dalle2的实现是每次随机mask掉10%的CLIP embedding,并且每次随机丢弃50%的text caption。
-
如何获得更高分辨率的生成图像
Dalle2采用了渐进式的生成方法。Dalle2训练了两个diffusion upsampler模型,第一个模型从 64 × 64 64 \times 64 64×64采样到 256 × 256 256 \times 256 256×256,第二个进一步采样到 1024 × 1024 1024 \times 1024 1024×1024。为了提升upsamper的稳健性,第一个上采样阶段用了高斯模糊;第二个上采样阶段用了多种BSR degradation操作[^8]
最后来看一下Dalle2的pipeline

Dalle2的生成质量和目前的局限性
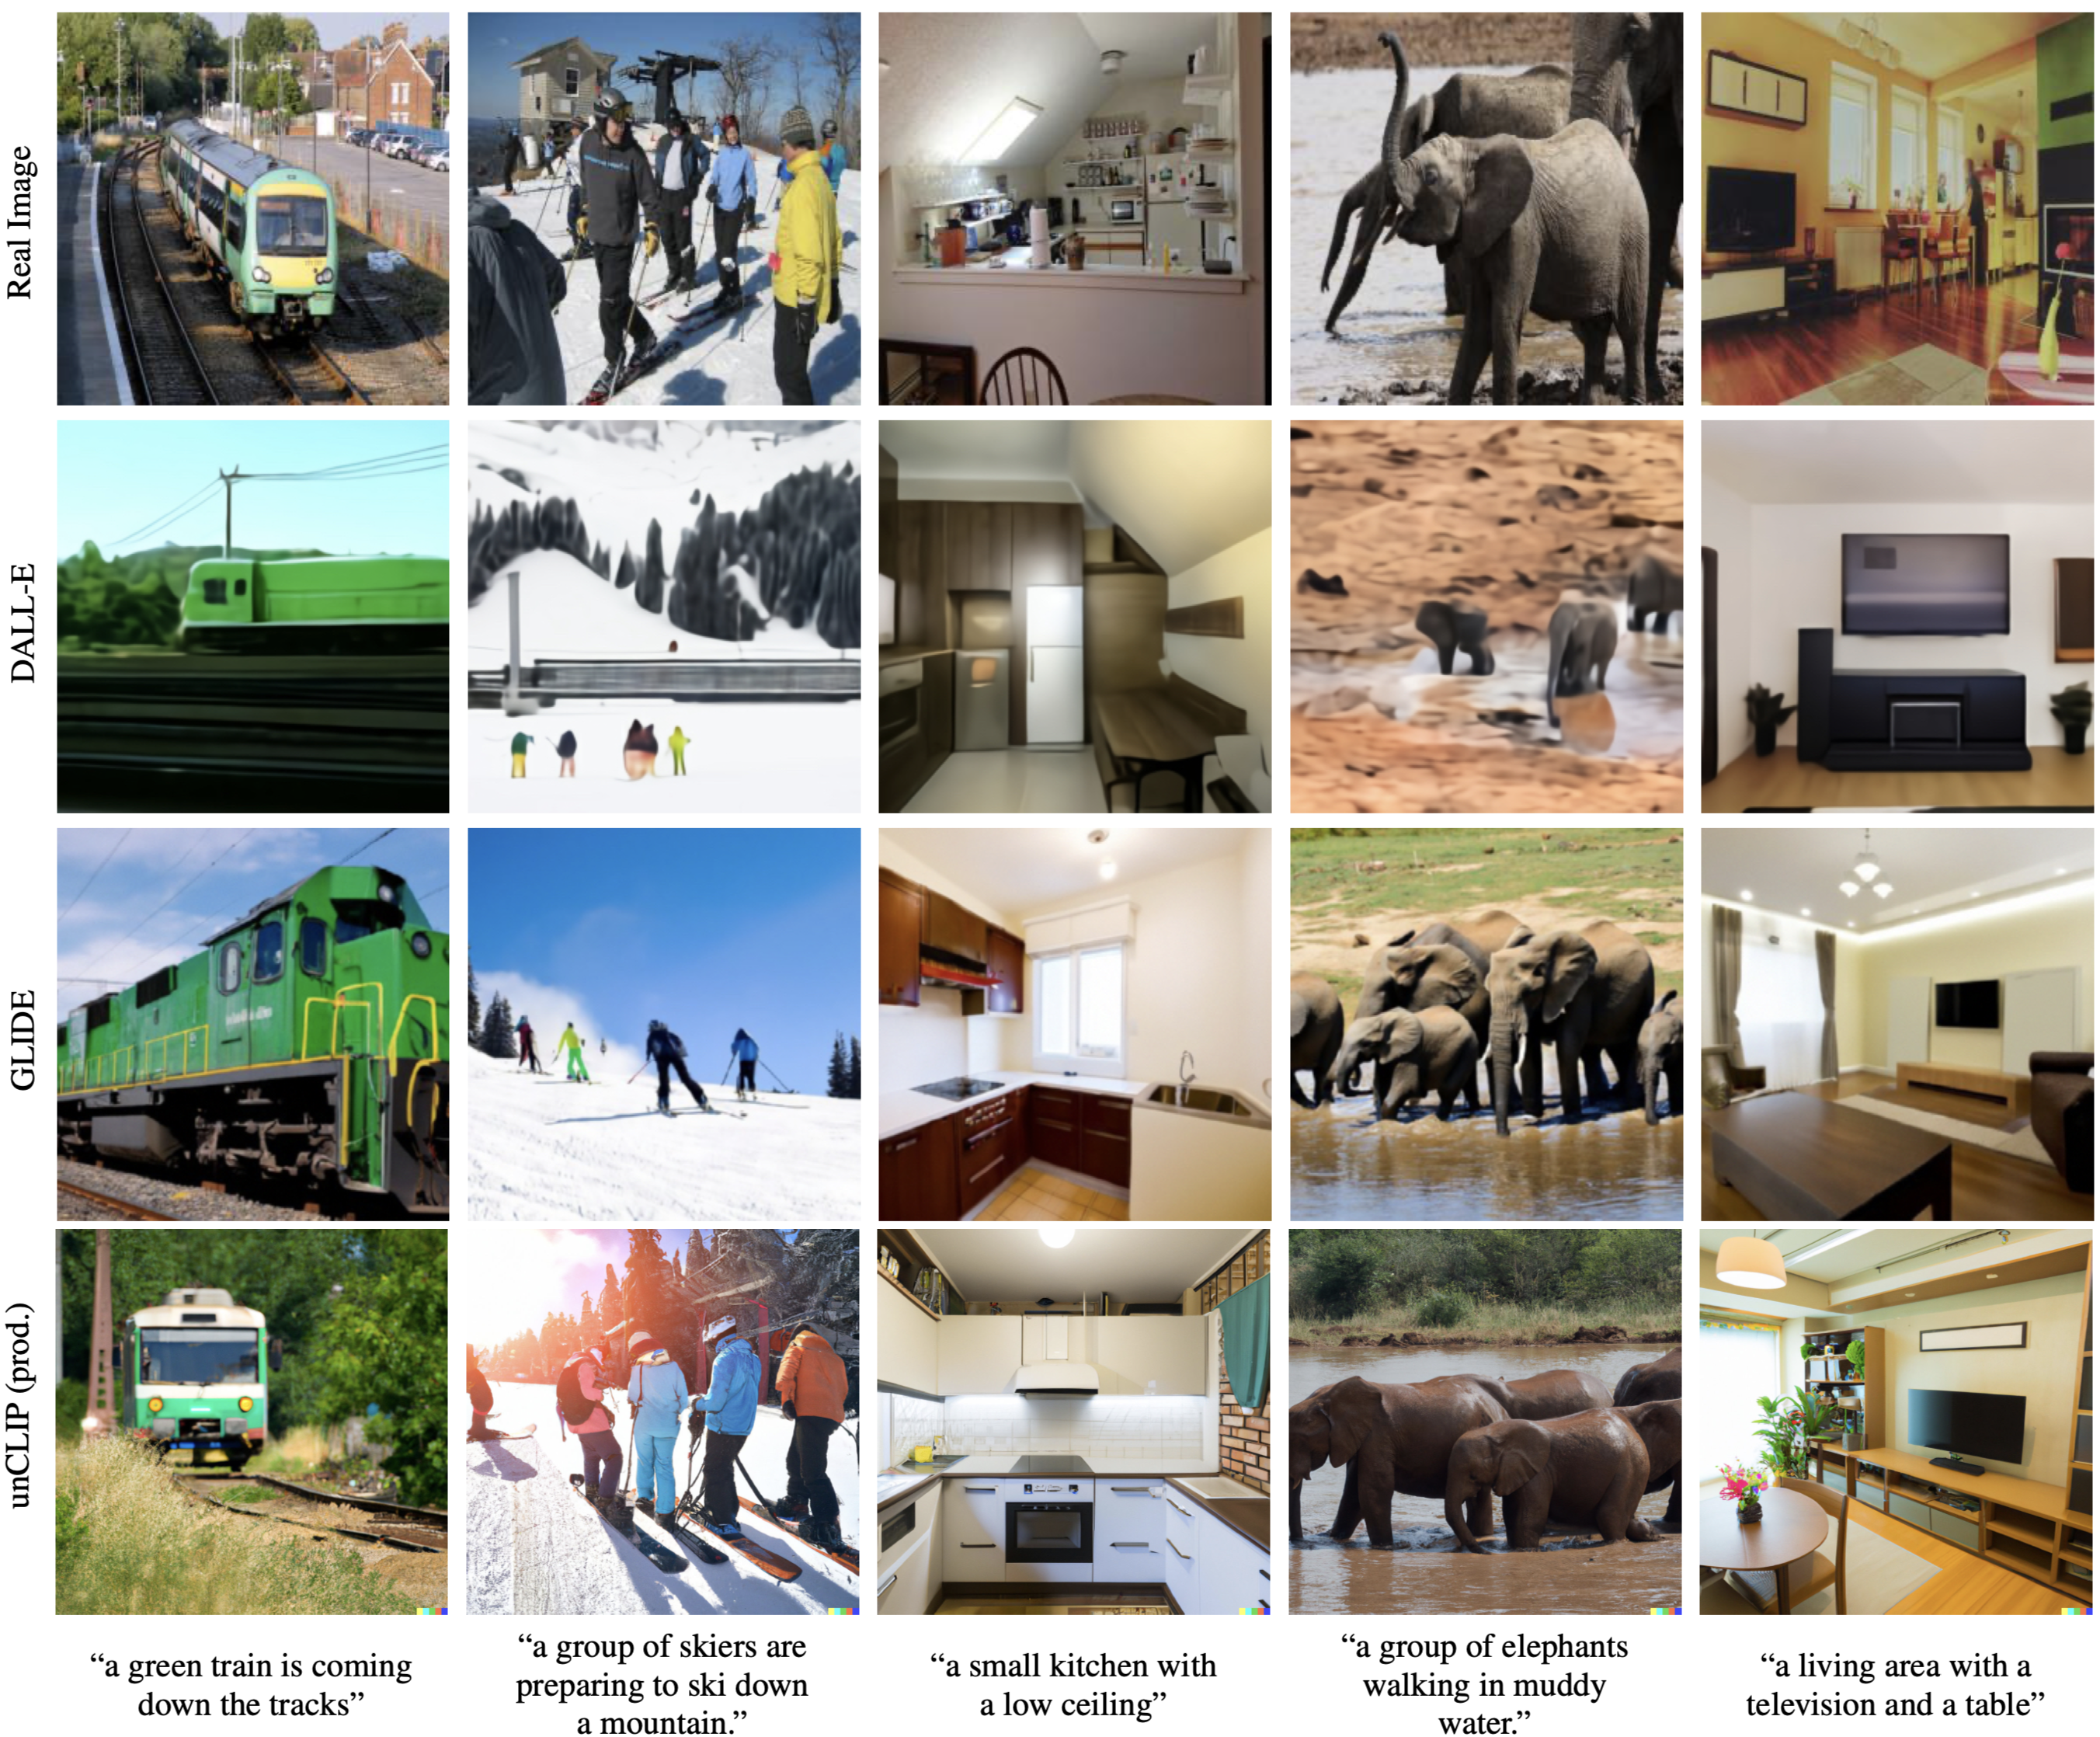
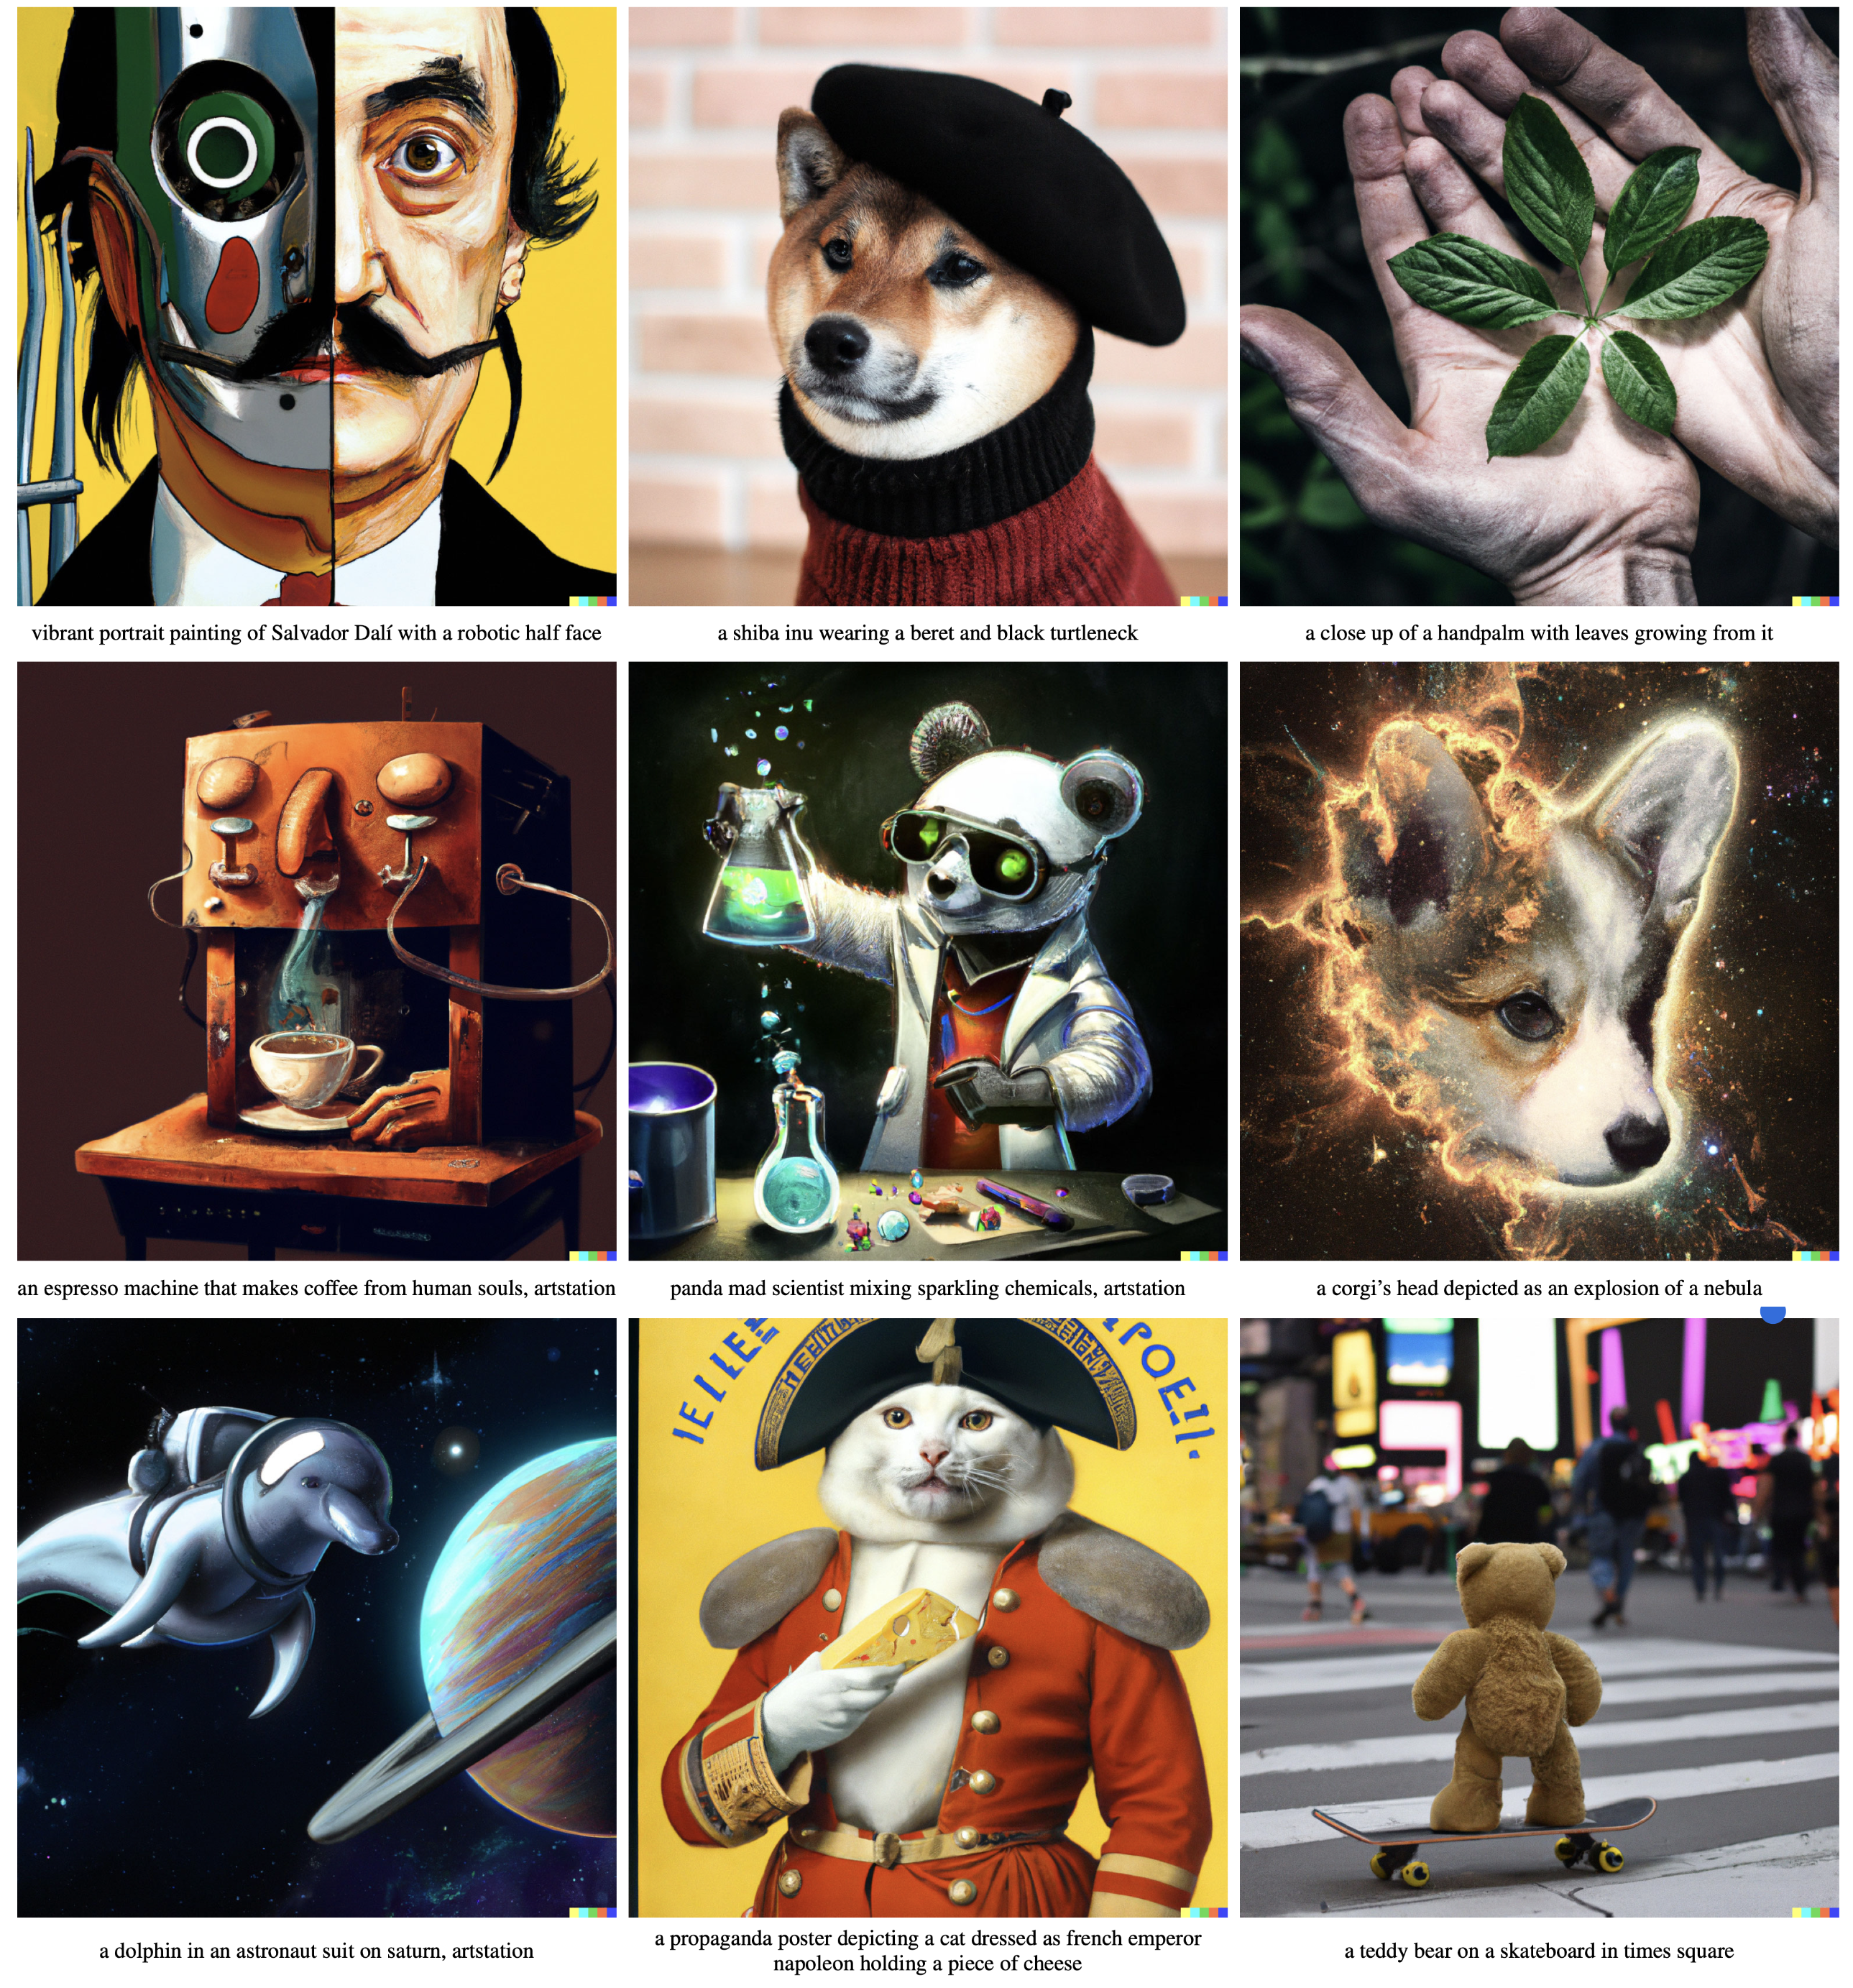
Dalle2的生成效果
基于MS-COCO caption生成效果
Other
Dalle2的局限性
CLIP的embedding没有将属性精确的绑定到对象,导致进行解码重建时会混淆属性和对象。
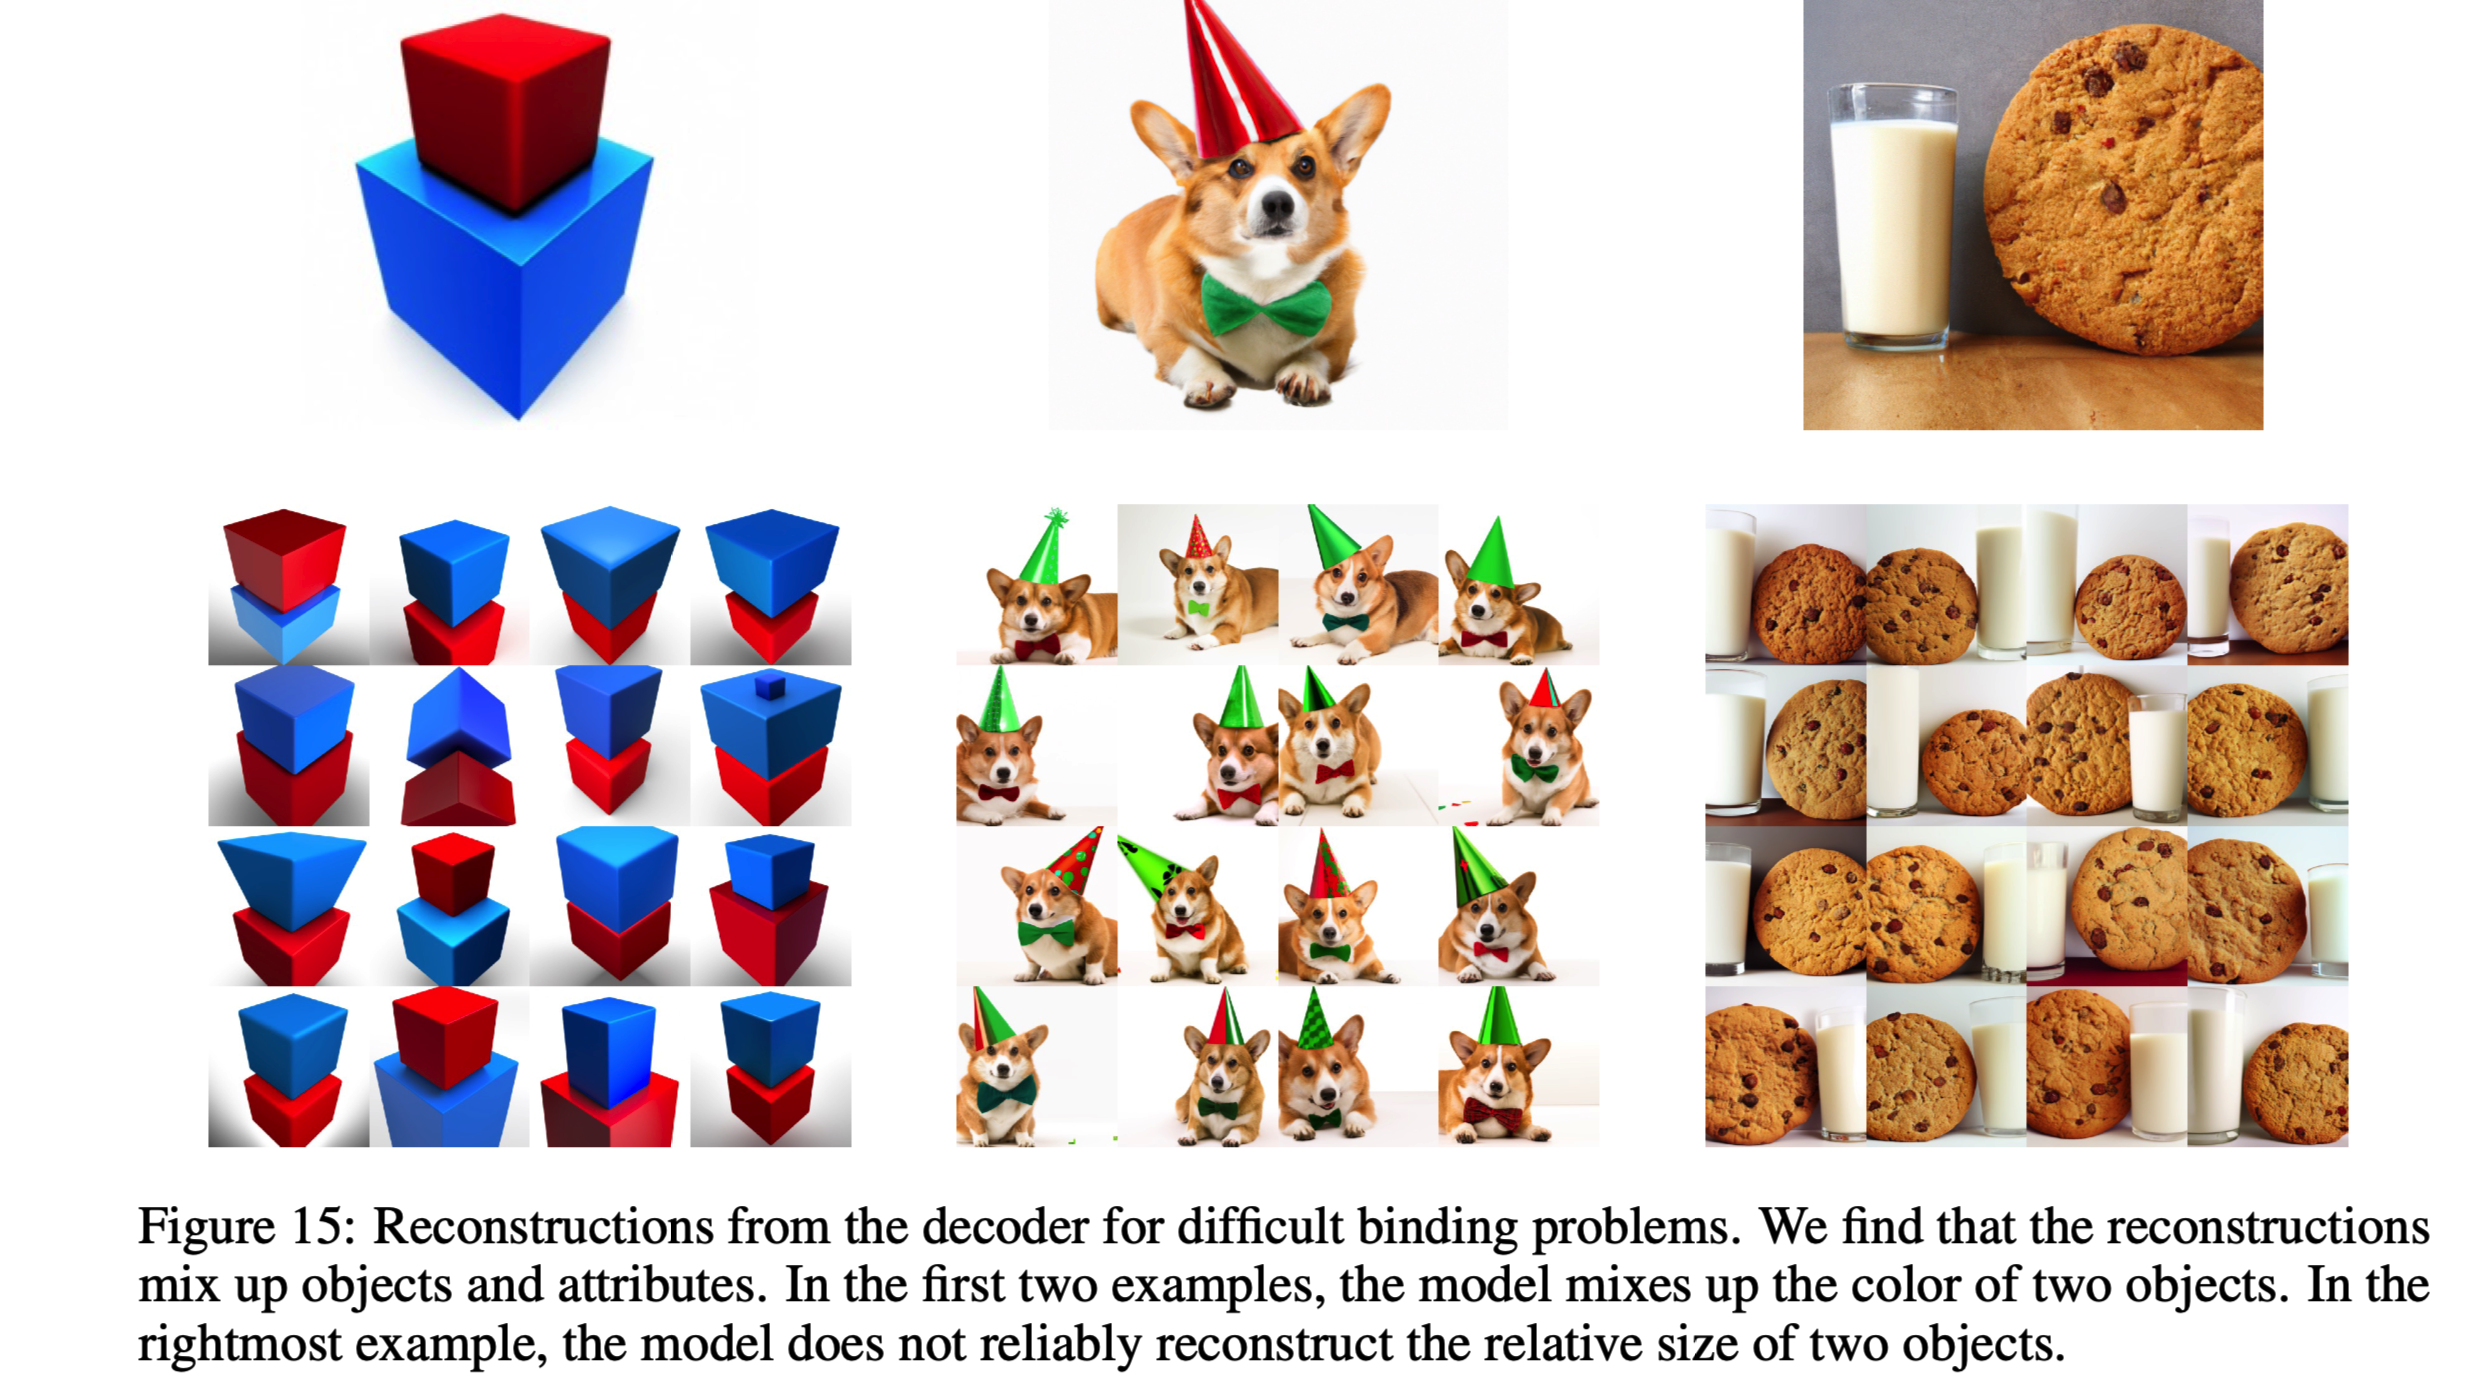
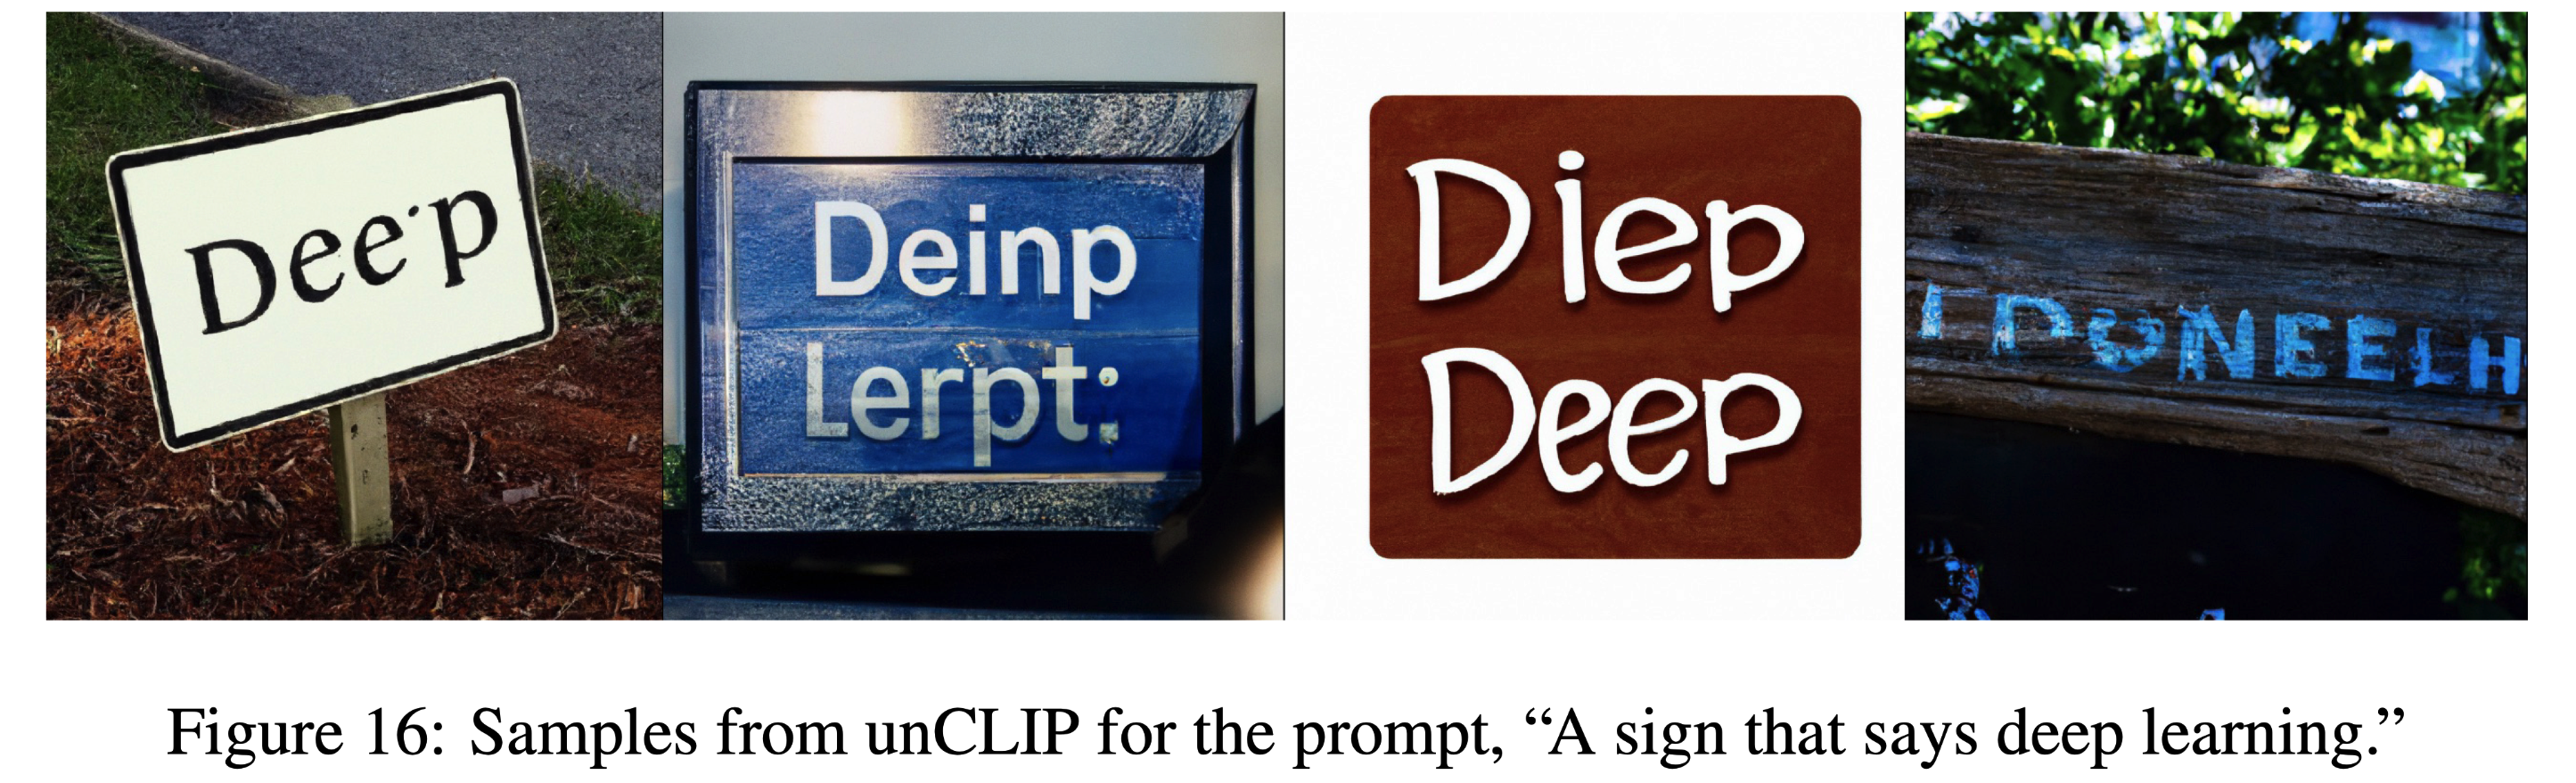
CLIP的embedding可能没有精确编码渲染文本的拼写信息,导致连续文本的生成会出现问题。
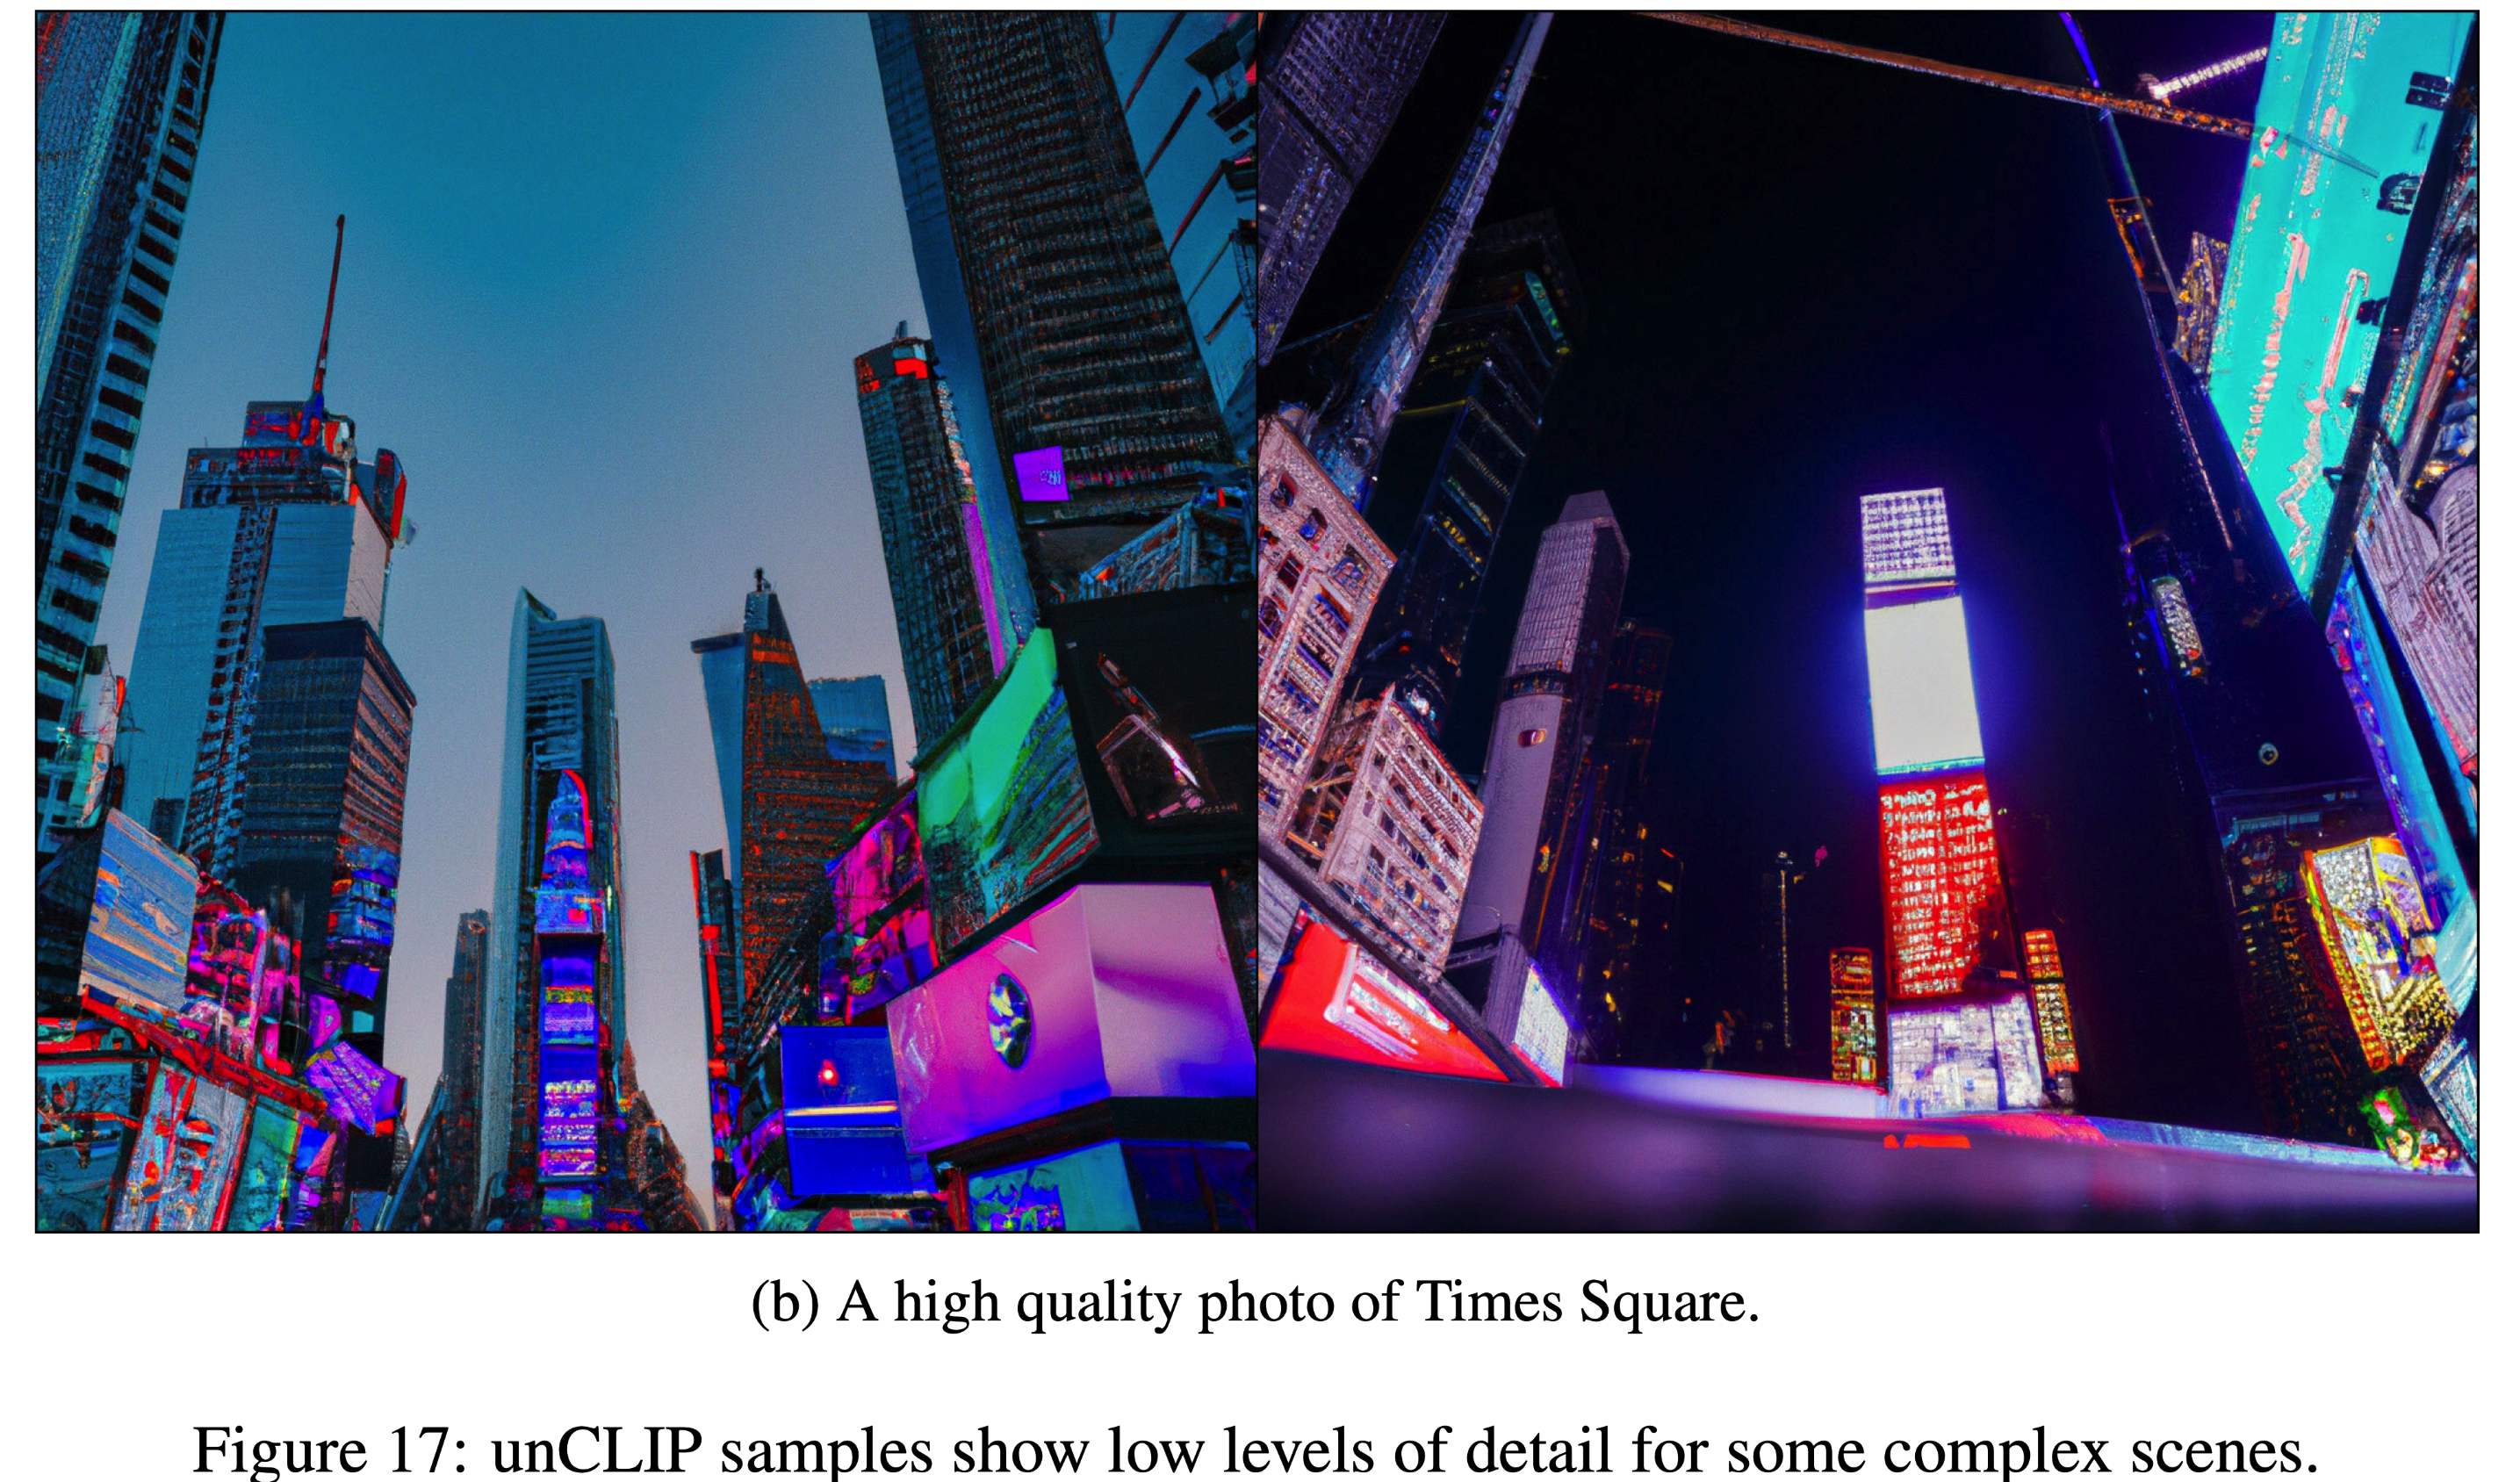
由于解码器是在 64 × 64 64 \times 64 64×64分辨率生成图像,虽有进行上采样,这可能导致难以在复杂场景生成细节。
参考文献
- Dalle2论文:Hierarchical Text-Conditional Image Generation with CLIP Latents
- GLIDE: Towards Photorealistic Image Generation and Editing with Text-Guided Diffusion Models.
- https://github.com/lucidrains/DALLE2-pytorch
- [Learning Transferable Visual Models From Natural Language Supervision](Learning Transferable Visual Models From Natural Language Supervision)
- DDPM (denoising diffusion probabilistic) 技术小结
- Mind the Gap: Understanding the Modality Gap in Multi-modal Contrastive Representation Learning
- Classifier-Free Diffusion Guidance
- High-Resolution Image Synthesis with Latent Diffusion Models
-
-


