(8)【Python/机器学习/深度学习】Deep-Learning模型与算法应用—常见的神经网络ANNMLP, CNN, RNN区别及应用&Keras、TensorFlow框架应用
目录
一、-神经网络ANNMLP, CNN, RNN区别及应用
1、常见的神经网络种类
2、Keras库介绍与应用
3、ANN多层感知机MLP应用
(1) MLP for Binary Classification(二元分类)
(2) ANN(MLP) for Multiclass Classification 预测蓝蝴蝶花品种 ('setosa', 'versicolor', 'virginica')(多元分类和回归)
(3) ANN(MLP) for Regression 预测Boston房价
4、CNN应用
CNN优缺点及应用领域
(4) Convolutional Neural Network (CNN) 识别手写数字字体
5、RNN应用
RNN优缺点及应用领域
(5)应用RNN汽车售卖量案例分析
6、ANN、CNN、RNN三者比较
二、Keras and TensorFlow tf keras区别及安装提示
要将Anaconda中的TensorFlow 2.4版本降级到2.2版本
三、Convolutional Neural NetworkCNN图像处理过程解析
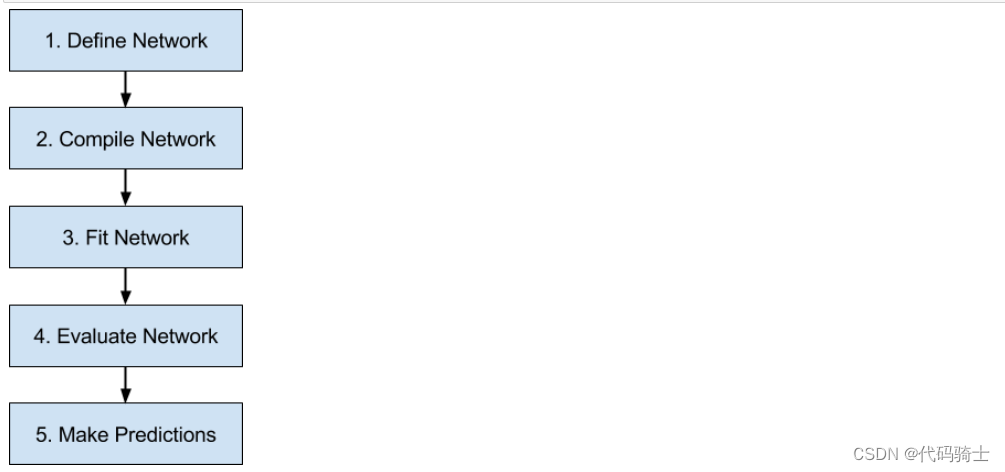
1、Keras工作流程及原理
2、CNN图像处理过程解析
3、简述完整的CNN图片处理过程:
4、CNN图像处理完整过程代码:
5、加强理解卷积作用:
6、加强平滑层理解:
7、加强Dropout层理解:
四、CNN应用Keras Tuner寻找最佳Hidden Layers层数和神经元数量
1、conda环境管理
2、新建conda环境
3、超参数
五、应用ANN+SMOTE+Keras Tuner算法进行信用卡交易欺诈侦测 (非均衡数据处理)
1、SMOTE Sampling
一、-神经网络ANNMLP, CNN, RNN区别及应用
1、常见的神经网络种类
1. Perceptron ANN:
感知机是一种用于二元分类任务的人工神经网络(ANN)。它由一个输入层、一个或多个隐藏层和一个输出层组成。感知机算法是一种简单而高效的学习算法,可用于训练感知机模型。它通过根据预测输出和实际输出之间的误差调整输入和隐藏节点之间连接的权重来工作。
2. Convolution ANN:
卷积神经网络(CNN)是一种专门用于图像识别任务的ANN。它由多个卷积滤波器层组成,这些滤波器应用于输入图像以提取边缘、角点和纹理等特征。这些特征然后通过一个或多个全连接层产生最终输出。CNN以其能够学习空间特征层次结构的能力而闻名,这使它们在识别复杂图像模式方面非常有效。
3. Recurrent ANN:
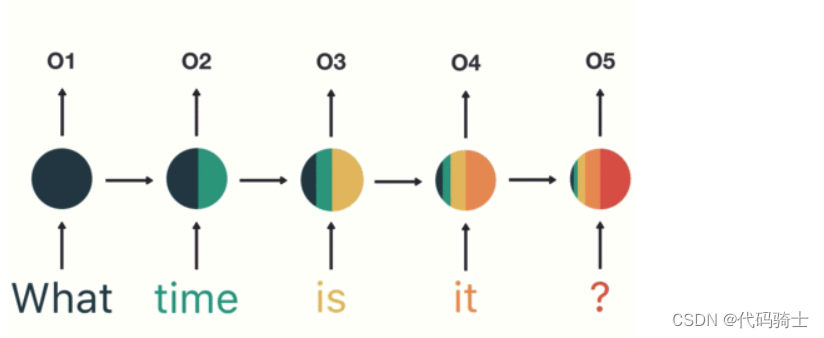
循环人工神经网络(RNN)是一种用于处理序列数据(如时间序列或自然语言)的ANN。它们具有反馈连接,可以将信息从一步传递到下一步,从而使它们能够保留先前输入的记忆。RNN常用于语音识别、机器翻译和情感分析等应用中。
4. GANs:
生成对抗网络(GANs)是一种用于生成类似于给定训练数据集的新数据样本的ANN。它由两个神经网络组成:一个生成器网络,用于生成新样本;一个判别器网络,试图区分真实和伪造样本。这两个网络在一个类似游戏中的场景中一起训练,其中生成器试图欺骗判别器认为其样本是真实的,而判别器则试图正确识别真实样本和伪造样本。这个过程会一直持续下去,直到生成器能够产生与真实样本无法区分的高质量样本为止。
此节介绍:多层感知机模型,简称MLP,是一种标准的全连接神经网络模型。
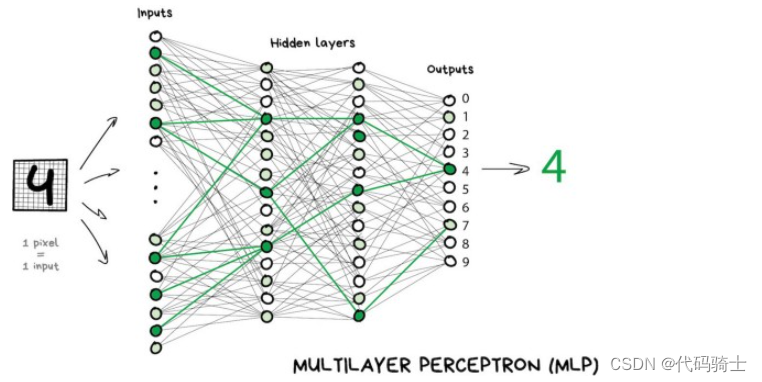
多层感知机(MLP,Multilayer Perceptron)是一种前向结构的人工神经网络,它的基本结构基于生物神经元模型。最典型的MLP包括输入层、一个或多个隐藏层和输出层,各层之间是完全连接的。在实际应用中,除了输入输出层外,MLP中间可以有多个隐层。当输入样本进入MLP网络后,样本会在网络中逐层前馈,即从输入层到隐藏层,再到输出层,逐层进行计算。
单个感知器(或神经元)可以想象为逻辑回归。
人工神经网络(ANN):人工神经网络(ANN)是由多个感知器或神经元组成的一层网络。由于输入只在前向方向上处理,因此ANN也被称为前馈神经网络。
优点:在整个网络上存储信息。能够处理不完整的知识。具有容错性。具有分布式记忆。
缺点:依赖于硬件。网络行为的不可解释性。确定适当的网络结构。
表格数据,文本数据
反向传播算法是一种监督学习方法,用于来自人工神经网络领域的多层前馈网络。
2、Keras库介绍与应用
是一个功能强大且易于使用的免费开源Python库,用于开发和评估深度学习模型。
在本教程中,您将涵盖以下步骤:
(1)定义Keras模型
(2)加载数据
(3)编译Keras模型
(4)拟合Keras模型
(5)评估Keras模型
(6)进行预测
3、ANN多层感知机MLP应用
通过一个或多个密集层(Dense layer)创建多层感知器(MLP)。这种模型适用于表格数据,即在表格或电子表格中的数据,每个变量对应一列,每行对应一个变量。您可能希望使用MLP探索的三个预测建模问题包括:二元分类、多类分类和回归。
(1) MLP for Binary Classification(二元分类)
# mlp for binary classification
from pandas import read_csv
from sklearn.model_selection import train_test_split
from sklearn.preprocessing import LabelEncoder
from tensorflow.keras import Sequential
from tensorflow.keras.layers import Dense
# load the dataset
df = read_csv('ionosphere.csv', header=None)
df
# split into input and output columns
X, y = df.values[:, :-1], df.values[:, -1]
# ensure all data are floating point values
X = X.astype('float32')
# encode strings to integer
y = LabelEncoder().fit_transform(y)
# split into train and test datasets
X_train, X_test, y_train, y_test = train_test_split(X, y, test_size=0.33)
print(X_train.shape, X_test.shape, y_train.shape, y_test.shape)
(235, 34) (116, 34) (235,) (116,)
# determine the number of input features
n_features = X_train.shape[1]
这是一个好的做法,使用'relu'激活函数和'he_normal'权重初始化。这种组合可以在很大程度上克服训练深度神经网络模型时的梯度消失问题。
# define model
model = Sequential()
model.add(Dense(10, activation='relu', kernel_initializer='he_normal', input_shape=(n_features,)))
model.add(Dense(8, activation='relu', kernel_initializer='he_normal'))
model.add(Dense(1, activation='sigmoid'))
# compile the model
model.compile(optimizer='adam', loss='binary_crossentropy', metrics=['accuracy'])
# fit the model
model.fit(X_train, y_train, epochs=150, batch_size=32, verbose=1)
# evaluate the model
loss, acc = model.evaluate(X_test, y_test, verbose=1)
print('Test Accuracy: %.3f' % acc)
116/116 [==============================] - 0s 1ms/sample - loss: 0.4140 - acc: 0.8879
Test Accuracy: 0.888
# make a prediction
row = [1,0,0.99539,-0.05889,0.85243,0.02306,0.83398,-0.37708,1,0.03760,0.85243,-0.17755,0.59755,-0.44945,0.60536,-0.38223,0.84356,-0.38542,0.58212,-0.32192,0.56971,-0.29674,0.36946,-0.47357,0.56811,-0.51171,0.41078,-0.46168,0.21266,-0.34090,0.42267,-0.54487,0.18641,-0.45300]
yhat = model.predict([[row]])
print('Predicted: %.3f' % yhat)
if yhat >= 1/2:
    yhat = 'G'
else:
    yhat = 'B'
print('Predicted: ', yhat)
Predicted: 0.964
Predicted:  G
完整代码:
# mlp for binary classification
from pandas import read_csv
from sklearn.model_selection import train_test_split
from sklearn.preprocessing import LabelEncoder
from tensorflow.keras import Sequential
from tensorflow.keras.layers import Dense
# load the dataset
df = read_csv('ionosphere.csv', header=None)
# split into input and output columns
X, y = df.values[:, :-1], df.values[:, -1]
# ensure all data are floating point values
X = X.astype('float32')
# encode strings to integer
y = LabelEncoder().fit_transform(y)
# split into train and test datasets
X_train, X_test, y_train, y_test = train_test_split(X, y, test_size=0.33)
print(X_train.shape, X_test.shape, y_train.shape, y_test.shape)
# determine the number of input features
n_features = X_train.shape[1]
# define model
model = Sequential()
model.add(Dense(10, activation='relu', kernel_initializer='he_normal', input_shape=(n_features,)))
model.add(Dense(8, activation='relu', kernel_initializer='he_normal'))
model.add(Dense(1, activation='sigmoid'))
# compile the model
model.compile(optimizer='adam', loss='binary_crossentropy', metrics=['accuracy'])
# fit the model
model.fit(X_train, y_train, epochs=150, batch_size=32, verbose=0)
# evaluate the model
loss, acc = model.evaluate(X_test, y_test, verbose=0)
print('Test Accuracy: %.3f' % acc)
# make a prediction
row = [1,0,0.99539,-0.05889,0.85243,0.02306,0.83398,-0.37708,1,0.03760,0.85243,-0.17755,0.59755,-0.44945,0.60536,-0.38223,0.84356,-0.38542,0.58212,-0.32192,0.56971,-0.29674,0.36946,-0.47357,0.56811,-0.51171,0.41078,-0.46168,0.21266,-0.34090,0.42267,-0.54487,0.18641,-0.45300]
yhat = model.predict([[row]])
print('Predicted: %.3f' % yhat)
(235, 34) (116, 34) (235,) (116,)
Test Accuracy: 0.940
Predicted: 0.962
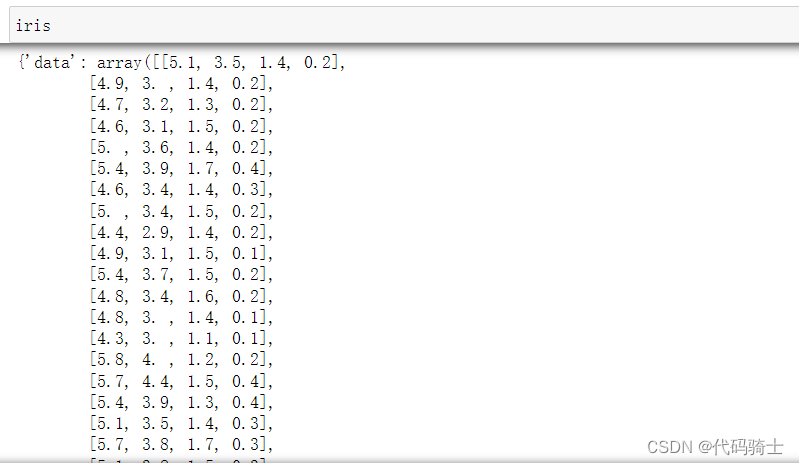
(2) ANN(MLP) for Multiclass Classification 预测蓝蝴蝶花品种 ('setosa', 'versicolor', 'virginica')(多元分类和回归)
from numpy import argmax
import numpy as np
import matplotlib.pyplot as plt
import seaborn as sns; sns.set(style='white')
%matplotlib inline
from sklearn import decomposition
from sklearn import datasets
# Loading the dataset
iris = datasets.load_iris()
X = iris.data
y = iris.target
from tensorflow.keras import Sequential
from tensorflow.keras.layers import Dense
X_train, X_test, y_train, y_test = train_test_split(X, y, test_size=0.33)
print(X_train.shape, X_test.shape, y_train.shape, y_test.shape)
# determine the number of input features
n_features = X_train.shape[1]
(100, 4) (50, 4) (100,) (50,)
# define model
model = Sequential()
model.add(Dense(10, activation='relu', kernel_initializer='he_normal', input_shape=(n_features,)))
model.add(Dense(8, activation='relu', kernel_initializer='he_normal'))
model.add(Dense(3, activation='softmax'))
# compile the model
model.compile(optimizer='adam', loss='sparse_categorical_crossentropy', metrics=['accuracy'])
softmax函数是用于神经网络模型输出层中预测多项分布的激活函数。也就是说,在需要进行多类分类问题的多类逻辑回归中,softmax被用作激活函数。它经常被用作神经网络的最后一层激活函数,将网络的输出归一化为预测输出类别的概率分布。
# fit the model
model.fit(X_train, y_train, epochs=150, batch_size=32, verbose=1)
# evaluate the model
loss, acc = model.evaluate(X_test, y_test, verbose=0)
print('Test Accuracy: %.3f' % acc)
# make a prediction
row = [8.1,3.8,8.4,8.2]
#row = [2.1,3.5,3.4,2.2]
#row = [6.1,6.5,6.4,6.2]
yhat = model.predict([[row]])
print('Predicted: %s (class=%d)' % (yhat, argmax(yhat)))
Test Accuracy: 0.820
Predicted: [[4.1921923e-04 3.9562088e-01 6.0395992e-01]] (class=2)
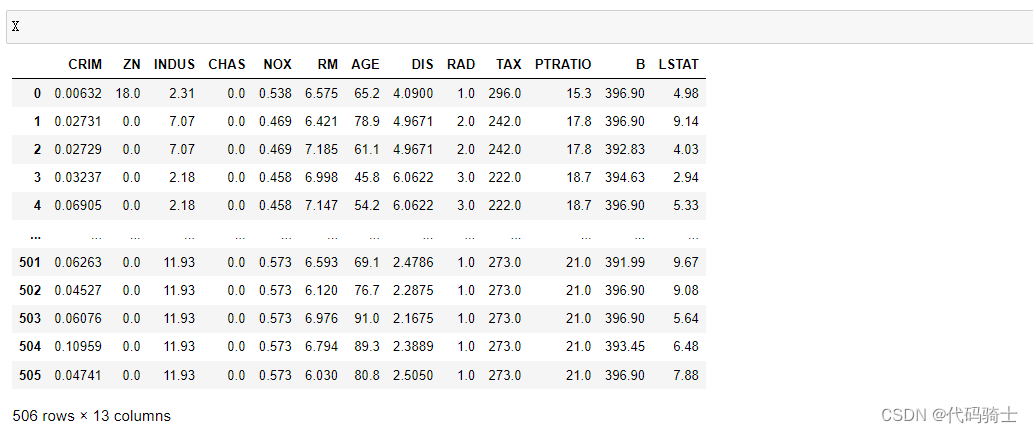
(3) ANN(MLP) for Regression 预测Boston房价
# mlp for regression
from numpy import sqrt
from sklearn.datasets import load_boston
from sklearn.model_selection import train_test_split
from tensorflow.keras import Sequential
from tensorflow.keras.layers import Dense
# load the dataset
boston=load_boston()
# split into input and output columns
X=pd.DataFrame(boston['data'])
X.columns=boston['feature_names']
y=boston.target
# split into train and test datasets
X_train, X_test, y_train, y_test = train_test_split(X, y, test_size=0.33)
print(X_train.shape, X_test.shape, y_train.shape, y_test.shape)
# determine the number of input features
n_features = X_train.shape[1]
n_features
(339, 13) (167, 13) (339,) (167,)
13
# define model
model = Sequential()
model.add(Dense(10, activation='relu', kernel_initializer='he_normal', input_shape=(n_features,)))
model.add(Dense(8, activation='relu', kernel_initializer='he_normal'))
model.add(Dense(8, activation='relu', kernel_initializer='he_normal'))
model.add(Dense(1))
# compile the model
model.compile(optimizer='adam', loss='mse')
# fit the model
model.fit(X_train, y_train, epochs=150, batch_size=32, verbose=0)
# evaluate the model
error = model.evaluate(X_test, y_test, verbose=0)
print('MSE: %.3f, RMSE: %.3f' % (error, sqrt(error)))
# make a prediction
row = [0.00632,18.00,2.310,0,0.5380,6.5750,65.20,4.0900,1,296.0,15.30,396.90,4.98]
yhat = model.predict([[row]])
print('Predicted: %.3f' % yhat)
MSE: 44.661, RMSE: 6.683
Predicted: 26.716
4、CNN应用
1. 「卷积」这个字源自拉丁文的 convolutus ,意思是「滚成一起」 。因此有「卷曲」或「复杂」的意思。
2. 视觉皮质视觉皮层处理视觉信息的大脑皮层。视觉皮层包括初级视觉皮层和其它一些与视觉有关的重要区域。亦称枕叶皮层。
卷积层是卷积神经网络(CNN)的第一层。它通过在图像上滑动过滤器(滤波器)或内核并执行元素级乘法和求和来从输入图像中提取特征。生成的特征图突出显示图像中包含特定特征的区域,例如边缘、角或纹理。
池化层跟随卷积层,并减少特征图的空间维度,同时保留重要信息。这是通过对特征图的每个补丁应用下采样操作(例如最大池化或平均池化)来实现的。池化有助于减少网络中的参数数量,从而降低计算复杂度并防止过拟合。
全连接层也称为密集层,通常是CNN的最后一层。它采用先前层提取的高级特征并将它们组合以进行最终预测。全连接层的输出可以是单个神经元用于二元分类任务,也可以是多个神经元用于多类分类任务。
总体而言,这三种类型的层共同作用,使CNN能够学习图像中的复杂模式和表示形式,使它们成为图像识别、分类和其他计算机视觉任务的强大工具。
CNN优缺点及应用领域
优点:
在图像识别问题上具有非常高的准确性。
无需任何人工监督即可自动检测重要特征。
权重共享。
缺点:
CNN 不编码对象的位置和方向。
缺乏对输入数据的空问不变性能力。
需要大量的训练数据。
图像数据
使用 CNN 的一般任务包括:
图像分类
目标检测
图像分割
人脸识别
图像描述生成
那么,谁在使用 CNN-
亚马逊
脸书
谷歌
安全机构
...
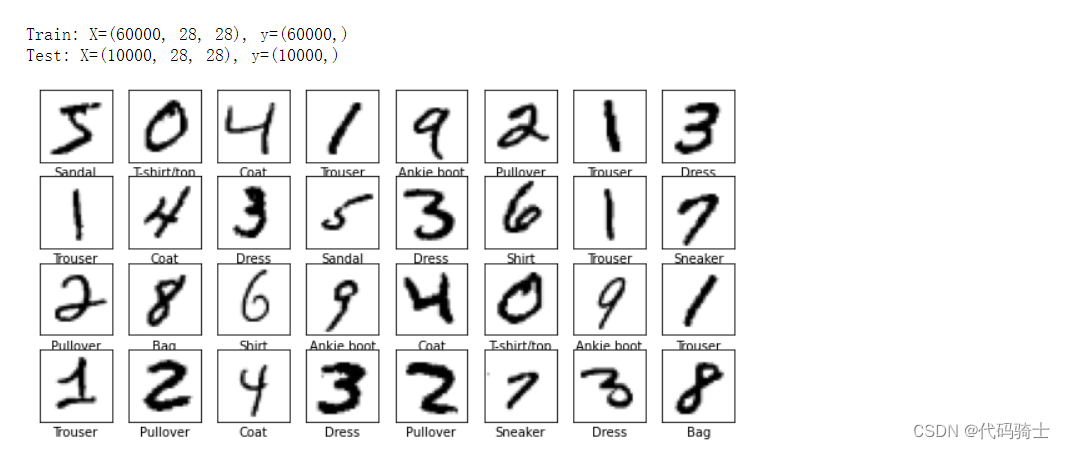
(4) Convolutional Neural Network (CNN) 识别手写数字字体
# example of loading and plotting the mnist dataset
from tensorflow.keras.datasets.mnist import load_data
from matplotlib import pyplot
# load dataset
(trainx, trainy), (testx, testy) = load_data()
# summarize loaded dataset
print('Train: X=%s, y=%s' % (trainx.shape, trainy.shape))
print('Test: X=%s, y=%s' % (testx.shape, testy.shape))
class_names=['T-shirt/top','Trouser','Pullover','Dress','Coat','Sandal','Shirt','Sneaker','Bag','Ankie boot']
plt.figure(figsize=(10,10))
for i in range(32):
    plt.subplot(8,8,i+1)
    plt.subplot(8,8,i+1)
    plt.xticks([])
    plt.yticks([])
    plt.grid(False)
    plt.imshow(trainx[i],cmap=plt.cm.binary)
    plt.xlabel(class_names[trainy[i]])
plt.show()
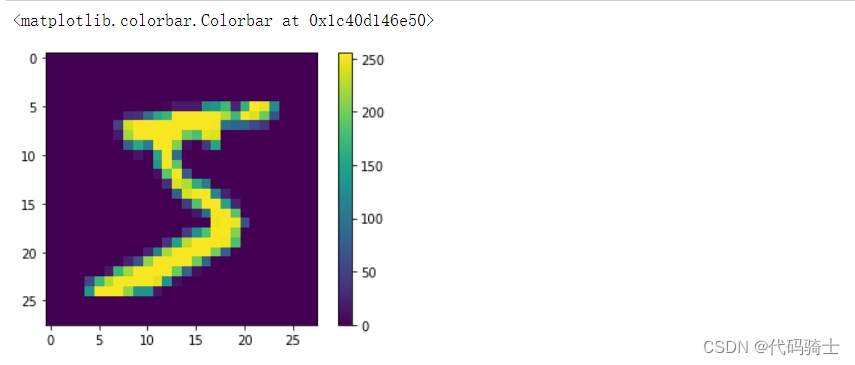
plt.imshow(trainx[0])
plt.colorbar()
plt.imshow(trainx[1])
plt.colorbar()
np.unique(trainy)
array([0, 1, 2, 3, 4, 5, 6, 7, 8, 9], dtype=uint8)
# normalize pixel values
#RGB (Red, Green, Blue) are 8 bit each.
#The range for each individual colour is 0-255 (as 2^8 = 256 possibilities).
#By dividing by 255, the 0-255 range can be described with a 0.0-1.0 range where 0.0 means 0 (0x00) and 1.0 means 255 (0xFF).
trainx, testx = trainx/255, testx/255
展平张量意味着删除除一个维度之外的所有维度。Keras中的Flatten层将张量重塑为与张量中元素数量相等的形状。这与创建一个包含元素的一维数组相同
model = tf.keras.models.Sequential([
    tf.keras.layers.Flatten(input_shape=(28,28)),
    tf.keras.layers.Dense(128,activation='relu'),
    tf.keras.layers.Dropout(0.2),
    tf.keras.layers.Dense(10,activation='softmax')
])
model.compile(optimizer='adam',
              loss='sparse_categorical_crossentropy',
              metrics=['accuracy']
             )
model.fit(trainx,trainy,epochs=10)
model.evaluate(testx,testy)
313/313 [==============================] - 0s 806us/step - loss: 0.2252 - accuracy: 0.9344
[0.22520847618579865, 0.9344000220298767]
testx.shape
(10000, 28, 28)
predictions=model.predict(testx)
313/313 [==============================] - 0s 752us/step
predictions.shape
(10000, 10)
predictions[0]
array([4.8166876e-05, 2.9390669e-08, 1.5408109e-04, 1.7690149e-03,
       6.7535387e-07, 3.7046630e-05, 1.3375139e-09, 9.9671692e-01,
       1.8265962e-05, 1.2558270e-03], dtype=float32)
array([9.7821126e-11, 3.0777655e-12, 1.1585580e-08, 3.7987062e-05, 6.5381586e-17, 8.2841369e-09, 8.5323407e-18, 9.9995959e-01, 3.0194844e-09, 2.4196399e-06], dtype=float32)表示0~9预测的概率
plt.imshow(testx[0])
def plot_image(i, predictions_array, y_test, img):
    predictions_array, y_test, img = predictions_array, y_test[i], img[i]
    plt.grid(False)
    plt.xticks([])
    plt.yticks([])
    plt.imshow(img, cmap=plt.cm.binary)
    predicted_label = np.argmax(predictions_array)
    if predicted_label == y_test:
        color = 'blue'
    else:
        color = 'red'
    plt.xlabel("{} {:2.0f}% ({})".format(class_names[predicted_label],
                                    100*np.max(predictions_array),
                                    class_names[y_test]),
                                    color=color)
def plot_value_array(i, predictions_array, y_test):
    predictions_array, y_test = predictions_array, y_test[i]
    plt.grid(False)
    plt.xticks(range(10))
    plt.yticks([])

    thisplot=plt.bar(range(10),predictions_array, color="#777777")
    plt.ylim([0,1])
    predicted_label=np.argmax(predictions_array)

    thisplot[predicted_label].set_color('red')
    thisplot[y_test].set_color('blue')
i=98
plt.figure(figsize=(6,3))
plt.subplot(1,2,1)
plot_image(i,predictions[i],testy,testx)
plt.subplot(1,2,2)
plot_value_array(i,predictions[i],testy)
plt.show()
print(predictions[98])
print(testy[98])
print(np.argmax(predictions[98]))
[5.3775855e-03 5.4203592e-06 5.7313172e-03 1.9448556e-05 7.9702200e-05
 3.8238410e-02 9.5031840e-01 1.4602109e-07 2.2869834e-04 8.3947151e-07]
6
6
rows=4
cols=4
num_images = rows* cols
plt.figure(figsize=(2*2*cols, 2*rows))
for i in range(num_images):
    plt.subplot(rows,2*cols,2*i+1)
    plot_image(i,predictions[i],testy,testx)
    plt.subplot(rows,2*cols,2*i+2)
    plot_value_array(i,predictions[i],testy)
plt.tight_layout()
plt.show()
5、RNN应用
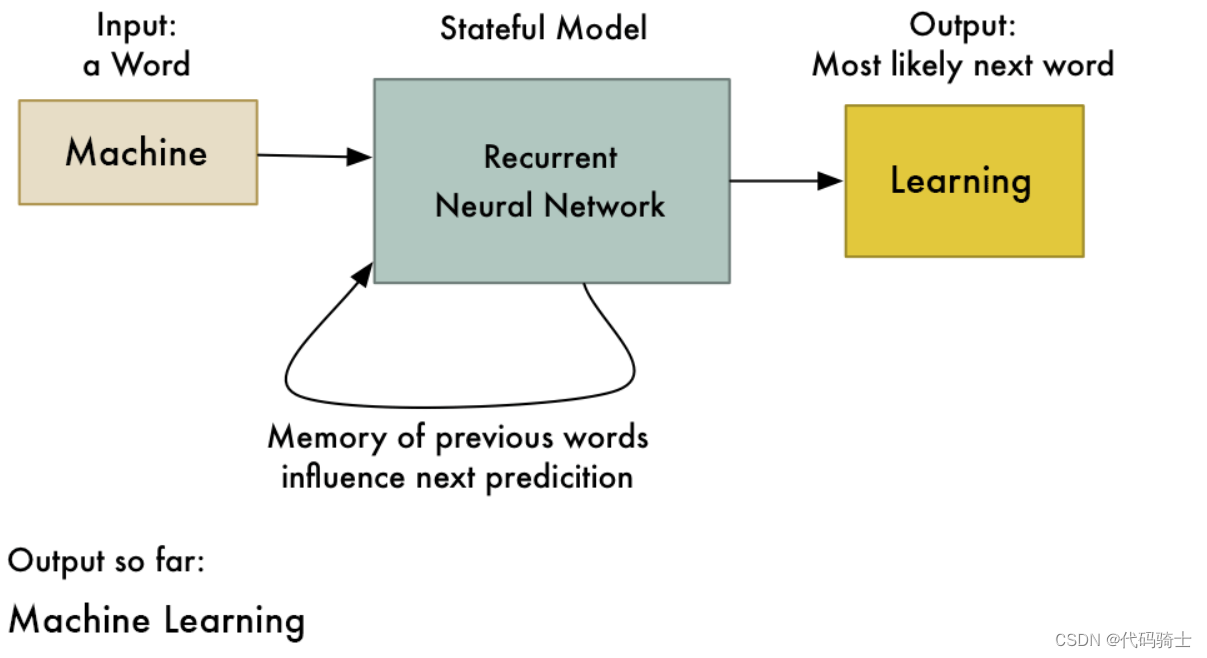
循环神经网络(RNN)是处理序列数据的最先进的算法,被苹果的Siri和谷歌的语音搜索所使用。由于其内部存储器,它是第一个记住其输入的算法,这使得它非常适合涉及序列数据的机器学习问题。
RNN优缺点及应用领域
RNN通过保存处理节点的输出并将结果反馈到模型中(它们不是仅沿一个方向传递信息)来工作。这就是模型如何学习预测一层的结果的方式。RNN模型中的每个节点都充当记忆细胞,继续计算和执行操作。如果网络的预测不正确,则系统会自我学习并在反向传播期间继续朝着正确的预测工作。
序列数据
优点:
RNN通过时间记住每个信息。由于具有记住先前输入的特征,它在时间序列预测中非常有用。这被称为长短期记忆。循环神经网络甚至与卷积层一起使用以扩展有效像素邻域。
缺点:
梯度消失和爆炸问题。训练RNN是一项非常困难的任务。如果使用tanh或relu作为激活函数,它无法处理非常长的序列。
应用:
循环神经网络语言建模和翻译机器翻译语音识别生成图像描述视频标签
(5)应用RNN汽车售卖量案例分析
from numpy import sqrt
from numpy import asarray
from pandas import read_csv
from tensorflow.keras import Sequential
from tensorflow.keras.layers import Dense
from tensorflow.keras.layers import LSTM
# load the dataset
df = read_csv('monthly-car-sales.csv', header=0, index_col=0, squeeze=True)
df
Month
1960-01     6550
1960-02     8728
1960-03    12026
1960-04    14395
1960-05    14587
           ...
1968-08    16722
1968-09    14385
1968-10    21342
1968-11    17180
1968-12    14577
Name: Sales, Length: 108, dtype: int64
# split a univariate sequence into samples
def split_sequence(sequence, n_steps):
	X, y = list(), list()
	for i in range(len(sequence)):
		# find the end of this pattern
		end_ix = i + n_steps
		# check if we are beyond the sequence
		if end_ix > len(sequence)-1:
			break
		# gather input and output parts of the pattern
		seq_x, seq_y = sequence[i:end_ix], sequence[end_ix]
		X.append(seq_x)
		y.append(seq_y)
	return asarray(X), asarray(y)
这是一个将单变量序列拆分为样本的函数。函数接受两个参数:一个序列(sequence)和一个步长(n_steps)。函数的目的是将输入序列拆分为多个子序列,每个子序列包含n_steps个元素,最后一个元素作为输出。
使用这个函数,你可以将一个单变量序列拆分为多个子序列,每个子序列包含n_steps个元素。
# retrieve the values
#values = df.values.astype('float32')
values = df.values
values
array([ 6550,  8728, 12026, 14395, 14587, 13791,  9498,  8251,  7049,
        9545,  9364,  8456,  7237,  9374, 11837, 13784, 15926, 13821,
       11143,  7975,  7610, 10015, 12759,  8816, 10677, 10947, 15200,
       17010, 20900, 16205, 12143,  8997,  5568, 11474, 12256, 10583,
       10862, 10965, 14405, 20379, 20128, 17816, 12268,  8642,  7962,
       13932, 15936, 12628, 12267, 12470, 18944, 21259, 22015, 18581,
       15175, 10306, 10792, 14752, 13754, 11738, 12181, 12965, 19990,
       23125, 23541, 21247, 15189, 14767, 10895, 17130, 17697, 16611,
       12674, 12760, 20249, 22135, 20677, 19933, 15388, 15113, 13401,
       16135, 17562, 14720, 12225, 11608, 20985, 19692, 24081, 22114,
       14220, 13434, 13598, 17187, 16119, 13713, 13210, 14251, 20139,
       21725, 26099, 21084, 18024, 16722, 14385, 21342, 17180, 14577],
      dtype=int64)
# specify the window size
n_steps = 5
# split into samples
X, y = split_sequence(values, n_steps)
# reshape into [samples, timesteps, features]
X = X.reshape((X.shape[0], X.shape[1],1))
# split into train/test
n_test = 12
X_train, X_test, y_train, y_test = X[:-n_test], X[-n_test:], y[:-n_test], y[-n_test:]
print(X_train.shape, X_test.shape, y_train.shape, y_test.shape)
(91, 5, 1) (12, 5, 1) (91,) (12,)
# define model
model = Sequential()
model.add(LSTM(100, activation='relu', kernel_initializer='he_normal', input_shape=(n_steps,1)))
model.add(Dense(50, activation='relu', kernel_initializer='he_normal'))
model.add(Dense(50, activation='relu', kernel_initializer='he_normal'))
model.add(Dense(1))
# compile the model
model.compile(optimizer='adam', loss='mse', metrics=['mae'])
# fit the model
model.fit(X_train, y_train, epochs=350, batch_size=32, verbose=1, validation_data=(X_test, y_test))
# evaluate the model
mse, mae = model.evaluate(X_test, y_test, verbose=1)
1/1 [==============================] - 0s 15ms/step - loss: 9129393.0000 - mae: 2464.5303
print('MSE: %.3f, RMSE: %.3f, MAE: %.3f' % (mse, sqrt(mse), mae))
# make a prediction
row = asarray([18024.0, 16722.0, 14385.0, 21342.0, 17180.0]).reshape((1, n_steps, 1))
yhat = model.predict(row)
print('Predicted: %.3f' % (yhat))
MSE: 14744320.000, RMSE: 3839.833, MAE: 2894.535
Predicted: 15765.898
完整代码:
from numpy import sqrt
from numpy import asarray
from pandas import read_csv
from tensorflow.keras import Sequential
from tensorflow.keras.layers import Dense
from tensorflow.keras.layers import LSTM

# split a univariate sequence into samples
def split_sequence(sequence, n_steps):
	X, y = list(), list()
	for i in range(len(sequence)):
		# find the end of this pattern
		end_ix = i + n_steps
		# check if we are beyond the sequence
		if end_ix > len(sequence)-1:
			break
		# gather input and output parts of the pattern
		seq_x, seq_y = sequence[i:end_ix], sequence[end_ix]
		X.append(seq_x)
		y.append(seq_y)
	return asarray(X), asarray(y)

# load the dataset
df = read_csv('monthly-car-sales.csv', header=0, index_col=0, squeeze=True)
# retrieve the values
values = df.values.astype('float32')
# specify the window size
n_steps = 5
# split into samples
X, y = split_sequence(values, n_steps)
# reshape into [samples, timesteps, features]
X = X.reshape((X.shape[0], X.shape[1], 1))
# split into train/test
n_test = 12
X_train, X_test, y_train, y_test = X[:-n_test], X[-n_test:], y[:-n_test], y[-n_test:]
print(X_train.shape, X_test.shape, y_train.shape, y_test.shape)
# define model
model = Sequential()
model.add(LSTM(100, activation='relu', kernel_initializer='he_normal', input_shape=(n_steps,1)))
model.add(Dense(50, activation='relu', kernel_initializer='he_normal'))
model.add(Dense(50, activation='relu', kernel_initializer='he_normal'))
model.add(Dense(1))
# compile the model
model.compile(optimizer='adam', loss='mse', metrics=['mae'])
# fit the model
model.fit(X_train, y_train, epochs=350, batch_size=32, verbose=2, validation_data=(X_test, y_test))
# evaluate the model
mse, mae = model.evaluate(X_test, y_test, verbose=0)
print('MSE: %.3f, RMSE: %.3f, MAE: %.3f' % (mse, sqrt(mse), mae))
# make a prediction
row = asarray([18024.0, 16722.0, 14385.0, 21342.0, 17180.0]).reshape((1, n_steps, 1))
yhat = model.predict(row)
print('Predicted: %.3f' % (yhat))
from IPython.display import Image
Image(filename='./Lesson53-comp.png')
6、ANN、CNN、RNN三者比较
卷积神经网络(CNN)通常用于计算机视觉,但当应用于各种自然语言处理任务时,它们也显示出有希望的结果。循环神经网络(RNN)被训练以识别跨越时间的模式,而CNN学习识别跨越空间的模式。
二、Keras and TensorFlow tf keras区别及安装提示
TensorFlow2.2版本能够兼容独立的引入Keras库(但实际上,Keras库backend仍是TF),
from numpy import loadtxt
from keras.models import Sequential
from keras.layers import Dense
TensorFlow2.4版本及以上就不支持直接调用Keras库了,必须用tf引入。
# first neural network with keras tutorial
from numpy import loadtxt
#from keras.models import Sequential
from tensorflow.keras import Sequential
#from keras.layers import Dense
from tensorflow.keras.layers import Dense
为了后续寻参方便,我们统一用TF2.2版本。
要将Anaconda中的TensorFlow 2.4版本降级到2.2版本
可以按照以下步骤操作:
1. 打开命令提示符(Windows)或终端(macOS/Linux)。
2. 创建一个新的虚拟环境,例如命名为`tf_2.2`,并激活它。在命令提示符中输入以下命令:
conda create -n tf_2.2 python=3.7
conda activate tf_2.2
3. 安装TensorFlow 2.2版本。在命令提示符中输入以下命令:
pip install tensorflow==2.2
4. 现在你已经成功将TensorFlow降级到2.2版本。可以在新创建的虚拟环境中使用它。
import tensorflow
print(tensorflow.__version__)
2.2.0
如果不是在自建的虚拟环境,直接在base命令中 输入指令:
pip install tensorflow==2.2
import tensorflow
print(tensorflow.__version__)
2.2.0
三、Convolutional Neural NetworkCNN图像处理过程解析
1、Keras工作流程及原理
Keras是一个强大且易于使用的免费开源Python库,用于开发和评估深度学习模型。您将在本教程中涵盖以下步骤:
(1)定义Keras模型
(2)加载数据
(3)编译Keras模型
(4)拟合Keras模型
(5)评估Keras模型
(6)进行预测
2、CNN图像处理过程解析
卷积神经网络(Convolutional Neural Networks, CNN)是一类包含卷积计算的前馈神经网络,主要基于图像任务的平移不变性设计,因此特别擅长于图像处理等任务。CNN在图像处理领域已经得到了广泛的应用,能够有效处理高维的图像数据,如RGB矩阵表示,避免了传统的前馈网络需要大量输入神经元的问题。
CNN的图像处理过程主要包括以下几个步骤:
1. 卷积层初步提取特征:卷积层的主要作用是提取图片每个小部分的特征。例如,对于一个尺寸为6*6的图像,每一个像素点都存储着图像的信息。我们可以定义一个卷积核(相当于权重)来从图像中提取特定的特征。卷积核与数字矩阵对应位相乘再相加,得到卷积层的输出结果。
2. 池化层提取主要特征:池化层的作用是对卷积层的输出进行降采样,从而减少网络中的参数数量和计算量。
3. 全连接层将各部分特征汇总:全连接层将前面所有层提取到的特征进行整合,并产生分类器进行预测识别。
4. 产生分类器,进行预测识别:全连接层的输出被送入到一个或多个全连接层中,每个全连接层都会输出一个类别的概率分布。最终,网络会对所有可能的类别进行排序,并选择概率最高的类别作为预测结果。
3、简述完整的CNN图片处理过程:
图片作为数据输入,经过卷积层:卷积层会创建(n*n大小的)1个或多个卷积核(或者叫滤波器)对图片进行从左到右上到下的一个扫描,每扫描一步都会得到相应扫描窗口内的一个图像特征值,这些特征值构成的矩阵就是特征矩阵,通常小于原图像尺寸,因为卷积核的尺寸相对于原图很小。特征矩阵再经过池化层:池化层同样会有一个一个扫描器对经过卷积层后的特征矩阵再次扫描,提取特征值,对原阵进行降维处理。最后传入神经网络全连接层进行分类、预测。在进入网络前要加一个平滑层过渡,因为全连接层处理的是1D(一维)的数据,矩阵是二维的,需要经过平滑层用Flatten函数将数据进行平滑处理,拉成一维,再传入神经网络进行分类的训练和预测。
卷积层也可以有多个,总之卷积核池化就是对图像进行特征提取,也就是降维,让计算机后面的计算能更方便,更快速。
最大池化层,池化层在经过卷积层初步特征处理完的特征矩阵上进行池化处理,最大池化处理是将池化层扫描中扫描窗口中最大的值作为特征值,最后组成池化特征矩阵。
平均池化层,将扫描窗口中的平均数作为特征值。
4、CNN图像处理完整过程代码:
from numpy import asarray
from numpy import unique
from numpy import argmax
from tensorflow.keras.datasets.mnist import load_data
from tensorflow.keras import Sequential
from tensorflow.keras.layers import Dense
from tensorflow.keras.layers import Conv2D
from tensorflow.keras.layers import MaxPool2D
from tensorflow.keras.layers import Flatten
from tensorflow.keras.layers import Dropout
# load dataset
(x_train, y_train), (x_test, y_test) = load_data()
# reshape data to have a single channel
x_train = x_train.reshape((x_train.shape[0], x_train.shape[1], x_train.shape[2], 1))
x_test = x_test.reshape((x_test.shape[0], x_test.shape[1], x_test.shape[2], 1))
# determine the shape of the input images
in_shape = x_train.shape[1:]
# determine the number of classes
n_classes = len(unique(y_train))
print(in_shape, n_classes)
# normalize pixel values
x_train = x_train.astype('float32') / 255.0
x_test = x_test.astype('float32') / 255.0
# define model
model = Sequential()
model.add(Conv2D(32, (3,3), activation='relu', kernel_initializer='he_uniform', input_shape=in_shape))
model.add(MaxPool2D((2, 2)))
#can not pass output of convolutional layer directly to the dense layer because output of convolutional layer
#is in multi-dimensional shape and dense layer requires input in single-dimensional shape i.e. 1-D array.
model.add(Flatten())
model.add(Dense(100, activation='relu', kernel_initializer='he_uniform'))
model.add(Dropout(0.5))
model.add(Dense(n_classes, activation='softmax'))
# define loss and optimizer
model.compile(optimizer='adam', loss='sparse_categorical_crossentropy', metrics=['accuracy'])
# fit the model
model.fit(x_train, y_train, epochs=10, batch_size=128, verbose=0)
# evaluate the model
loss, acc = model.evaluate(x_test, y_test, verbose=0)
print('Accuracy: %.3f' % acc)
# make a prediction
image = x_train[0]
yhat = model.predict(asarray([image]))
print('Predicted: class=%d' % argmax(yhat))
(28, 28, 1) 10
Accuracy: 0.986
Predicted: class=5
5、加强理解卷积作用:
# define input data
data = [[0, 0, 0, 1, 1, 0, 0, 0],
		[0, 0, 0, 1, 1, 0, 0, 0],
		[0, 0, 0, 1, 1, 0, 0, 0],
		[0, 0, 0, 1, 1, 0, 0, 0],
		[0, 0, 0, 1, 1, 0, 0, 0],
		[0, 0, 0, 1, 1, 0, 0, 0],
		[0, 0, 0, 1, 1, 0, 0, 0]]
#		[0, 0, 0, 1, 1, 0, 0, 0]]
data = asarray(data)
data
array([[0, 0, 0, 1, 1, 0, 0, 0],
       [0, 0, 0, 1, 1, 0, 0, 0],
       [0, 0, 0, 1, 1, 0, 0, 0],
       [0, 0, 0, 1, 1, 0, 0, 0],
       [0, 0, 0, 1, 1, 0, 0, 0],
       [0, 0, 0, 1, 1, 0, 0, 0],
       [0, 0, 0, 1, 1, 0, 0, 0]])
data = data.reshape(7, 8, 1)
data
array([[[0],
        [0],
        [0],
        [1],
        [1],
        [0],
        [0],
        [0]],
       [[0],
        [0],
        [0],
        [1],
        [1],
        [0],
        [0],
        [0]],
       [[0],
        [0],
        [0],
        [1],
        [1],
        [0],
        [0],
        [0]],
       [[0],
        [0],
        [0],
        [1],
        [1],
        [0],
        [0],
        [0]],
       [[0],
        [0],
        [0],
        [1],
        [1],
        [0],
        [0],
        [0]],
       [[0],
        [0],
        [0],
        [1],
        [1],
        [0],
        [0],
        [0]],
       [[0],
        [0],
        [0],
        [1],
        [1],
        [0],
        [0],
        [0]]])
### create model
model = Sequential()
model.add(Conv2D(3, (5,5), input_shape=(7, 8, 1)))
### summarize model
model.summary()
Model: "sequential_40"
_________________________________________________________________
Layer (type)                 Output Shape              Param #
=================================================================
conv2d_40 (Conv2D)           (None, 3, 4, 3)           78
=================================================================
Total params: 78
Trainable params: 78
Non-trainable params: 0
_________________________________________________________________
这个输出结果表示一个卷积层(Conv2D)的输出形状为 (None, 3, 4, 3),其中 None 表示批量大小(batch size),3 表示输出的高度,4 表示输出的宽度,3 表示输出的通道数。78 表示该层的参数数量,包括卷积核权重和偏置项等。
6、加强平滑层理解:
#Flattening a tensor means to remove all of the dimensions except for one
#Here is a standalone example illustrating Flatten operator with the Keras Functional API
import numpy as np
from keras.layers import Input, Flatten
from keras.models import Model
inputs = Input(shape=(3,2,4))
#Define a model consisting only of the Flatten operation
prediction = Flatten()(inputs)
model = Model(inputs=inputs, outputs=prediction)
X = np.arange(0,24).reshape(1,3,2,4)
print(X)
#[[[[ 0  1  2  3]
#   [ 4  5  6  7]]
#
#  [[ 8  9 10 11]
#   [12 13 14 15]]
#
#  [[16 17 18 19]
#   [20 21 22 23]]]]
model.predict(X)
#array([[  0.,   1.,   2.,   3.,   4.,   5.,   6.,   7.,   8.,   9.,  10.,
#         11.,  12.,  13.,  14.,  15.,  16.,  17.,  18.,  19.,  20.,  21.,
#         22.,  23.]], dtype=float32)
[[[[ 0  1  2  3]
   [ 4  5  6  7]]
  [[ 8  9 10 11]
   [12 13 14 15]]
  [[16 17 18 19]
   [20 21 22 23]]]]
Out[121]:
array([[ 0.,  1.,  2.,  3.,  4.,  5.,  6.,  7.,  8.,  9., 10., 11., 12.,
        13., 14., 15., 16., 17., 18., 19., 20., 21., 22., 23.]],
      dtype=float32)
7、加强Dropout层理解:
#Usually dropout is placed on the fully connected layers
from IPython.display import Image
Image(filename='D:\\python\\Project0-Python-MachineLearning\\Lesson55-dropout.JPEG')
四、CNN应用Keras Tuner寻找最佳Hidden Layers层数和神经元数量
1、conda环境管理
2、新建conda环境
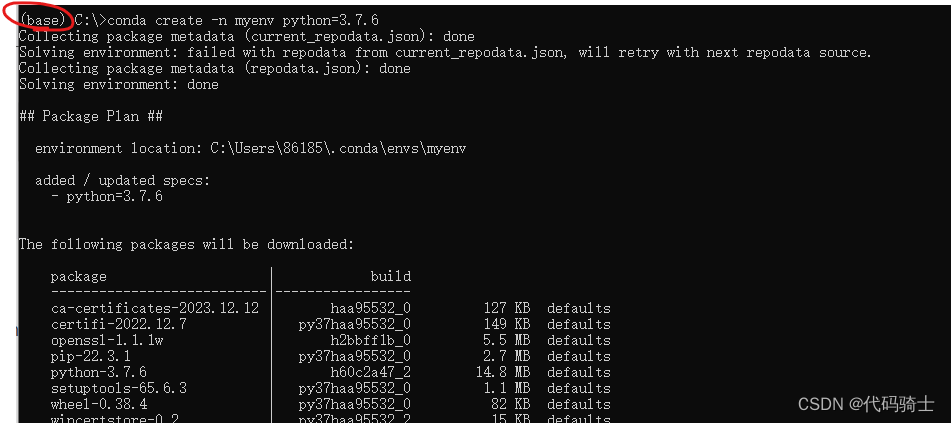
创建新环境
conda create -n myenv python=3.7.6
切换环境
conda activate myenv
安装Keras Tuner库
pip install -U keras-tuner
Keras Tuner是一个用于超参数调整的高级API,它可以帮助用户在Keras模型中寻找最佳的超参数组合。使用Keras Tuner,用户可以训练多个不同的模型,并选择最优的模型进行预测和评估。
Keras Tuner提供了多种搜索算法,包括随机搜索、网格搜索和贝叶斯优化等。用户可以根据自己的需求选择最适合的搜索算法。此外,Keras Tuner还支持自定义的超参数空间和验证集分割策略,以满足不同应用场景的需求。
使用Keras Tuner可以大大减少手动调整超参数的时间和工作量,提高模型的性能和泛化能力。
安装tensorflow库
conda install tensorflow==2.3
TensorFlow是由谷歌团队开发的一种开源的机器学习框架,完全基于Python语言设计。它最初由谷歌大脑团队在2011年开发并被称为DistBelief,经过改进和广泛使用后,于2015年正式命名为TensorFlow。
在TensorFlow中,数据是以张量的形式表示的。张量可以被看作是矢量和矩阵的高维泛化,是TensorFlow内部基本数据类型的多维数组表示。这使得TensorFlow能够灵活处理各种类型的数据和复杂的数学运算。
作为一个端到端的开源机器学习平台,TensorFlow可以帮助用户进行数据处理、模型构建、模型部署和运行等各个环节。无论是使用预训练模型还是创建自定义模型,用户都可以在本地、设备、浏览器或云端运行模型,实现MLOps。
pip3 install keras==2.3.0 -i https://pypi.tuna.tsinghua.edu.cn/simple
安装jupyter库
pip install jupyter
Jupyter Notebook是一个基于Web的交互式计算环境,它允许用户以网页的形式创建和共享包含代码、文本、数学方程式、可视化等内容的文档。它支持多种编程语言,包括但不限于Python、R、Julia等。
你可以在计算机的终端或命令提示符中使用pip安装Jupyter Notebook,具体的命令是`pip install jupyter`。安装完成后,可以通过运行`jupyter notebook`命令在默认浏览器中打开一个新的Jupyter Notebook页面。在该页面上,你可以创建新的笔记本、编辑代码、运行代码以及生成丰富的动态文档。如果需要关闭Jupyter Notebook,只需在浏览器中选择 "File"(文件)菜单,然后选择 "Close and Halt"(关闭并停止)即可。
上面方法安装Jupyter失败了(输入 jupyter notebook 报错 ModuleNotFoundError: No module named ‘pysqlite2‘ 解决方案_modulenotfounderror: no module named 'pysqlite2-CSDN博客)
conda info检测环境文件位置:
然根据链接的解决fangfa将下载好的dll文件复制到环境下的DLL目录即可。
3、超参数
https://keras-team.github.io/keras-tuner/
- 我们应该有多少个隐藏层?
- 我们在隐藏层中应该有多少个神经元?
- 学习率
#https://keras-team.github.io/keras-tuner/
#conda create –n myenv python=3.7.6
#conda activate myenv
#pip install -U keras-tuner
#conda install tensorflow==2.3
我的成功的运行环境:
from IPython.display import Image
Image(filename='./Lesson56-Step-.png')
from tensorflow.keras.datasets import fashion_mnist
(x_train, y_train), (x_test, y_test) = fashion_mnist.load_data()
'''
Label Description
0 T-shirt/top
1 Trouser
2 Pullover
3 Dress
4 Coat
5 Sandal
6 Shirt
7 Sneaker
8 Bag
9 Ankle boot
'''
import matplotlib.pyplot as plt
%matplotlib inline
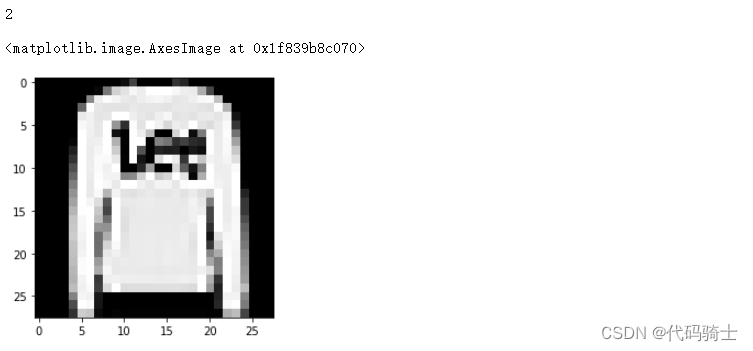
print(y_test[1])
plt.imshow(x_test[1], cmap="gray")
#each having 1 channel (grayscale, it would have been 3 in the case of color, 1 each for Red, Green and Blue)
x_train = x_train.reshape(-1, 28, 28, 1)
x_test = x_test.reshape(-1, 28, 28, 1)
from tensorflow import keras
from tensorflow.keras.layers import Conv2D, MaxPooling2D, Dense, Flatten, Activation
model = keras.models.Sequential()
model.add(Conv2D(32, (3, 3), input_shape=x_train.shape[1:]))
model.add(Activation('relu'))
model.add(MaxPooling2D(pool_size=(2, 2)))
model.add(Conv2D(32, (3, 3)))
model.add(Activation('relu'))
model.add(MaxPooling2D(pool_size=(2, 2)))
model.add(Flatten())  # this converts our 3D feature maps to 1D feature vectors
model.add(Dense(10))
model.add(Activation("softmax"))
model.compile(optimizer="adam",
              loss="sparse_categorical_crossentropy",
              metrics=["accuracy"])
model.fit(x_train, y_train, batch_size=64, epochs=1, validation_data = (x_test, y_test))
938/938 [==============================] - 5s 5ms/step - loss: 1.1493 - accuracy: 0.7577 - val_loss: 0.5125 - val_accuracy: 0.8170
model.summary()
Model: "sequential_4"
_________________________________________________________________
 Layer (type)                Output Shape              Param #
=================================================================
 conv2d_8 (Conv2D)           (None, 26, 26, 32)        320

 activation_12 (Activation)  (None, 26, 26, 32)        0

 max_pooling2d_5 (MaxPoolin  (None, 13, 13, 32)        0
 g2D)

 conv2d_9 (Conv2D)           (None, 11, 11, 32)        9248

 activation_13 (Activation)  (None, 11, 11, 32)        0

 max_pooling2d_6 (MaxPoolin  (None, 5, 5, 32)          0
 g2D)

 flatten_4 (Flatten)         (None, 800)               0

 dense_4 (Dense)             (None, 10)                8010

 activation_14 (Activation)  (None, 10)                0

=================================================================
Total params: 17578 (68.66 KB)
Trainable params: 17578 (68.66 KB)
Non-trainable params: 0 (0.00 Byte)
_________________________________________________________________
from kerastuner.tuners import RandomSearch from kerastuner.engine.hyperparameters import HyperParameters
def build_model(hp):  # random search passes this hyperparameter() object
    model = keras.models.Sequential()
    model.add(Conv2D(hp.Int('input_units',
                                min_value=32,
                                max_value=256,
                                step=32), (3, 3), input_shape=x_train.shape[1:]))
    model.add(Activation('relu'))
    model.add(MaxPooling2D(pool_size=(2, 2)))
    for i in range(hp.Int('n_layers', 1, 4)):  # adding variation of layers.
        model.add(Conv2D(hp.Int(f'conv_{i}_units',
                                min_value=32,
                                max_value=256,
                                step=32), (3, 3)))
        model.add(Activation('relu'))
    model.add(Flatten())
    model.add(Dense(10))
    model.add(Activation("softmax"))
    model.compile(optimizer="adam",
                  loss="sparse_categorical_crossentropy",
                  metrics=["accuracy"])
    return model
tuner = RandomSearch( build_model, objective='val_accuracy', max_trials=1, # how many model variations to test? executions_per_trial=1, # how many trials per variation? (same model could perform differently) directory='Test56', project_name='Optimise')tuner.search(x=x_train, y=y_train, verbose=1, # just slapping this here bc jupyter notebook. The console out was getting messy. epochs=1, batch_size=64, #callbacks=[tensorboard], # if you have callbacks like tensorboard, they go here. validation_data=(x_test, y_test))tuner.results_summary()
Results summary
Results in Test56\Optimise
Showing 10 best trials
Objective(name="val_accuracy", direction="max")
Trial 0 summary
Hyperparameters:
input_units: 192
n_layers: 1
conv_0_units: 32
五、应用ANN+SMOTE+Keras Tuner算法进行信用卡交易欺诈侦测 (非均衡数据处理)
我认为所谓非均衡数据预测是指针对于数据集中小量本数据的预测,而不是以往对于大量本的数据的处理。我对其亲切的称为:反方向的预测。
应用 - 信用卡欺诈检测
使用SMOTE处理不平衡数据 - 过采样 参见第37、38节课分享
ANN处理
使用Keras Tuner的ANN寻参 - 另一个环境 参见第56节课分享
import numpy as np
import pandas as pd
import keras
import matplotlib.pyplot as plt
import seaborn as sns
data = pd.read_csv('creditcard.csv',sep=',')
data
data.info()
from sklearn.preprocessing import StandardScaler
data['Amount(Normalized)'] = StandardScaler().fit_transform(data['Amount'].values.reshape(-1,1))
data.iloc[:,[29,31]]
data = data.drop(columns = ['Amount', 'Time'], axis=1) # This columns are not necessary anymore.
X = data.drop('Class', axis=1)
y = data['Class']
from sklearn.model_selection import train_test_split X_train, X_test, y_train, y_test = train_test_split(X, y, test_size=0.3, random_state=42) # We are transforming data to numpy array to implementing with keras X_train = np.array(X_train) X_test = np.array(X_test) y_train = np.array(y_train) y_test = np.array(y_test)
from tensorflow import keras
from tensorflow.keras import layers
from kerastuner.tuners import RandomSearch
from keras.models import Sequential
from keras.layers import Dense, Dropout
model = Sequential([
    Dense(units=20, input_dim = X_train.shape[1], activation='relu'),
    Dense(units=24,activation='relu'),
    Dropout(0.5),
    Dense(units=20,activation='relu'),
    Dense(units=24,activation='relu'),
    Dense(1, activation='sigmoid')
])
model.summary()
model.compile(optimizer='adam', loss='binary_crossentropy', metrics=['accuracy']) model.fit(X_train, y_train, batch_size=30, epochs=5)
score = model.evaluate(X_test, y_test)
print('Test Accuracy: {:.2f}%\nTest Loss: {}'.format(score[1]*100,score[0]))
85443/85443 [==============================] - 2s 20us/step Test Accuracy: 99.95% Test Loss: 0.0024937106810595817
from sklearn.metrics import confusion_matrix, classification_report
y_pred = model.predict(X_test)
y_test = pd.DataFrame(y_test)
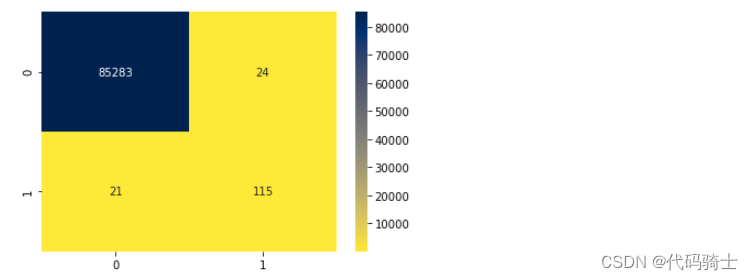
cm = confusion_matrix(y_test, y_pred.round())
sns.heatmap(cm, annot=True, fmt='.0f', cmap='cividis_r')
plt.show()
1、SMOTE Sampling
from imblearn.over_sampling import SMOTE
X_smote, y_smote = SMOTE().fit_sample(X, y)
X_smote = pd.DataFrame(X_smote)
y_smote = pd.DataFrame(y_smote)
y_smote.iloc[:,0].value_counts()
1    284315
0    284315
Name: Class, dtype: int64
X_train, X_test, y_train, y_test = train_test_split(X_smote, y_smote, test_size=0.3, random_state=0)
X_train = np.array(X_train)
X_test = np.array(X_test)
y_train = np.array(y_train)
y_test = np.array(y_test)
model.compile(optimizer='adam', loss='binary_crossentropy', metrics=['accuracy'])
model.fit(X_train, y_train, batch_size = 30, epochs = 5)
score = model.evaluate(X_test, y_test)
print('Test Accuracy: {:.2f}%\nTest Loss: {}'.format(score[1]*100,score[0]))
170589/170589 [==============================] - 3s 20us/step Test Accuracy: 99.79% Test Loss: 0.008372916505159264
y_pred = model.predict(X_test)
y_test = pd.DataFrame(y_test)
cm = confusion_matrix(y_test, y_pred.round())
sns.heatmap(cm, annot=True, fmt='.0f')
plt.show()
y_pred2 = model.predict(X)
y_test2 = pd.DataFrame(y)
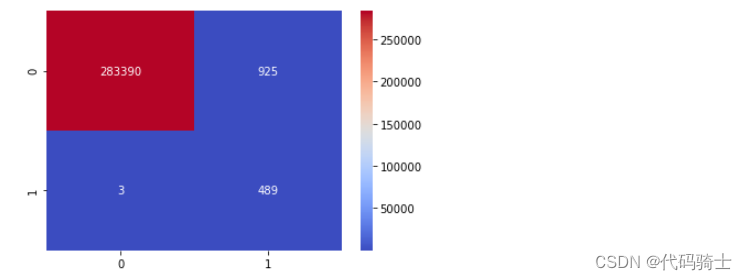
cm2 = confusion_matrix(y_test2, y_pred2.round())
sns.heatmap(cm2, annot=True, fmt='.0f', cmap='coolwarm')
plt.show()
scoreNew = model.evaluate(X, y)
print('Test Accuracy: {:.2f}%\nTest Loss: {}'.format(scoreNew[1]*100,scoreNew[0]))
284807/284807 [==============================] - 6s 22us/step Test Accuracy: 99.67% Test Loss: 0.01322028800950512
print(classification_report(y_test2, y_pred2.round()))
              precision    recall  f1-score   support
           0       1.00      1.00      1.00    284315
           1       0.35      0.99      0.51       492
    accuracy                           1.00    284807
   macro avg       0.67      1.00      0.76    284807
weighted avg       1.00      1.00      1.00    284807
def build_model(hp): model = keras.Sequential() for i in range(hp.Int('num_layers', 2, 20)): model.add(layers.Dense(units=hp.Int('units_' + str(i), min_value=32, max_value=512, step=32), activation='relu')) model.add(layers.Dense(10, activation='softmax')) model.compile( optimizer=keras.optimizers.Adam( hp.Choice('learning_rate', [1e-2, 1e-3, 1e-4])), loss='sparse_categorical_crossentropy', metrics=['accuracy']) return model tuner = RandomSearch( build_model, objective='val_accuracy', max_trials=10, directory='my_dir', project_name='helloworld') tuner.search(X_train, y_train, epochs=5, validation_data=(X_test, y_test))Trial 10 Complete [00h 10m 21s] val_accuracy: 0.9994499087333679 Best val_accuracy So Far: 0.999555230140686 Total elapsed time: 00h 52m 18s INFO:tensorflow:Oracle triggered exit
tuner.results_summary()


