SpringSecurity安全框架 ——认证与授权
目录
一、简介
1.1 什么是Spring Security
1.2 工作原理
1.3 为什么选择Spring Security
1.4 HttpSecurity 介绍🌟
二、用户认证
2.1 导入依赖与配置
2.2 用户对象UserDetails
2.3 业务对象UserDetailsService
2.4 SecurityConfig配置
2.4.1 BCryptPasswordEncoder密码编码器
2.4.2 RememberMe 记住登录信息
2.4.3 CSRF防御(跨站请求伪造)
三、用户授权
3.1 授权介绍
3.2 构建 UserDetails 对象
3.2.1 准备数据表
3.2.2 设置用户权限
3.3 修改SpringSecurity配置类
3.4 控制Controller层接口权限
3.5 相关页面模版与工具类
3.6 权限测试
一、简介
1.1 什么是Spring Security
Spring Security是一个基于Spring框架的安全性框架,可用于对Java应用程序进行身份验证、授权和其他安全性功能的添加。它不仅可以对Web应用程序进行保护,还可以保护非Web环境下的应用程序,如远程服务和命令行应用程序等。Spring Security提供了一系列可插拔的安全性特性,如基于标记的身份验证、权限控制、会话管理、密码加密等。它还支持多种安全性协议和标准,如OAuth、SAML、OpenID等,可与各种身份提供商集成。
1.2 工作原理
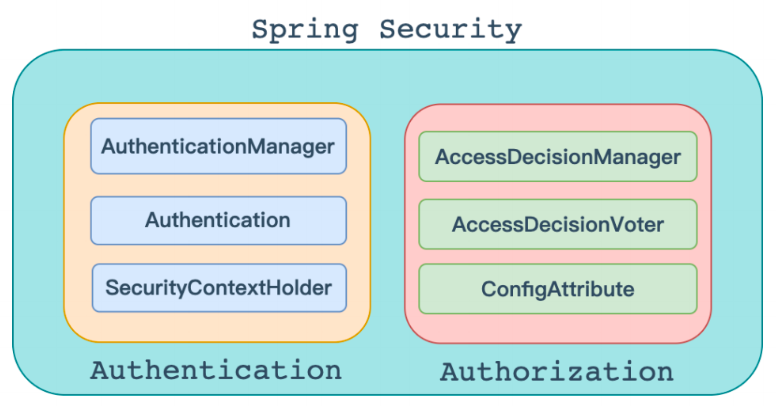
权限框架一般包含两大核心模块:认证(Authentication)和授权(Authorization)。
-
认证:认证模块负责验证用户身份的合法性,生成认证令牌,并保存到服务端会话中(如TLS)。
-
授权:鉴权模块负责从服务端会话内获取用户身份信息,与访问的资源进行权限比对。
核心组件介绍:
-
AuthenticationManager:管理身份验证,可以从多种身份验证方案中选择一种。
-
Authentication:用于验证用户的身份。
-
SecurityContextHolder:用于管理 SecurityContext 的 ThreadLocal,以便在整个请求上下文中进行访问,方便用户访问。
-
AccessDecisionManager:负责对访问受保护的资源的请求进行决策(即决定是否允许用户访问资源)
-
AccessDecisionVoter:是AccessDecisionManager的实现组件之一,它用于对用户请求的访问受保护的资源所需要的角色或权限进行投票。
-
ConfigAttribute:用于表示受保护资源或URL需要的访问权限,它可以理解为是访问控制策略的一部分
1.3 为什么选择Spring Security
SpringBoot 没有发布之前,Shiro 应用更加广泛,因为 Shiro 是一个强大且易用的 Java 安全框架,能够非常清晰的处理身份验证、授权、管理会话以及密码加密。利用其易于理解的API,可以快速、轻松地获得任何应用程序,从最小的移动应用程序到最大的网络和企业应用程序。但是 Shiro 只是一个框架而已,其中的内容需要自己的去构建,前后是自己的,中间是Shiro帮我们去搭建和配置好的。
SpringBoot 发布后,随着其快速发展,Spring Security(前身叫做Acegi Security) 重新进入人们的视野。SpringBoot 解决了 Spring Security 各种复杂的配置,Spring Security 在我们进行用户认证以及授予权限的时候,通过各种各样的拦截器来控制权限的访问,从而实现安全,也就是说 Spring Security 除了不能脱离 Spring,Shiro 的功能它都有。
-
在用户认证方面,Spring Security 框架支持主流的认证方式,包括 HTTP 基本认证、HTTP 表单验证、HTTP 摘要认证、OpenID 和 LDAP 等。
-
在用户授权方面,Spring Security 提供了基于角色的访问控制和访问控制列表(Access Control List,ACL),可以对应用中的领域对象进行细粒度的控制。
Shiro在这个环境下实际已经不具备优势了。因为Spring这个生态链现在是太强大了。
1.4 HttpSecurity 介绍🌟
HttpSecurity 是 Spring Security 的一个核心类,用于配置应用程序的安全策略。
HttpSecurity 类通常包含许多方法,可以用于配置以下内容:
-
HTTP 请求的安全策略,例如访问控制、跨站点请求伪造 (CSRF) 防护等。
-
HTTP 验证的安全策略,例如基于表单、HTTP 基本身份验证、OAuth 等。
-
访问受保护资源时所需的身份验证和授权方式。
方法 说明 authorizeRequests() 用于配置如何处理请求的授权,默认情况下所有的请求都需要进行认证和授权才能访问受保护的资源 formLogin() 用于配置基于表单的身份验证,包括自定义登录页面、登录请求路径、用户名和密码的参数名称、登录成功和失败的跳转等。 httpBasic() 用于配置基于HTTP Basic身份验证,包括定义使用的用户名和密码、realm名称等。 logout() 用于配置退出登录功能,包括定义退出登录请求的URL、注销成功后的跳转URL、清除会话、删除Remember-Me令牌等。 csrf() 用于配置跨站请求伪造保护,包括定义CSRF Token的名称、保存方式、忽略某些请求等。 sessionManagement() 用于配置会话管理,包括定义并发控制、会话失效、禁用URL重定向、会话固定保护等。 rememberMe() 用于配置Remember-Me功能,包括定义Remember-Me令牌的名称、有效期、加密方法、登录成功后的处理方式等。 exceptionHandling() 用于配置自定义的异常处理,包括定义异常处理器和异常处理页面等。 headers() 用于配置HTTP响应头信息,包括定义X-Content-Type-Options、X-XSS-Protection、Strict-Transport-Security等头信息。 cors() 用于配置跨域资源共享,包括定义可访问的来源、Headers等。 addFilter() 用于向当前HttpSecurity中添加自定义的Filter。 and() 用于在配置中添加另一个安全规则,并将两个规则合并。 匹配规则:
-
URL匹配
方法 说明 requestMatchers() 配置一个request Mather数组,参数为RequestMatcher对象,其match规则自定义,需要的时候放在最前面,对需要匹配的的规则进行自定义与过滤 authorizeRequests() URL权限配置 antMatchers() 配置一个request Mather的string数组,参数为ant路径格式, 直接匹配url anyRequest() 匹配任意url,无参 ,最好放在最后面 -
保护URL
方法 说明 authenticated() 保护Url,需要用户登录 permitAll() 指定URL无需保护,一般应用与静态资源文件 hasRole(String role) 限制单个角色访问 hasAnyRole(String… roles) 允许多个角色访问 access(String attribute) 该方法使用 SPEL, 所以可以创建复杂的限制 hasIpAddress(String ipaddressExpression) 限制IP地址或子网 -
登录formLogin
方法 说明 loginPage() 设置登录页面的 URL defaultSuccessUrl() 设置登录成功后的默认跳转页面 failuerHandler() 登录失败之后的处理器 successHandler() 登录成功之后的处理器 failuerUrl() 登录失败之后系统转向的url,默认是this.loginPage + “?error” loginProcessingUrl() 设置登录请求的 URL,即表单提交的 URL usernameParameter() 设置登录表单中用户名字段的参数名,默认为 username passwordParameter() 设置登录表单中密码字段的参数名,默认为 password -
登出logout
方法 说明 logoutUrl() 登出url , 默认是/logoutl logoutSuccessUrl() 登出成功后跳转的 url 默认是/login?logout logoutSuccessHandler() 登出成功处理器,设置后会把logoutSuccessUrl 置为null 二、用户认证
2.1 导入依赖与配置
基于Spring Initializr创建SpringBoot项目(本次案例采用Spring Boot 2.7.12版本为例),导入基本依赖:
            org.springframework.boot
            spring-boot-starter-security


            org.springframework.boot
            spring-boot-starter-web


            org.springframework.boot
            spring-boot-starter-freemarker


            org.projectlombok
            lombok
            true


            com.baomidou
            mybatis-plus-boot-starter
            3.5.2


            com.baomidou
            mybatis-plus-generator
            3.5.2


            com.alibaba
            fastjson
            2.0.32


            com.mysql
            mysql-connector-j
            runtime
spring-boot-starter-security包含了以下几个主要的依赖:
-
spring-security-core:Spring Security的核心模块,提供了基于权限的访问控制以及其他安全相关功能。
-
spring-security-config:提供了Spring Security的配置实现,例如通过Java配置创建安全策略和配置Token存储等。
-
spring-security-web:提供了Spring Security Web的基本功能,例如Servlet集成和通过HttpSecurity配置应用程序安全策略。
配置application.yml文件:
spring:
  datasource:
    type: com.zaxxer.hikari.HikariDataSource
    driver-class-name: com.mysql.jdbc.Driver
    username: root
    password: 123456
    url: jdbc:mysql://localhost:3306/bookshop?useUnicode=true&characterEncoding=utf8&useSSL=false
  freemarker:
    enabled: true
    suffix: .ftl
    template-loader-path: classpath:/templates/
mybatis-plus:
  # Mybatis Mapper所对应的XML位置
  mapper-locations: classpath:mapper/*.xml
  # 别名包扫描路径
  type-aliases-package: com.ycxw.springsecurity.entity
  # 是否开启自动驼峰命名规则(camel case)映射
  configuration:
    map-underscore-to-camel-case: true
  global-config:
    db-config:
      logic-delete-field: deleted # 全局逻辑删除的实体字段名
      logic-delete-value: 1       # 逻辑已删除值(默认为 1)
      logic-not-delete-value: 0   # 逻辑未删除值(默认为 0)
logging:
  level:
    com.jun.security01.mapper: debug
2.2 用户对象UserDetails
首先准备一张用户表,通过mybatis-plus生成代码后修改User类并实现UserDetails接口。
package com.ycxw.springsecurity.entity;
import com.baomidou.mybatisplus.annotation.IdType;
import com.baomidou.mybatisplus.annotation.TableField;
import com.baomidou.mybatisplus.annotation.TableId;
import com.baomidou.mybatisplus.annotation.TableName;
import io.swagger.annotations.ApiModel;
import io.swagger.annotations.ApiModelProperty;
import lombok.Getter;
import lombok.Setter;
import lombok.experimental.Accessors;
import org.springframework.security.core.GrantedAuthority;
import org.springframework.security.core.userdetails.UserDetails;
import java.io.Serializable;
import java.time.LocalDateTime;
import java.util.List;
/**
 * 用户信息表(继承UserDetails类)
 *
 * @author 云村小威
 * @since 2023-12-21
 */
@Getter
@Setter
@Accessors(chain = true)
@TableName("sys_user")
@ApiModel(value = "User对象", description = "用户信息表")
public class User implements Serializable, UserDetails {
    private static final long serialVersionUID = 1L;
    @ApiModelProperty("唯一标识")
    @TableId(value = "id", type = IdType.AUTO)
    private Integer id;
    @ApiModelProperty("用户账号")
    @TableField("username")
    private String username;
    @ApiModelProperty("用户密码")
    @TableField("password")
    private String password;
    @ApiModelProperty("真实姓名")
    @TableField("real_name")
    private String realName;
    @ApiModelProperty("身份证号")
    @TableField("id_card")
    private String idCard;
    @ApiModelProperty("性别,男或女")
    @TableField("gender")
    private String gender;
    @ApiModelProperty("家庭住址")
    @TableField("address")
    private String address;
    @ApiModelProperty("联系电话")
    @TableField("phone")
    private String phone;
    @ApiModelProperty("创建时间")
    @TableField("create_date")
    private LocalDateTime createDate;
    /**
     * 是否过期
     */
    @TableField("account_non_expired")
    private boolean accountNonExpired;
    /**
     * 存放用户的权限(不存放在数据库中)
     */
    @TableField(exist = false)
    private List authorities;
    /**
     * 是否锁定
     */
    @TableField("account_non_locked")
    private boolean accountNonLocked;
    /**
     * 是否过期
     */
    @TableField("credentials_non_expired")
    private boolean credentialsNonExpired;
    /**
     * 是否启用
     */
    @TableField("enabled")
    private boolean enabled;
}
实现UserDatails接口会重写它的五个方法,如该类最后的五个属性,除authorities属性以外,请将其他四个属性加入数据库表中(原用户表未有该字段,通过实现UserDatails后需要身份验证和授权则要添加)
UserDetails是Spring Security框架中的一个接口,它代表了应用程序中的用户信息。UserDetails接口定义了一组方法,用于获取用户的用户名、密码、角色和权限等信息,以便Spring Security可以使用这些信息进行身份验证和授权。
以下是UserDetails接口中定义的方法:
-
getUsername():获取用户的用户名。
-
getPassword():获取用户的密码。
-
getAuthorities():获取用户的角色和权限信息。
-
isEnabled():判断用户是否可用。
-
isAccountNonExpired():判断用户的账号是否过期。
-
isAccountNonLocked():判断用户的账号是否被锁定。
-
isCredentialsNonExpired():判断用户的凭证是否过期。
自定义用户信息时,可以实现UserDetails接口并覆盖其中的方法来提供自己的用户信息。
2.3 业务对象UserDetailsService
修改UserServiceImpl并实现UserDetailsService,重写loadUserByUsername(String username)方法。
package com.ycxw.springsecurity.service.impl;
import com.baomidou.mybatisplus.core.conditions.query.QueryWrapper;
import com.baomidou.mybatisplus.extension.service.impl.ServiceImpl;
import com.ycxw.springsecurity.entity.User;
import com.ycxw.springsecurity.mapper.UserMapper;
import com.ycxw.springsecurity.service.IUserService;
import org.springframework.security.core.userdetails.UserDetails;
import org.springframework.security.core.userdetails.UserDetailsService;
import org.springframework.security.core.userdetails.UsernameNotFoundException;
import org.springframework.stereotype.Service;
import java.util.Objects;
/**
 * 用户信息表 服务实现类
 *
 * @author 云村小威
 * @since 2023-12-21
 */
@Service
public class UserServiceImpl extends ServiceImpl implements IUserService, UserDetailsService {
    @Override
    public UserDetails loadUserByUsername(String username) throws UsernameNotFoundException {
        // 根据用户名查询用户
        User user = getOne(new QueryWrapper().eq("username", username));
        //判断用户是否存在
        if (Objects.isNull(user))
            throw new UsernameNotFoundException("用户不存在");
        return user;
    }
}
UserDetailsService是Spring Security中的一个接口,它用于从特定数据源(如数据库)中获取用户详细信息,以进行身份验证和授权。实现该接口的类需要实现loadUserByUsername方法,该方法根据给定的用户名返回一个UserDetails对象,该对象包含有关用户的详细信息,例如密码、角色和权限等。在Spring Security中,UserDetailsService通常与DaoAuthenticationProvider一起使用,后者是一个身份验证提供程序,用于验证用户的凭据。
2.4 SecurityConfig配置
2.4.1 BCryptPasswordEncoder密码编码器
Spring Security提供了多种密码加密方式,大致可以归类于以下几种:
-
对密码进行明文处理,即不采用任何加密方式;
-
采用MD5加密方式;
-
采用哈希算法加密方式;
BCryptPasswordEncoder是Spring Security中一种基于bcrypt算法的密码加密方式。bcrypt算法是一种密码哈希函数,具有防止彩虹表攻击的优点,因此安全性较高。
使用BCryptPasswordEncoder进行密码加密时,可以指定一个随机生成的salt值(俗称:加盐),将其与原始密码一起进行哈希计算。salt值可以增加密码的安全性,因为即使两个用户使用相同的密码,由于使用不同的salt值进行哈希计算,得到的哈希值也是不同的。
在Spring Security中,可以通过在SecurityConfig配置类中添加以下代码来使用BCryptPasswordEncoder进行密码加密:
@Bean
public PasswordEncoder passwordEncoder() {
    return new BCryptPasswordEncoder();
}
这样就可以在Spring Security中使用BCryptPasswordEncoder进行密码加密了。
相比BCryptPasswordEncoder密码编码器之下明文和MD5加密的缺点是?
明文的缺点:
- 安全性低: 明文存储密码非常不安全,因为任何有权访问数据库的人都能够看到用户的密码。
- 容易受到攻击: 明文存储密码很容易受到攻击,例如暴力破解攻击和彩虹表攻击。
MD5 加密的缺点:
- 安全性低: MD5 算法是一种弱加密算法,很容易被破解。
- 不可逆: MD5 加密是不可逆的,这意味着无法从哈希值中恢复明文密码。
- 容易受到碰撞攻击: MD5 算法容易受到碰撞攻击,这意味着可以找到两个不同的输入,它们产生相同的哈希值。(可根据相同加密后的密码找出明文密码)
因此,明文和 MD5 加密都不适合用于保护用户密码。
2.4.2 RememberMe 记住登录信息
在实际开发中,为了用户登录方便常常会启用记住我(Remember-Me)功能。如果用户登录时勾选了“记住我”选项,那么在一段有效时间内,会默认自动登录,免去再次输入用户名、密码等登录操作。该功能的实现机理是根据用户登录信息生成 Token 并保存在用户浏览器的 Cookie 中,当用户需要再次登录时,自动实现校验并建立登录态的一种机制。
Spring Security提供了两种 Remember-Me 的实现方式:
-
简单加密 Token:用散列算法加密用户必要的登录系信息并生成 Token 令牌。
-
持久化 Token:数据库等持久性数据存储机制用的持久化 Token 令牌。
rememberMe主要方法介绍:
方法 说明 rememberMeParameter() 指定在登录时“记住我”的 HTTP 参数,默认为 remember-me tokenValiditySeconds() 设置 Token 有效期为 200s,默认时长为 2 星期 tokenRepository() 指定 rememberMe 的 token 存储方式,可以使用默认的 PersistentTokenRepository 或自定义的实现 userDetailsService() 指定 UserDetailsService 对象 rememberMeCookieName() 指定 rememberMe 的 cookie 名称 基于持久化Token配置:
Remember-Me 功能的开启需要在configure(HttpSecurity http)方法中通过http.rememberMe()配置,该配置主要会在过滤器链中添加 RememberMeAuthenticationFilter 过滤器,通过该过滤器实现自动登录。
    // 注入用户服务
    @Autowired
    private UserDetailsService userDetailsService;
    @Autowired
    private ObjectMapper objectMapper;
    // 注入数据源(spring自带)
    @Resource
    public DataSource dataSource;
    // 创建持久令牌存储库
    @Bean
    public PersistentTokenRepository persistentTokenRepository() {
        // 创建一个JdbcTokenRepositoryImpl实例
        JdbcTokenRepositoryImpl tokenRepository = new JdbcTokenRepositoryImpl();
        // 设置数据源
        tokenRepository.setDataSource(dataSource);
        // 设置启动时创建表
        tokenRepository.setCreateTableOnStartup(false);
        // 返回tokenRepository
        return tokenRepository;
    }
    /*
     * 安全过滤器链
     * */
    @Bean
    public SecurityFilterChain securityFilterChain(HttpSecurity http) throws Exception {
        http.authorizeRequests().antMatchers("/").permitAll()
                // 设置角色权限
                //.antMatchers("/admin/**").hasRole("ADMIN").antMatchers("/user/**").hasAnyRole("ADMIN", "USER")
                //其他所有请求都需要用户进行身份验证。
                .anyRequest().authenticated()
                .and().formLogin()
                // 设置登录页面的 URL
                .loginPage("/")
                // 设置登录请求的 URL,即表单提交的 URL
                .loginProcessingUrl("/userLogin")
                // 设置登录表单中用户名字段的参数名,默认为username
                .usernameParameter("username")
                // 设置登录表单中密码字段的参数名,默认为password
                .passwordParameter("password")
                // 登录成功后返回的数据
                .successHandler((res, resp, ex) -> {
                    Object user = ex.getPrincipal();
                    objectMapper
                            .writeValue(resp.getOutputStream(), JsonResponseBody.success(user));
                })
                .and()
                /*配置注销*/
                .logout()
                // 设置安全退出的URL路径
                .logoutUrl("/logout")
                // 设置退出成功后跳转的路径
                .logoutSuccessUrl("/").and()
                /*配置 rememberMe 功能*/
                .rememberMe()
                // 指定 rememberMe 的参数名,用于在表单中携带 rememberMe 的值。
                .rememberMeParameter("remember-me")
                // 指定 rememberMe 的有效期,单位为秒,默认2周。
                .tokenValiditySeconds(60)
                // 指定 rememberMe 的 cookie 名称。
                .rememberMeCookieName("remember-me-cookie")
                // 指定 rememberMe 的 token 存储方式,可以使用默认的 PersistentTokenRepository 或自定义的实现。
                .tokenRepository(persistentTokenRepository())
                // 指定 rememberMe 的认证方式,需要实现 UserDetailsService 接口,并在其中查询用户信息。
                .userDetailsService(userDetailsService)
        return http.build();
    }
2.4.3 CSRF防御(跨站请求伪造)
CSRF(Cross-Site Request Forgery,跨站请求伪造)是一种利用用户已登录的身份在用户不知情的情况下发送恶意请求的攻击方式。攻击者可以通过构造恶意链接或者伪造表单提交等方式,让用户在不知情的情况下执行某些操作,例如修改密码、转账、发表评论等。
为了防范CSRF攻击,常见的做法是在请求中添加一个CSRF Token(也叫做同步令牌、防伪标志),并在服务器端进行验证。CSRF Token是一个随机生成的字符串,每次请求都会随着请求一起发送到服务器端,服务器端会对这个Token进行验证,如果Token不正确,则拒绝执行请求。
在Spring Security中,防范CSRF攻击可以通过启用CSRF保护来实现。启用CSRF保护后,Spring Security会自动在每个表单中添加一个隐藏的CSRF Token字段,并在服务器端进行验证。如果Token验证失败,则会抛出异常,从而拒绝执行请求。启用CSRF保护的方式是在Spring Security配置文件中添加.csrf()方法,例如:
http
    .csrf()
        .csrfTokenRepository(CookieCsrfTokenRepository.withHttpOnlyFalse());
在上面的配置中,我们使用了CookieCsrfTokenRepository作为CSRF Token的存储方式,并设置了httpOnly为false,以便在客户端可以访问到该Token。
在表单中添加:
.csrf()主要方法介绍:
方法 说明 disable() 关闭CSRF防御 csrfTokenRepository() 设置CookieCsrfTokenRepository实例,用于存储和检索CSRF令牌。与HttpSessionCsrfTokenRepository不同,CookieCsrfTokenRepository将CSRF令牌存储在cookie中,而不是在会话中。 ignoringAntMatchers() 设置一组Ant模式,用于忽略某些请求的CSRF保护。例如,如果您想要忽略所有以/api/开头的请求,可以使用.ignoringAntMatchers("/api/**")。 csrfTokenManager() 设置CsrfTokenManager实例,用于管理CSRF令牌的生成和验证。默认情况下,Spring Security使用DefaultCsrfTokenManager实例来生成和验证CSRF令牌。 requireCsrfProtectionMatcher() 设置RequestMatcher实例,用于确定哪些请求需要进行CSRF保护。默认情况下,Spring Security将对所有非GET、HEAD、OPTIONS和TRACE请求进行CSRF保护。 如果针对一些特定的请求接口,不需要进行CSRF防御,可以通过以下配置忽略:
http.csrf().ignoringAntMatchers("/upload"); // 禁用/upload接口的CSRF防御三、用户授权
3.1 授权介绍
Spring Security 中的授权分为两种类型:
-
基于角色的授权:以用户所属角色为基础进行授权,如管理员、普通用户等,通过为用户分配角色来控制其对资源的访问权限。
-
基于资源的授权:以资源为基础进行授权,如 URL、方法等,通过定义资源所需的权限,来控制对该资源的访问权限。
Spring Security 提供了多种实现授权的机制,最常用的是使用基于注解的方式,建立起访问资源和权限之间的映射关系。
其中最常用的两个注解是 @Secured 和 @PreAuthorize。@Secured 注解是更早的注解,基于角色的授权比较适用,@PreAuthorize 基于 SpEL 表达式的方式,可灵活定义所需的权限,通常用于基于资源的授权。
3.2 构建 UserDetails 对象
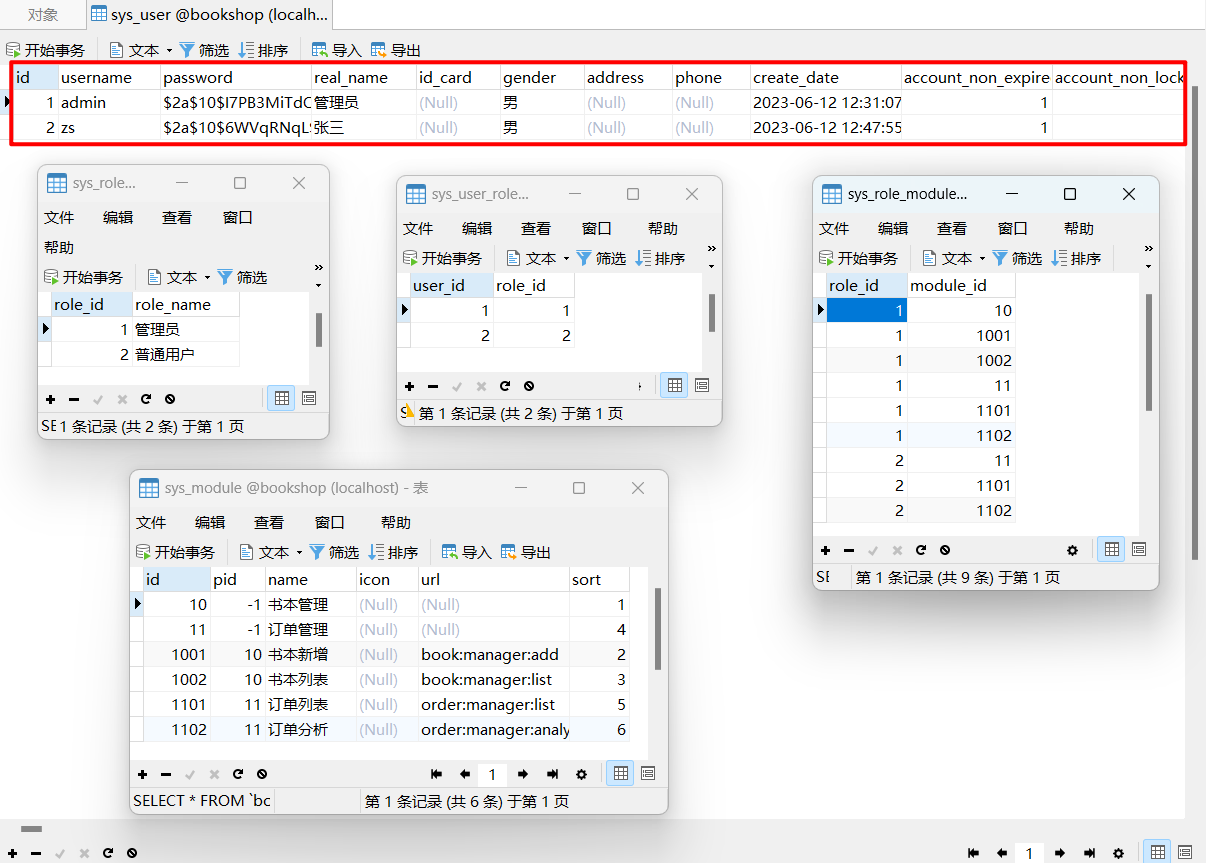
3.2.1 准备数据表
- sys_user - 用户信息表
- sys_role - 角色信息表
- sys_user_role - 用户角色表
- sys_module - 模块信息表
- sys_role_module - 角色权限表
3.2.2 设置用户权限
package com.ycxw.springsecurity.config;
import com.baomidou.mybatisplus.core.conditions.query.QueryWrapper;
import com.ycxw.springsecurity.entity.*;
import com.ycxw.springsecurity.service.*;
import org.springframework.beans.factory.annotation.Autowired;
import org.springframework.security.core.authority.SimpleGrantedAuthority;
import org.springframework.security.core.userdetails.UserDetails;
import org.springframework.security.core.userdetails.UserDetailsService;
import org.springframework.security.core.userdetails.UsernameNotFoundException;
import org.springframework.stereotype.Component;
import java.util.List;
import java.util.Objects;
import java.util.stream.Collectors;
@Component
public class MyUserDetailsService implements UserDetailsService {
    @Autowired
    private IUserService userService;
    @Autowired
    private IUserRoleService userRoleService;
    @Autowired
    private IRoleService roleService;
    @Autowired
    private IRoleModuleService roleModuleService;
    @Autowired
    private IModuleService moduleService;
    @Override
    public UserDetails loadUserByUsername(String username) throws UsernameNotFoundException {
        /*查询当前用户*/
        User user = userService
                .getOne(new QueryWrapper().eq("username", username));
        if (user == null) {
            throw new UsernameNotFoundException("用户名无效");
        }
        /*
         * map 遍历所有的对象,返回新的数据会放到一个新流中
         * collect 将流中的元素变成一个集合
         * */
        //先查询出所有的身份id
        List role_ids = userRoleService
                .list(new QueryWrapper().eq("user_id", user.getId()))
                .stream().map(UserRole::getRoleId)
                .collect(Collectors.toList());
        //查询角色对应的权限
        List roles = roleService.list(new QueryWrapper().in("role_id", role_ids))
                .stream().map(Role::getRoleName)
                .collect(Collectors.toList());
        // 查询权限对应的模块
        List module_ids = roleModuleService.list(new QueryWrapper().in("role_id", role_ids))
                .stream().map(RoleModule::getModuleId)
                .collect(Collectors.toList());
        /// 查询模块对应的 URL
        List modules = moduleService.list(new QueryWrapper().in("id", module_ids))
                .stream().map(Module::getUrl)
                /* filter 过滤流中的内容(对象不为空)*/
                .filter(Objects::nonNull)
                .collect(Collectors.toList());
        /*
         * roles -> [管理员,普通用户]
         * +
         * modules -> [book:manager:add,book:manager:list]
         */
        // 将角色和模块合并为一个集合
        roles.addAll(modules);
        // roles [管理员,普通用户,book:manager:add,book:manager:list]
        // 构建 SimpleGrantedAuthority 对象
        List authorities = roles.stream()
                .map(SimpleGrantedAuthority::new)
                .collect(Collectors.toList());
        // 设置用户的权限
        user.setAuthorities(authorities);
        // 返回 UserDetails 对象
        return user;
    }
}
根据用户名查询用户信息并构建 UserDetails 对象,以便 Spring Security 进行身份验证。
3.3 修改SpringSecurity配置类
当我们想要开启spring方法级安全时,只需要在任何 @Configuration实例上使用@EnableGlobalMethodSecurity 注解就能达到此目的。同时这个注解为我们提供了prePostEnabled 、securedEnabled 和 jsr250Enabled 三种不同的机制来实现同一种功能。
package com.ycxw.springsecurity.config;
import com.fasterxml.jackson.databind.ObjectMapper;
import com.ycxw.springsecurity.resp.JsonResponseBody;
import com.ycxw.springsecurity.resp.JsonResponseStatus;
import org.springframework.beans.factory.annotation.Autowired;
import org.springframework.context.annotation.Bean;
import org.springframework.context.annotation.Configuration;
import org.springframework.security.authentication.AuthenticationManager;
import org.springframework.security.authentication.ProviderManager;
import org.springframework.security.authentication.dao.DaoAuthenticationProvider;
import org.springframework.security.config.annotation.method.configuration.EnableGlobalMethodSecurity;
import org.springframework.security.config.annotation.web.builders.HttpSecurity;
import org.springframework.security.config.annotation.web.configuration.EnableWebSecurity;
import org.springframework.security.core.userdetails.UserDetailsService;
import org.springframework.security.crypto.bcrypt.BCryptPasswordEncoder;
import org.springframework.security.crypto.password.PasswordEncoder;
import org.springframework.security.web.SecurityFilterChain;
import org.springframework.security.web.authentication.rememberme.JdbcTokenRepositoryImpl;
import org.springframework.security.web.authentication.rememberme.PersistentTokenRepository;
import org.springframework.security.web.csrf.CookieCsrfTokenRepository;
import org.springframework.security.web.util.matcher.AntPathRequestMatcher;
import javax.annotation.Resource;
import javax.sql.DataSource;
@Configuration
@EnableWebSecurity //前置权限验证
@EnableGlobalMethodSecurity(prePostEnabled = true) //后置权限验证
public class WebSecurityConfig {
    // 注入数据源(spring自带)
    @Resource
    public DataSource dataSource;
    @Autowired
    private ObjectMapper objectMapper;
    /*自定义处理身份验证失败的接口*/
    @Autowired
    private MyAuthenticationFailureHandler myAuthenticationFailureHandler;
    // 注入用户服务
    @Autowired
    private UserDetailsService userDetailsService;
    /*
     * 密码编码器: 用于对密码进行加密
     * */
    @Bean
    public PasswordEncoder passwordEncoder() {
        return new BCryptPasswordEncoder();
    }
    // 创建持久令牌存储库
    @Bean
    public PersistentTokenRepository persistentTokenRepository() {
        // 创建一个JdbcTokenRepositoryImpl实例
        JdbcTokenRepositoryImpl tokenRepository = new JdbcTokenRepositoryImpl();
        // 设置数据源
        tokenRepository.setDataSource(dataSource);
        // 设置启动时创建表
        tokenRepository.setCreateTableOnStartup(false);
        // 返回tokenRepository
        return tokenRepository;
    }
    // 创建认证管理器
    @Bean
    public AuthenticationManager authenticationManager() throws Exception {
        // 创建一个DAO认证提供者
        DaoAuthenticationProvider provider = new DaoAuthenticationProvider();
        // 设置用户详情服务和密码编码器
        provider.setUserDetailsService(userDetailsService);
        provider.setPasswordEncoder(passwordEncoder());
        // 返回一个提供者管理器
        return new ProviderManager(provider);
    }
    /*
     * 安全过滤器链
     * */
    @Bean
    public SecurityFilterChain securityFilterChain(HttpSecurity http) throws Exception {
        http.authorizeRequests().antMatchers("/").permitAll()
                //其他所有请求都需要用户进行身份验证。
                .anyRequest().authenticated()
                .and().formLogin()
                // 设置登录页面的 URL
                .loginPage("/")
                // 设置登录请求的 URL,即表单提交的 URL
                .loginProcessingUrl("/userLogin")
                // 设置登录表单中用户名字段的参数名,默认为username
                .usernameParameter("username")
                // 设置登录表单中密码字段的参数名,默认为password
                .passwordParameter("password")
                // 登录成功后返回的数据
                .successHandler((res, resp, ex) -> {
                    Object user = ex.getPrincipal();
                    objectMapper
                            .writeValue(resp.getOutputStream(), JsonResponseBody.success(user));
                })
                /*登录失败后的处理器*/
                .failureHandler(myAuthenticationFailureHandler)
                .and()
                .exceptionHandling()
                //权限不足
                .accessDeniedHandler((req, resp, ex) -> {
                    objectMapper
                            .writeValue(resp.getOutputStream(), JsonResponseBody.other(JsonResponseStatus.NO_ACCESS));
                })
                //没有认证
                .authenticationEntryPoint((req, resp, ex) -> {
                    objectMapper
                            .writeValue(resp.getOutputStream(), JsonResponseBody.other(JsonResponseStatus.NO_LOGIN));
                })
                .and()
                /*配置注销*/
                .logout()
                // 设置安全退出的URL路径
                .logoutUrl("/logout")
                // 设置退出成功后跳转的路径
                .logoutSuccessUrl("/").and()
                /*配置 rememberMe 功能*/
                .rememberMe()
                // 指定 rememberMe 的参数名,用于在表单中携带 rememberMe 的值。
                .rememberMeParameter("remember-me")
                // 指定 rememberMe 的有效期,单位为秒,默认2周。
                .tokenValiditySeconds(60)
                // 指定 rememberMe 的 cookie 名称。
                .rememberMeCookieName("remember-me-cookie")
                // 指定 rememberMe 的 token 存储方式,可以使用默认的 PersistentTokenRepository 或自定义的实现。
                .tokenRepository(persistentTokenRepository())
                // 指定 rememberMe 的认证方式,需要实现 UserDetailsService 接口,并在其中查询用户信息。
                .userDetailsService(userDetailsService).and()
                /*使用`POST`请求退出登陆,并携带`CRSF`令牌*/
                .logout().logoutRequestMatcher(new AntPathRequestMatcher("/logout"))
                .logoutSuccessUrl("/")
                .permitAll().and()
                /*CSRF防御配置*/
                .csrf().csrfTokenRepository(CookieCsrfTokenRepository.withHttpOnlyFalse());
        return http.build();
    }
}
@EnableGlobalMethodSecurity是Spring Security提供的一个注解,用于启用方法级别的安全性。它可以在任何@Configuration类上使用,以启用Spring Security的方法级别的安全性功能。它接受一个或多个参数,用于指定要使用的安全注解类型和其他选项。以下是一些常用的参数:
-
prePostEnabled:如果设置为true,则启用@PreAuthorize和@PostAuthorize注解。默认值为false。
-
securedEnabled:如果设置为true,则启用@Secured注解。默认值为false。
-
jsr250Enabled:如果设置为true,则启用@RolesAllowed注解。默认值为false。
-
proxyTargetClass:如果设置为true,则使用CGLIB代理而不是标准的JDK动态代理。默认值为false。
使用@EnableGlobalMethodSecurity注解后,可以在应用程序中使用Spring Security提供的各种注解来保护方法,例如@Secured、@PreAuthorize、@PostAuthorize和@RolesAllowed。这些注解允许您在方法级别上定义安全规则,以控制哪些用户可以访问哪些方法。
注解介绍:
注解 说明 @PreAuthorize 用于在方法执行之前对访问进行权限验证 @PostAuthorize 用于在方法执行之后对返回结果进行权限验证 @Secured 用于在方法执行之前对访问进行权限验证 @RolesAllowed 是Java标准的注解之一,用于在方法执行之前对访问进行权限验证 3.4 控制Controller层接口权限
package com.ycxw.springsecurity.controller;
import org.springframework.security.access.prepost.PreAuthorize;
import org.springframework.stereotype.Controller;
import org.springframework.web.bind.annotation.RequestMapping;
import org.springframework.web.bind.annotation.ResponseBody;
@Controller
public class IndexController {
    @RequestMapping("/")
    public String toLogin() {
        return "login";
    }
    @RequestMapping("/index")
    public String toIndex() {
        return "index";
    }
    @ResponseBody
    @RequestMapping("/order_add")
    @PreAuthorize("hasAuthority('order:manager:list')") /*设置权限字段*/
    public String order_add() {
        return "订单列表";
    }
    @ResponseBody
    @PreAuthorize("hasAuthority('book:manager:add')")
    @RequestMapping("/book_add")
    public String book_add() {
        return "书本新增";
    }
}
3.5 相关页面模版与工具类
1、login.ftl
用户登录


        用户:


        密码:

    记住我
2、自定义数据返回类
例:
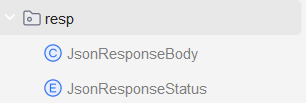
JSON 响应的状态码和状态信息:
package com.ycxw.springsecurity.resp;
import lombok.Getter;
@Getter
public enum JsonResponseStatus {
    OK(200, "OK"),
    UN_KNOWN(500, "未知错误"),
    RESULT_EMPTY(1000, "查询结果为空"),
    NO_ACCESS(3001, "没有权限"),
    NO_LOGIN(4001, "没有登录"),
    LOGIN_FAILURE(5001, "登录失败"),
    ;
    private final Integer code;
    private final String msg;
    JsonResponseStatus(Integer code, String msg) {
        this.code = code;
        this.msg = msg;
    }
}
3、处理身份验证失败封类
package com.ycxw.springsecurity.config;
import com.baomidou.mybatisplus.core.conditions.query.QueryWrapper;
import com.fasterxml.jackson.databind.ObjectMapper;
import com.ycxw.springsecurity.entity.User;
import com.ycxw.springsecurity.resp.JsonResponseBody;
import com.ycxw.springsecurity.resp.JsonResponseStatus;
import com.ycxw.springsecurity.service.IUserService;
import org.springframework.beans.factory.annotation.Autowired;
import org.springframework.security.core.AuthenticationException;
import org.springframework.security.web.authentication.AuthenticationFailureHandler;
import org.springframework.stereotype.Component;
import javax.servlet.ServletException;
import javax.servlet.http.HttpServletRequest;
import javax.servlet.http.HttpServletResponse;
import java.io.IOException;
/*
    实现处理身份验证失败的接口
*/
@Component
public class MyAuthenticationFailureHandler implements AuthenticationFailureHandler {
    @Autowired
    private ObjectMapper objectMapper;
    @Autowired
    private IUserService userService;
    @Override
    public void onAuthenticationFailure(HttpServletRequest request, HttpServletResponse response, AuthenticationException exception) throws IOException, ServletException {
       /*
       利用锁:
       判断当前用户登录超过3次进行锁定
       */
        if (1 == 2) {
            User user = userService.getOne(new QueryWrapper().eq("username", request.getParameter("username")));
            user.setAccountNonLocked(false);
            userService.updateById(user);
        }
        objectMapper.writeValue(response.getOutputStream(), JsonResponseBody.other(JsonResponseStatus.LOGIN_FAILURE));
    }
}
3.6 权限测试
1、普通用户权限
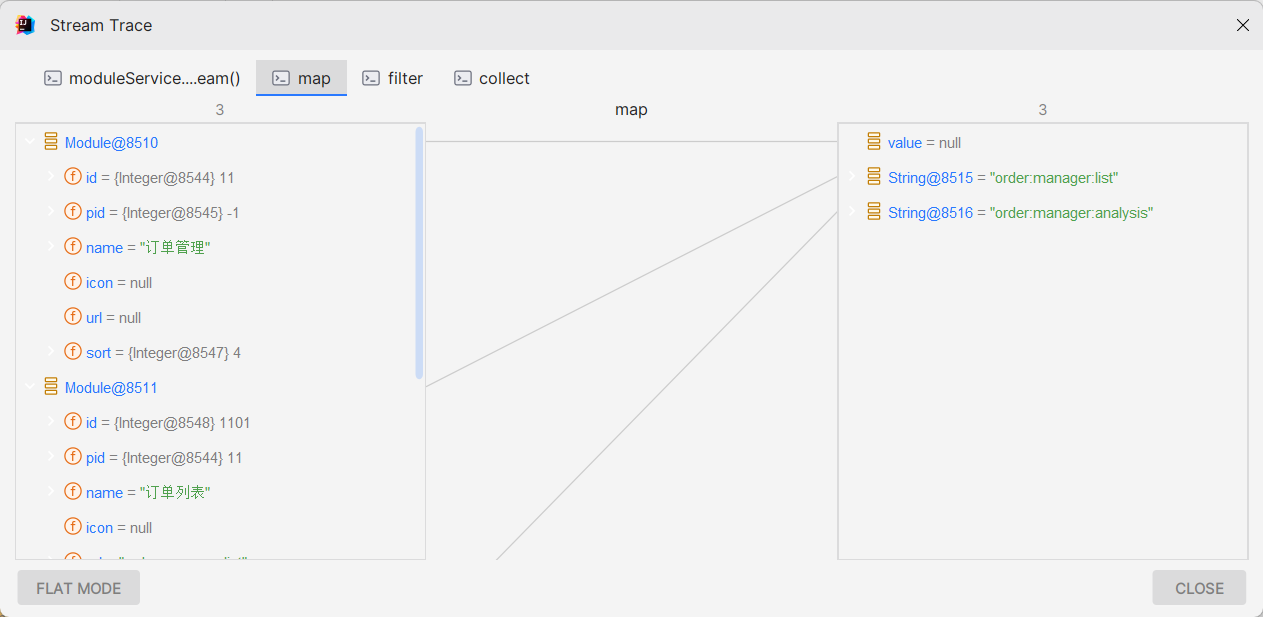
只拥有两个路径的权限
测试接口:没有book_add权限将不能访问
2、管理员权限
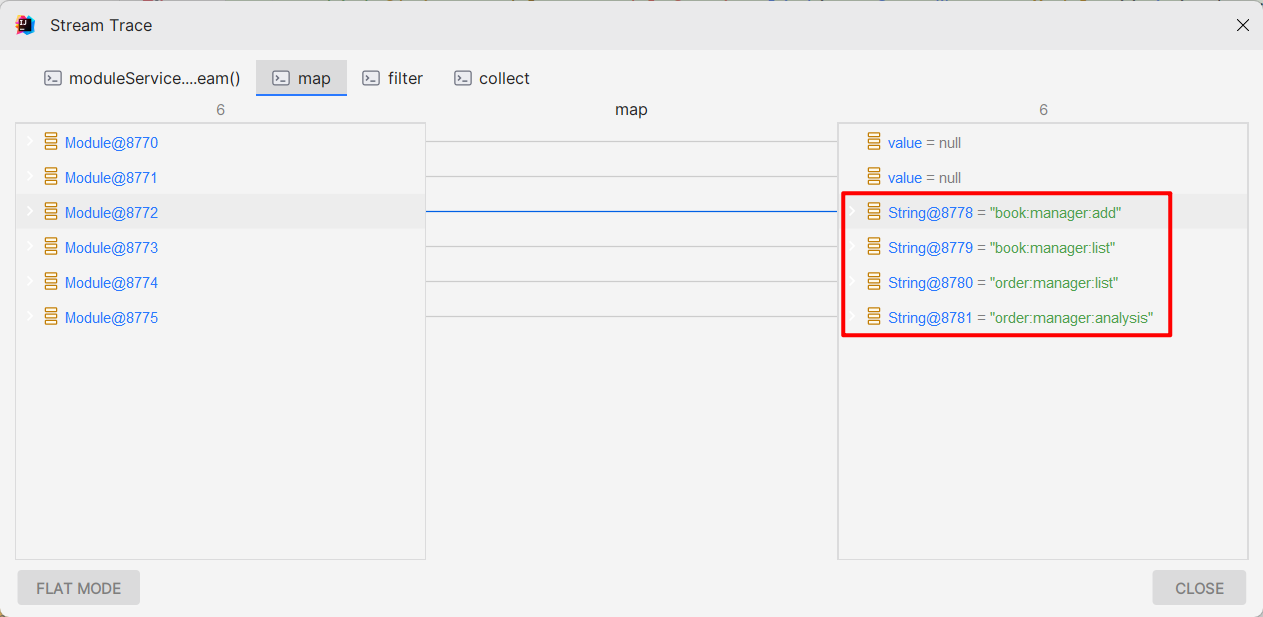
拥有六个路径的权限
测试接口:管理员能访问所有接口
-
-
-
-
-
-
-
-
-
-
-
-


