【Android】最新版Android13使用Notification,Notification的基本使用和进阶使用


一、使用Notification
1、创建一个通知
1.1 注册一个渠道
在Android13,版本通知的使用发生了新的变化。
1.1.1 NotificationManager原生类
首先我们需要创建一个NotificationManager用于管理通知。NotificationManager 仅支持在 API 等级 11(Android 3.0)及以上的设备上使用,因此在较旧的 Android 版本上无法使用较新的通知功能。
//创建notificationManager对通知进行管理
NotificationManager notificationManager = (NotificationManager) getSystemService(Context.NOTIFICATION_SERVICE);
`1.1.2 NotificationManagerCompat兼容类
NotificationManagerCompat 是 Android Support Library(现在是 AndroidX 库)中提供的通知管理兼容类。它用于支持在各个 API 等级的设备上管理通知,并提供了一致的通知管理接口,无需手动进行版本适配。
NotificationManagerCompat notificationManager = NotificationManagerCompat.from(this);
这两种方式任意选择一种即可。
接下来需要注册一个渠道(channel),通知渠道是一种对通知进行分类和管理的机制。
// 在 MainActivity 或其他合适的地方创建通知渠道
if (Build.VERSION.SDK_INT >= Build.VERSION_CODES.O) {
    String channelId = "001";   //通知渠道的标识符
    CharSequence channelName = "QQ";    //通知渠道的位置
    String channelDescription = "来自QQ好友的消息";    //通知渠道的描述
    //设置通知渠道的级别
    int importance = NotificationManager.IMPORTANCE_DEFAULT;
    //创建通知渠道
    NotificationChannel notificationChannel = new NotificationChannel(channelId, channelName, importance);
    notificationChannel.setDescription(channelDescription);//可以省略

    //在系统中注册消息
    notificationManager.createNotificationChannel(notificationChannel);
}
通过 if (Build.VERSION.SDK_INT >= Build.VERSION_CODES.O) 条件判断,确保当前设备运行的 Android 版本是 8.0 或更高版本。只有在这种情况下,通知渠道才会被创建。
然后,定义了三个变量和设置了一个渠道级别用于设置通知渠道的属性:
| 参数 | 说明 |
|---|---|
| channelId | 通知渠道的ID,用户不可见,实例化Notification的时候需要用到。 |
| channelName | 通知渠道的名称,这个是方便用户管理通知用的,用户可见 |
| channelDescription | 通知渠道的描述。用于在系统设置界面和通知管理中向用户显示通知渠道的详细描述。 |
| importance | 渠道优先级 |
渠道的优先级有三种:
- IMPORTANCE_DEFAULT:(默认级别)
- IMPORTANCE_HIGH:(高)
- IMPORTANCE_LOW:(低)
- IMPORTANCE_MAX:最重要的通知,系统会立马使得消息显示在屏幕
接下来通过NotificationChannel创建一个渠道,构造方法的三个参数分别是:Id、name、importance。
通过setDescription() 方法设置渠道的表述消息
最后在系统中注册消息即可:
notificationManager.createNotificationChannel(notificationChannel);
1.2、扩充知识CharSequence
使用 CharSequence 类型的好处在于它是一个通用接口,它可以包含不同类型的字符序列,包括不可变的字符串 String 和可变的字符串 StringBuilder、StringBuffer 等。这样,我们在定义通知渠道时,可以使用 CharSequence 类型的变量,允许传递不同类型的字符序列。
1.3 创建通知
注意Android 8以上都需要获取权限
//申请通知权限
if (ContextCompat.checkSelfPermission(MainActivity.this,
                                      Manifest.permission.POST_NOTIFICATIONS) != PackageManager.PERMISSION_GRANTED) {
    ActivityCompat.requestPermissions(MainActivity.this, new String[]{Manifest.permission.POST_NOTIFICATIONS}, 1);
}
还需要在AndroidManifest中进行注册:
接下来才进行创建通知:
//创建通知
Notification notification = new NotificationCompat.Builder(MainActivity.this, "001")
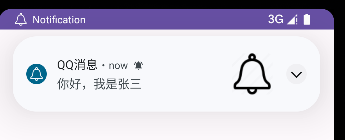
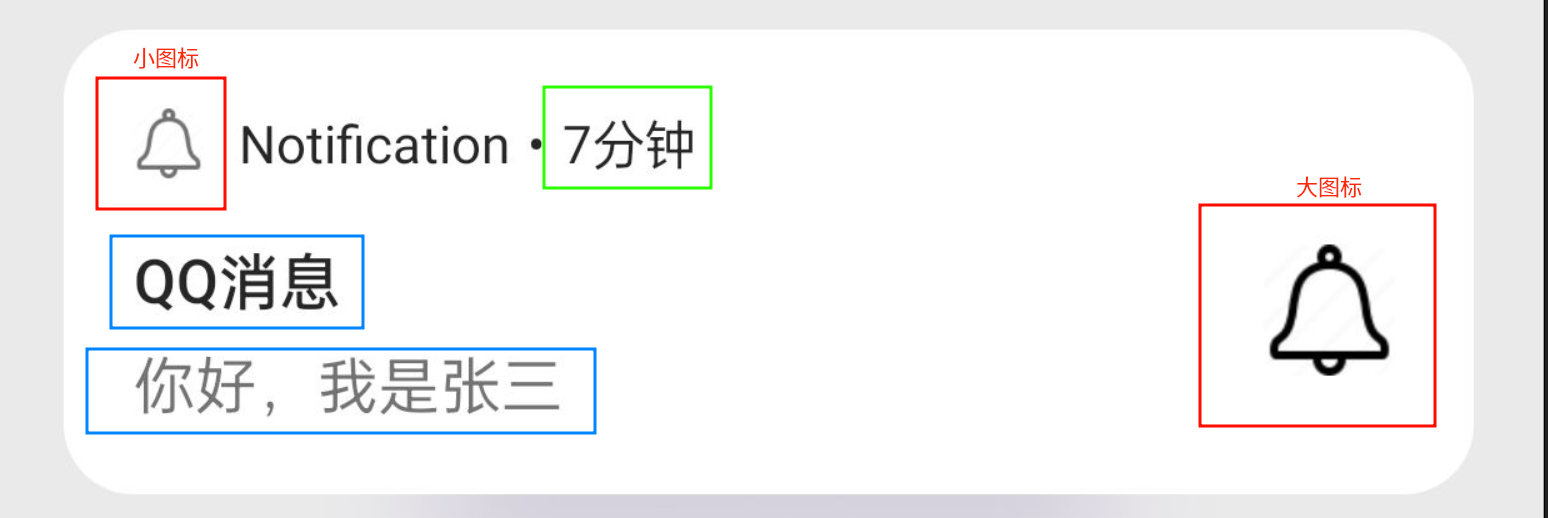
.setContentTitle("QQ消息") //消息的标题
.setContentText("你好,我是张三") //消息的内容
.setWhen(System.currentTimeMillis()) //指定通知被创建的时间
.setSmallIcon(R.drawable.notify) //通知的小图标
.setLargeIcon(BitmapFactory.decodeResource
(getResources(), R.drawable.notify)) //通知的大图标
.build();
//显示一个通知
notificationManager.notify(1, notification);
在 setLargeIcon() 方法中,需要传递一个 Bitmap 对象作为大图标的内容。这里使用了 BitmapFactory.decodeResource(getResources(), R.drawable.notify) 来将 R.drawable.notify 资源转换成 Bitmap 对象,并将其作为大图标设置给通知。
1.4 为消息设置点击事件
//点击通知后跳转页面
Intent intent = new Intent(MainActivity.this,MainActivity2.class);
PendingIntent pi = PendingIntent.getActivity(MainActivity.this, 0, intent, PendingIntent.FLAG_IMMUTABLE);
使用PendingIntent,他有四个参数:

- 第二个参数一般不会使用,通常传入0
- 第三个参数是Intent对象
- 第四个参数是一个标志(flag),用于确定意图的行为
有四个值可选通常是FLAG_IMMUTABLE
-
PendingIntent.FLAG_IMMUTABLE: 这是 Android 12(API 级别 31)及更高版本中引入的标志。创建的 PendingIntent 对象将变为不可变。不可变的 PendingIntent 在创建后就无法修改其内容、标志或其他属性,提高了安全性和性能。
-
PendingIntent.FLAG_UPDATE_CURRENT: 用于指定如果创建的 PendingIntent 已经存在,那么使用现有的 PendingIntent,并更新其中的 Intent 内容为新传入的 Intent。如果不存在,就创建一个新的 PendingIntent。这个标志通常用于在多次创建相同 PendingIntent 的场景,确保只有一个 PendingIntent 实例,并且其中的 Intent 内容保持最新。
-
PendingIntent.FLAG_CANCEL_CURRENT:如果创建的 PendingIntent 已经存在,那么将现有的 PendingIntent 取消掉,然后创建一个新的 PendingIntent。即先取消已存在的 PendingIntent,再创建新的。
-
PendingIntent.FLAG_NO_CREATE:如果创建的 PendingIntent 已经存在,不会再创建新的 PendingIntent,而是返回已存在的 PendingIntent。如果不存在,返回 null。这个标志通常用于查询是否已经存在特定的 PendingIntent,而不会真正创建新的实例。
最后使用在创建通知时加上:
.setContentIntent(pi) //点击后的跳转事件
然后点击这个通知就可以实现跳转了。

通过这个动图,我们发现点击通知后通知依然没有消失,这是为什么?
解决方法有两种:
- 一种是在NotificationCompat.Builder中再连缀一个**setAutoCancel()**方法

- 另一种是显式的调用NotificationManager中的**cancel()**方法。

这个1就是我们在创建通知时,为这个通知设置的id

2、通知的进阶用法
android 13都需要在渠道中注册
2.1 设置震动
//注册震动
long[] vibrationPattern = {100, 200, 300, 400}; // 设置震动模式,参数为一个 long 类型数组,表示震动的时长和间隔
// 配置通知出现时的震动(如果 Android 设备支持的话)
notificationChannel.enableVibration(true);
notificationChannel.setVibrationPattern(vibrationPattern);
notificationChannel.setVibrationPattern(vibrationPattern);这段代码也可以不在渠道中设置,只需要使用notificationChannel.enableVibration(true);注册。
然后在通知NotificationCompat.Builder中:
.setVibrate(new long[]{100, 200, 300, 400})注意设置权限;
2.2 设置闪烁灯
// 设置通知渠道的闪灯效果
notificationChannel.enableLights(true); // 允许通知闪灯
然后在通知NotificationCompat.Builder中:
.setLights(Color.RED,1000,2000)
第一个参数是颜色,第二个是亮灯时长,第三个是暗灯时长
2.3 设置声音
.setSound(Uri.fromFile(new File("/system/media/audio/ringtones/Big_Easy.ogg")))2.4 创建富文本通知内容
.setStyle(new NotificationCompat.BigTextStyle().bigText("ssssssssssssssssssssssssssssssssssssssssssssssssssssssssssssssssssssssssssssssssssssssssssssssssssssssssssssssssssssssssssssssssssssssssssssssssssssssssssssssssssssssssssssssssssssssssss"))
2.5 显示大图
.setStyle(new NotificationCompat.BigPictureStyle().bigPicture(BitmapFactory.decodeResource(getResources(),R.drawable.notify)))